
Showing posts with label Home Tour. Show all posts
Showing posts with label Home Tour. Show all posts
Monday, September 7, 2015
Monday, August 24, 2015
Bamboo Roman Shades: Dining Room Update
So, I STILL haven't made my dining room table. All of the wood is just sitting in the garage waiting to be sanded down and stained. I swear, I will get to it one of these days! So, until then, here is a dining room update!


Monday, August 10, 2015
Updated Kitchen Shelves
Hey there - long time, no write! Life's been busy in so many ways, so this little blog has taken a backseat. I would love to be blogging more frequently again, but that won't happen until things slow down a bit more. Until then, I'll pop on every once in awhile to share things.
Recently, I put in new shelving in the kitchen.

Recently, I put in new shelving in the kitchen.

Monday, May 5, 2014
Studio Reveal! The Details
Yep! The studio reveal gets another post! Today is all about the details, so be prepared for lots of pictures. (You can check out the studio reveal here and "the plan" here).

Friday, May 2, 2014
Wednesday, April 30, 2014
Studio Reveal!
I'm officially unofficially done with the studio! Thank goodness! (I say "officially unofficially" because there's still a few things left to do, but they won't get done for awhile, so I'm calling it done for now).
Friday, January 31, 2014
Garage Organization: Inside the Cabinets
My garage organization has been a work-in-progress for the last couple of years. I work on it when I'm in the mood - mostly because it is a huge project and I didn't want to get overwhelmed and totally abandon it. In the beginning, I made a list of what needed to be accomplished and broke it down into smaller projects so it would be easier to get done.
I previously mentioned in other posts that I was able to get some organizing done over the holidays and this was one of them.

What a great "before and after", right?!
Friday, January 10, 2014
Hall Bathroom Makeover: The Reveal
Hello and Happy New Year! How quickly time flies, right? This past holiday season was a busy one for me, but I managed to complete some projects - just didn't get a chance to share yet. And this month I'll be busy & stressed at my job, so I'm hoping that doesn't get in the way of projects I'd like to get started on. At least I have some completed projects to share with you soon. ;)
So, now for the hall bathroom reveal - FINALLY! The bathroom was finished since before Thanksgiving and I added a few final touches in the last few of weeks. I have one more project planned for it, but not sure when I'll get around to it, so for now I've officially called it done. D-o-n-e! Bada-bing, bada-boom!

So, now for the hall bathroom reveal - FINALLY! The bathroom was finished since before Thanksgiving and I added a few final touches in the last few of weeks. I have one more project planned for it, but not sure when I'll get around to it, so for now I've officially called it done. D-o-n-e! Bada-bing, bada-boom!

Wednesday, October 23, 2013
Studio Project: Work Station Ruler
Earlier this year, I had received a free yard stick and thought I could use it for a project at some point. While working on my new studio redo, I finally figured out how I could use it! All I needed was a couple of Command Strips (I used what I had in my stash) and the ruler.
I haven't shared my new studio yet because it's not quite ready, but I bought 2 of these Linnmon tables (the table tops come in different sizes and you can choose whatever legs you want). These tables have a nice, flat edge that was perfect for adhering the yardstick to! I figured that it would be good for measuring out fabric, ribbon, etc.

I haven't shared my new studio yet because it's not quite ready, but I bought 2 of these Linnmon tables (the table tops come in different sizes and you can choose whatever legs you want). These tables have a nice, flat edge that was perfect for adhering the yardstick to! I figured that it would be good for measuring out fabric, ribbon, etc.

Friday, October 18, 2013
Fall Front Porch
Since I recently shared my back patio, I thought I would share my Fall front porch.


Monday, October 14, 2013
Back Patio
I recently had this guest post on looking after your outdoor furniture during the winter months and it occurred to me that I've never really shared any of my outdoor spaces. I've previously shared some of my flowers & plants, but not much else. So, I snapped some pictures to share my back patio space. It's not much and I want to completely change it, but it's low on the project list so nothing major will be happening any time soon.
For now, I've just done some sprucing up.

Friday, September 27, 2013
Living Room Update: My New Ikea Vittsjo Shelf
So, I previously mentioned in this post how I bought this Vittsjo shelf. I had moved the Billy bookcase from the living room into my rearranged & reorganized studio and used the Vittsjo to replace it. (This is one of those 4 projects I mentioned in the last 2 posts)


Tuesday, July 23, 2013
Craft Room Redux - A Start
You may soon be seeing some fewer posts around here. This crazy heat has slowed down my progress (i.e. it's made me lazy). We actually had a slight break from the heat over the weekend - had some light rain on Saturday and a good amount of rain on Sunday evening. It made it nice & cool, so I took advantage of it and got to work.
For awhile, I had been thinking to re-arrange my craft room. I previously shared the "in progress" here. I have an idea of how I want the room to turn out - it will just take some time because I'll be buying a new piece of furniture and building/buying a workstation. Once I learn how to make a proper mood board, I'll share my ideas for the room. But, first thing's first - I needed to get started on this because my craft room had turned into a dumping ground since Christmas. It was getting really bad in there. *Shudder*
So, this is what my living room looked like the other day after I took everything out so I could re-arrange furniture.

It's like both Joann & Michael threw up in my living room. ;) But, seriously - all that stuff on the bottom/middle/right of the picture? That came out of my Ikea Expedit. That sucker holds A LOT!
So, I'll be working on this and part of the garage re-organization and they'll both take a bit of time. And if the heat starts up again, then I might get lazy again. In the meantime, wish me luck in cleaning up this mess. Ack!
Originally posted by Adventures in DIY
Tuesday, July 2, 2013
Entryway Makeover
After painting my garage entry door and front entry door, I was inspired to makeover my entryway. I'm very happy about how it turned out!


Friday, June 7, 2013
Front Entry Door
Last July, I bought a new entry door which I shared about here on the blog. It came primed and ready to go, but I never got around to painting it until now.
Here is what I started with...
 Go ahead. You can say it..."YUCK!" Trust me - my feelings are not hurt one bit.
Here is the new, primed door after it was installed (you can see how the primed door is a different color than the casing)...


I used the directions from Thrifty Decor Chick's tutorial on how to paint a door with panels. I've always painted flat doors, so I thought I'd get as many tips as I could. I started out using a paint brush and painted on the edges of the 2 panels, the trim around the windows, and around the hardware.


I used a foam roller brush to paint the rest of the door. Here it is after one coat...


And here it is after it's all painted with the 3rd and final coat (and with the paint scraped off the windows). I also gave the casing 2 coats of the same white to match...

And here's a quick round-up so you can see them all together...

The front entry door & the garage entry door are very close to each other and the new paint job is already making that dark corner a bit brighter. It also inspired me to makeover my teeny tiny entryway. I'll be sharing that soon.
Originally posted by Adventures in DIY
Linked up to:
Here is what I started with...

Here is the new, primed door after it was installed (you can see how the primed door is a different color than the casing)...

Much, much better already!
I started out by taping off the bottom seal of the door and around the casing. I also taped off the hinges, hardware, and used foil on the handle. It's all ready for paint now - I used my go-to white, Behr's off the shelf Ultra Pure White.


I learned from painting my french doors that you don't need to tape off the windows - the paint will easily scrape off them if you use a razor blade (I use this paint scraper).


Two coats...


And here's a quick round-up so you can see them all together...

The front entry door & the garage entry door are very close to each other and the new paint job is already making that dark corner a bit brighter. It also inspired me to makeover my teeny tiny entryway. I'll be sharing that soon.
Originally posted by Adventures in DIY
Linked up to:
Monday, June 3, 2013
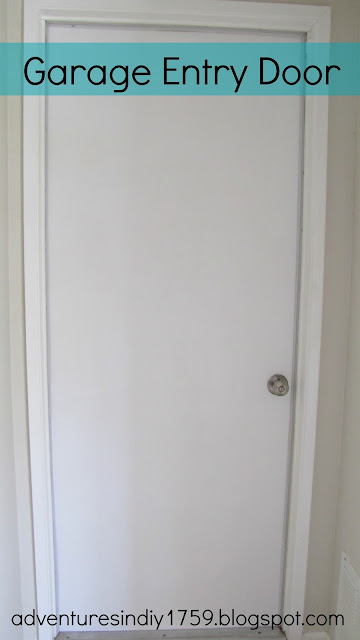
Garage Entry Door
Hello! I've been busy lately getting things done from my project list. I just love crossing things off of lists. :)
I've painted most of the doors in my house, but I still had 2 left to do. You can see how I painted my interior doors here, here, here, and here. And the french doors here, here, and here. I didn't use any fancy colors, just plain white, but it truly made a difference with all the doors. Everyday, I still look at them and think what a difference a fresh coat of paint did to brighten up the place!
So, 1 of the last 2 doors I had left to do was the garage entry door.

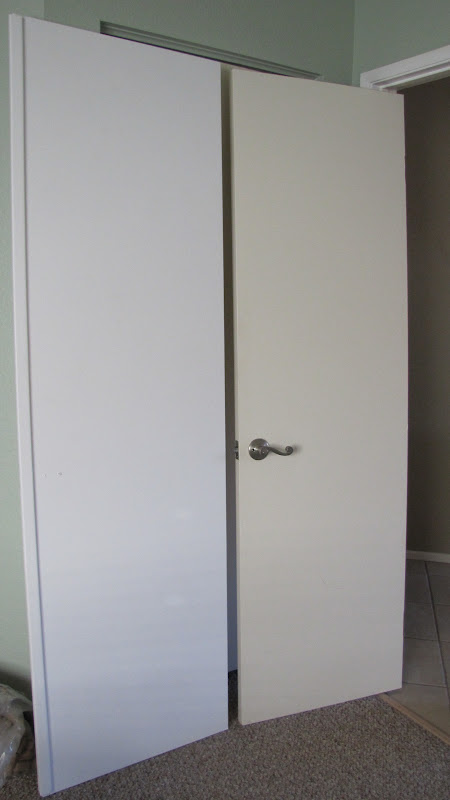
Here is a good "before and after" of other doors in the house since they are side by side. The door on the left got a fresh coat of Ultra Pure White by Behr (off the shelf) and the door on the right was the original color from when I moved in. It looked like a very dingy white. This is a good example of the color difference because all of the doors in the house were this dingy color.


I've painted most of the doors in my house, but I still had 2 left to do. You can see how I painted my interior doors here, here, here, and here. And the french doors here, here, and here. I didn't use any fancy colors, just plain white, but it truly made a difference with all the doors. Everyday, I still look at them and think what a difference a fresh coat of paint did to brighten up the place!
So, 1 of the last 2 doors I had left to do was the garage entry door.

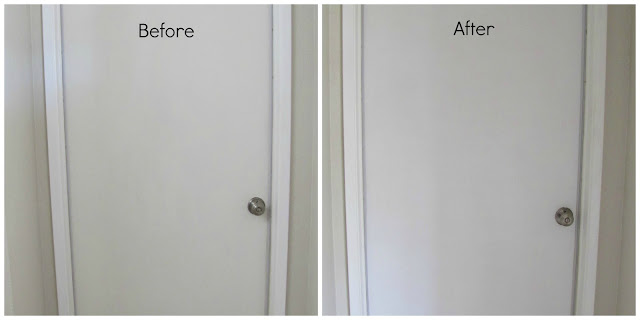
Here is a "before" picture. Unfortunately, with the wall & door placement, these are the best pictures I could get using natural light. It's a bit hard to tell, but you can see the color difference between the door and the door's casing (the casing was already painted the brighter white a few years ago).

It was very, very obvious that whoever painted this door previously, didn't let it dry enough before closing the door. A lot of the paint had ripped off the door & stuck on the weatherstripping. I didn't want the same thing to happen this time, so before I starting painting, I got a piece of yarn and tied it to the door knob and to the metal rack so it would hold the door open.

Side note: the lighting in my kitchen looks pink/red, but it's not really that color. It's weird that it turned out that way in the picture.
I sanded down the parts of the door where the paint had come off from the previous paint job. I did as much as I could, but didn't put great effort into it because this door stays shut all the time, so no one will really notice it. When I painted the new white, this is how it looked.

The perfectionist in me really had to resist fixing it, but it was a lot better than before and at least it's not as noticeable as previously.
I let the door dry for over 24 hours and haven't had a problem with the paint ripping off or sticking to the weatherstripping at all. Here's a before & after of the door after it was painted.

It's only a slight difference in the picture, but you can really notice in person how much brighter the door is now. It doesn't look so dingy and dark in that spot anymore.
Next up...the front entry door. Stay tuned...
Tuesday, May 14, 2013
French Doors Window Treatment
After I got the french doors painted, I decided to, well, cover them up! I know - you would think I would want to see my lovely painted doors all the time, right?

I'm truly happy with how they came out, but ever since I bought the house, I have been debating on the window treatment for the french doors. I was never in a big rush to get them done, though - I don't have any neighbors that live directly behind me, since there is a big sports park right behind my house. So, over the last few years, here have been my ideas for window treatments:
1) Bamboo blinds - I really love those. However, all the windows weren't very wide and they would have to be custom ordered which means big buck$$.
2) The old style curtain rods (I remember these from back when I was a kid). But, I wasn't sure exactly how to attach it to my metal/steel doors & sidelites and if I changed my mind later, I'd have good sized holes left in the doors.
3) Magnetic rods. For quite awhile, I thought that this was the best idea because they could be easily installed and removed without damaging the doors & sidelites. But, I wasn't sure how they would hold up to being opened and closed everyday. Also, since there would be one rod per door, the curtains would obstruct a lot of the light since I wouldn't be able to push them completely out of they way of the windows.
4) Install a single curtain rod over all the sidelites, french doors, and the side window. I figured this might be the best & cheapest way to get them all covered up. Also, when I pull back the curtains, it would still allow all of the light in. The only issue was still how much it would cost exactly because of the width of both french doors, both sidelites, and the side window.
Now, it was time to research...I had looked online and at different stores for curtains and could never find a pair that were wide enough (they needed to cover at least 121 1/2 inches). I would have to buy more than one pair and with everything being at least $20, this was going to add up. I even considered using painter's drop cloths and sheets, but with the width I needed, it was still going to not be cheap. I also looked into the hardware (curtain rods, finials, curtain rings) and everything was expensive and a lot of it wasn't my "style". I didn't need or want anything really fancy looking. So, after a lot of research, I hopped on the Ikea website to see what they had. I had perused their window treatments at the store in the past, but I was only just browsing. They didn't have much of a selection to choose from, but the prices were excellent. So, I made a trip to Ikea and here is what I got:
Racka curtain rod x 1 @ $4.99 ea
Raffig finial x 1 pair @ $1.99 pair
Betydlig bracket x 3 @ $1.49 ea
Syrlig rings/hangers (set of 10) x 3 sets @ $2.99 set
Vivan curtains x 2 pair @ $9.99 pair
My grand total was $40.40 (+tax) which completely covers the set of french doors, the set of sidelites and a side window! Not bad at all!
I installed the brackets with no problems. It was pretty easy - the only thing is that they didn't come with screws, so you will need to make sure you have some on hand (I needed 2 screws per bracket).
 Please don't mind the gross popcorn ceiling. They will be gone one day - hopefully soon.
And then I put together all the rings with the clips on them.

I decided to install the curtain rod as close to the ceiling as possible to give height to the wall. I also took down the blinds in that side window - they were cheap, aluminum blinds and I always left them up anyways.


The curtains I bought were a bit see through (obviously), but they aren't completely mesh and still give me some privacy. You definitely can see any sources of light through them though (the tv, the lamp), but anything else is mostly safe from prying eyes.


I love how they turned out and think they are nice touch to the wall.
Originally Posted by Adventures in DIY
Linked up to:

Sally photobombed the picture. Can you spot her? :)
I'm truly happy with how they came out, but ever since I bought the house, I have been debating on the window treatment for the french doors. I was never in a big rush to get them done, though - I don't have any neighbors that live directly behind me, since there is a big sports park right behind my house. So, over the last few years, here have been my ideas for window treatments:
1) Bamboo blinds - I really love those. However, all the windows weren't very wide and they would have to be custom ordered which means big buck$$.
2) The old style curtain rods (I remember these from back when I was a kid). But, I wasn't sure exactly how to attach it to my metal/steel doors & sidelites and if I changed my mind later, I'd have good sized holes left in the doors.
3) Magnetic rods. For quite awhile, I thought that this was the best idea because they could be easily installed and removed without damaging the doors & sidelites. But, I wasn't sure how they would hold up to being opened and closed everyday. Also, since there would be one rod per door, the curtains would obstruct a lot of the light since I wouldn't be able to push them completely out of they way of the windows.
4) Install a single curtain rod over all the sidelites, french doors, and the side window. I figured this might be the best & cheapest way to get them all covered up. Also, when I pull back the curtains, it would still allow all of the light in. The only issue was still how much it would cost exactly because of the width of both french doors, both sidelites, and the side window.
Now, it was time to research...I had looked online and at different stores for curtains and could never find a pair that were wide enough (they needed to cover at least 121 1/2 inches). I would have to buy more than one pair and with everything being at least $20, this was going to add up. I even considered using painter's drop cloths and sheets, but with the width I needed, it was still going to not be cheap. I also looked into the hardware (curtain rods, finials, curtain rings) and everything was expensive and a lot of it wasn't my "style". I didn't need or want anything really fancy looking. So, after a lot of research, I hopped on the Ikea website to see what they had. I had perused their window treatments at the store in the past, but I was only just browsing. They didn't have much of a selection to choose from, but the prices were excellent. So, I made a trip to Ikea and here is what I got:
Racka curtain rod x 1 @ $4.99 ea
Raffig finial x 1 pair @ $1.99 pair
Betydlig bracket x 3 @ $1.49 ea
Syrlig rings/hangers (set of 10) x 3 sets @ $2.99 set
Vivan curtains x 2 pair @ $9.99 pair
My grand total was $40.40 (+tax) which completely covers the set of french doors, the set of sidelites and a side window! Not bad at all!
I installed the brackets with no problems. It was pretty easy - the only thing is that they didn't come with screws, so you will need to make sure you have some on hand (I needed 2 screws per bracket).
And then I put together all the rings with the clips on them.

I decided to install the curtain rod as close to the ceiling as possible to give height to the wall. I also took down the blinds in that side window - they were cheap, aluminum blinds and I always left them up anyways.

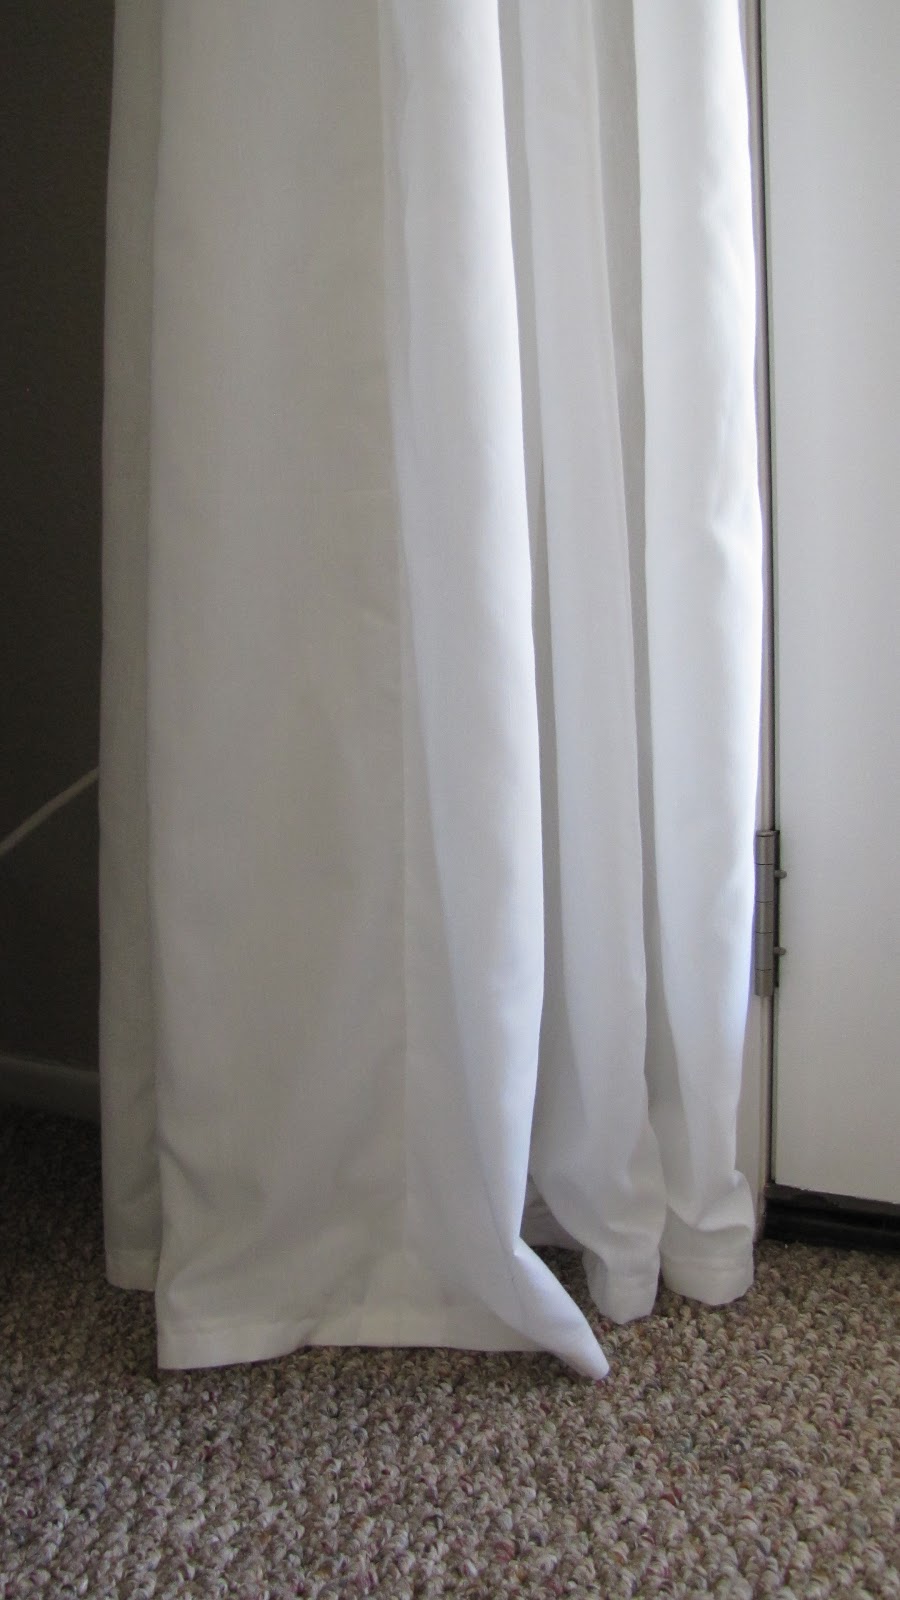
Since I needed 2 pairs of curtains to cover the width of all the doors and windows, I ended up sewing each pair together - so 2 pairs ended up becoming 1 extra-wide pair. They were also too long - I generally don't mind the "pooling" look, but since I would be opening & closing the curtains everyday AND since the curtains were covering a main entrance to the house, I decided to hem them so they just barely hit the floor.
The curtains I bought were a bit see through (obviously), but they aren't completely mesh and still give me some privacy. You definitely can see any sources of light through them though (the tv, the lamp), but anything else is mostly safe from prying eyes.


I love how they turned out and think they are nice touch to the wall.
Originally Posted by Adventures in DIY
Linked up to:
Friday, May 10, 2013
Garage Workbench
Hello all! Today I'm sharing my garage workbench. A few things to note: 1) I did not build this myself . 2) This was done a few years ago. And 3) Please excuse my poorly photoshopped pictures. I'm still experimenting with Photoshop - this was the best I could do, but the purpose was served! ;)
Here is how my garage started out. The previous owners had white cabinets installed on that wall and some great lighting all throughout the garage. They also had some electrical outlets installed in that empty wall space below the cabinets and also inside some of the cabinets. But, that empty space was prime real estate for a workbench!

I bought pegboard to fill the wall space below the cabinets. Not only does it give it a cleaner look, but it's also great for storage.


Here's the finished workbench and pegboard wall...

I'm still working on getting the garage organized - there's a lot to do, so I'm doing it all in small steps, but I've made some good progress.
Originally posted by Adventures in DIY
Here is how my garage started out. The previous owners had white cabinets installed on that wall and some great lighting all throughout the garage. They also had some electrical outlets installed in that empty wall space below the cabinets and also inside some of the cabinets. But, that empty space was prime real estate for a workbench!

I bought pegboard to fill the wall space below the cabinets. Not only does it give it a cleaner look, but it's also great for storage.


As you can see in the pictures above, there was a lot of wiring going on at the right side of the empty space. It's a Verizon box and although I don't use them, I didn't want it completely covered in case I needed access to it at some point in the future - this way I wouldn't have to take part of the peg board down. The picture below shows the cut-out for the box for easy access.

Here's the finished workbench and pegboard wall...

I'm still working on getting the garage organized - there's a lot to do, so I'm doing it all in small steps, but I've made some good progress.
Originally posted by Adventures in DIY
Monday, January 21, 2013
Garage Organization: Cleaning the Cabinets
It's only mid-January and I've already crossed a few things off of my 2013 project list! Saaah-weet! I'm usually a lot more motivated when the weather is cooler, so I'm trying to take advantage of that right now. :)
Even though I'm not completely ready to tackle the rest of my garage organization project, I got a wild hair to do #2 on this list, which is to clean the inside of the garage cabinets and the doors of the cabinets. This really needed to be done before I could actually organize anything inside because it was a big dusty mess inside those cabinets! There's really not a whole lot to show, but I did snap a couple of pictures so you could see an example of how dirty the shelves were.
 Nasty, right? These particular shelves stored bottles of oil & I have no idea what that red stuff was on that top shelf, but it was a goopy mess (for the record, I did not create any of the messes inside these cabinets).
After some elbow grease, look at how nicely they came out. The shelves are even shiny now!

All of my cabinets look this nice inside now - no more layers of dirt and dust. Oh, wait - I lied. Not all my cabinets look like this. One cabinet is completely filled with all kinds of supplies, so once I'm ready to start the actual organization of the "stuff", that cabinet will get cleaned once it's emptied. I have another cabinet that was filled with stuff too, but it was already well organized, so I was still able to clean inside that one (plus, it happened that it wasn't too dirty inside).
Here's a re-visit of my list for this project:
1) Take everything off the storage shelves above the washer/dryer and move the shelves back to their original place.
2) Clean up the doors and insides of the cabinets.
3) Reorganize inside the cabinets by category (use plastic bins/tupperware/ziplock baggies).
4) Buy hooks to hang some items up on the walls.
I also originally had a few other things on this list that involved painting, but painting doesn't really fit in the "garage organization" category, so I have taken them off this particular list.
Now that I've finished #2, I'm not going to do #3 quite yet. I have moved back to painting the french doors. I reaaaally want (need) to get this done, so I've told myself I have to finish this before I can move on to anything else - this was my motivation to get it completed and it seems to be working. :)
Originally posted by: Adventures in DIY
Even though I'm not completely ready to tackle the rest of my garage organization project, I got a wild hair to do #2 on this list, which is to clean the inside of the garage cabinets and the doors of the cabinets. This really needed to be done before I could actually organize anything inside because it was a big dusty mess inside those cabinets! There's really not a whole lot to show, but I did snap a couple of pictures so you could see an example of how dirty the shelves were.

After some elbow grease, look at how nicely they came out. The shelves are even shiny now!

All of my cabinets look this nice inside now - no more layers of dirt and dust. Oh, wait - I lied. Not all my cabinets look like this. One cabinet is completely filled with all kinds of supplies, so once I'm ready to start the actual organization of the "stuff", that cabinet will get cleaned once it's emptied. I have another cabinet that was filled with stuff too, but it was already well organized, so I was still able to clean inside that one (plus, it happened that it wasn't too dirty inside).
Here's a re-visit of my list for this project:
3) Reorganize inside the cabinets by category (use plastic bins/tupperware/ziplock baggies).
5) Re-do the laundry area to make it "prettier" **this actually has it's own list now**
I also originally had a few other things on this list that involved painting, but painting doesn't really fit in the "garage organization" category, so I have taken them off this particular list.
Now that I've finished #2, I'm not going to do #3 quite yet. I have moved back to painting the french doors. I reaaaally want (need) to get this done, so I've told myself I have to finish this before I can move on to anything else - this was my motivation to get it completed and it seems to be working. :)
Originally posted by: Adventures in DIY
Wednesday, January 9, 2013
New Gas Range
I'm slooooowly converting all of my kitchen appliances to stainless steel. Here is the newest addition the kitchen family...

Isn't she a beaut?! Ok, so, it's not anything super fancy, but it looks really nice in there with the updated dishwasher and fridge.
Although, I was not looking to convert the appliances to stainless steel so quickly, opportunities arose. And when opportunities arise, you sometimes just have to grab them while they're there! After a few years of researching gas ranges, I scored a great deal online this past Black Friday. I was on the Home Depot website and since they started their Black Friday sale early, it gave me time to think about it and do more research before taking the plunge and I'm sure glad I did.
The old range was decent enough, but it was white & the oven door's hinges were a little off. It seemed to work fine, but you just had to make sure to really push the door in.

Also, the grates were nice because it was one long piece - it made sliding pots and pans to another burner really easy. But, then it also made it more difficult to clean them really good.
 There would be no cleaning of the grates via this pin from Pinterest. Hmph.
But, with the new range, the grates are separated, yet when sitting on the stove, the design makes it act like one big piece - pretty nifty.

The night before the delivery, I removed the old range (got some help from my stepdad since I wasn't able to pull it away from the wall myself - I needed some extra muscles). Once it was pulled away from the wall, I just unplugged it from the outlet, shut off the gas valve, and unscrewed the gas line from the valve.

Wow! You see that dirty floor? Nasty. Ick.

I made sure to clean it up really well because who knows when it will be cleaned again. :)

The delivery guys came at 7am. On Sunday morning. Yeesh, that's early. But I'm not complaining - just glad I didn't have to wait around for hours. I decided to have them install it because when my old range was reinstalled after doing work in the kitchen (not by me, for the record), it would faintly smell like gas most of the time the oven was on, so I thought it would be good for them to install it to ensure that it was done correctly. It was worth the extra bucks to have them take care of that for me.
Oh, you want to see the new range again? Sure, why not!
I need to adjust the height on it still, but it sure is looking good in there. And did I mention that it's a self-cleaning oven? Woo!
So, I guess I need to start researching prices & details on over-the-range microwaves next and the conversion will be complete. I'm waiting for you, Black Friday!
originally posted by http://adventuresindiy1759.blogspot.com/

Isn't she a beaut?! Ok, so, it's not anything super fancy, but it looks really nice in there with the updated dishwasher and fridge.
Although, I was not looking to convert the appliances to stainless steel so quickly, opportunities arose. And when opportunities arise, you sometimes just have to grab them while they're there! After a few years of researching gas ranges, I scored a great deal online this past Black Friday. I was on the Home Depot website and since they started their Black Friday sale early, it gave me time to think about it and do more research before taking the plunge and I'm sure glad I did.
The old range was decent enough, but it was white & the oven door's hinges were a little off. It seemed to work fine, but you just had to make sure to really push the door in.

Also, the grates were nice because it was one long piece - it made sliding pots and pans to another burner really easy. But, then it also made it more difficult to clean them really good.

But, with the new range, the grates are separated, yet when sitting on the stove, the design makes it act like one big piece - pretty nifty.

The night before the delivery, I removed the old range (got some help from my stepdad since I wasn't able to pull it away from the wall myself - I needed some extra muscles). Once it was pulled away from the wall, I just unplugged it from the outlet, shut off the gas valve, and unscrewed the gas line from the valve.

Wow! You see that dirty floor? Nasty. Ick.

I made sure to clean it up really well because who knows when it will be cleaned again. :)

The delivery guys came at 7am. On Sunday morning. Yeesh, that's early. But I'm not complaining - just glad I didn't have to wait around for hours. I decided to have them install it because when my old range was reinstalled after doing work in the kitchen (not by me, for the record), it would faintly smell like gas most of the time the oven was on, so I thought it would be good for them to install it to ensure that it was done correctly. It was worth the extra bucks to have them take care of that for me.
Oh, you want to see the new range again? Sure, why not!
I need to adjust the height on it still, but it sure is looking good in there. And did I mention that it's a self-cleaning oven? Woo!
So, I guess I need to start researching prices & details on over-the-range microwaves next and the conversion will be complete. I'm waiting for you, Black Friday!
originally posted by http://adventuresindiy1759.blogspot.com/
Subscribe to:
Comments (Atom)