Showing posts with label Crafty. Show all posts

Wednesday, August 30, 2023

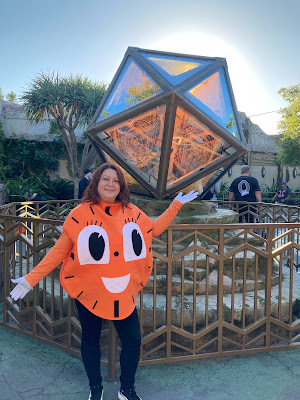
DIY Miss Minutes Loki Costume

Hi there!

Since Halloween will be here before you know it, I wanted to hop on to share a Halloween costume I made a couple of years ago for when we went to Oogie Boogie Bash, which is Disney California Adventure's (aka "DCA") yearly Halloween party!

I'm not the biggest Marvel fan, but I do enjoy some of the movies and Disney+ series.  With Avengers Campus being a new addition to DCA that year, I decided to dress as Miss Minutes - a character from the Loki series on Disney+. I had a feeling that many people would dress up as the different Loki variants (and they did!), so I thought Miss Minutes was a great choice for a more unique character.

Final Miss Minutes costume

Thursday, December 8, 2016

Nightmare Before Christmas Man-Eating Wreath

If you've ever seen "The Nightmare Before Christmas", then you probably know what the Man-Eating Wreath is!  I've been wanting to make this for a few years now and finally got around to it!


Monday, May 30, 2016

Disney Princesses Zippered Pillow

So, I was originally supposed to share this post several months ago, but kind of forgot.  Oopsie.  I have been trying to learn more sewing techniques and this one might be a game changer - sewing with zippers!  I made this Disney Princesses pillow for my niece for her birthday and she LOVED it!

Monday, November 30, 2015

Cork Christmas Tree

I've got another Christmas craft for you today!  Now, I've mentioned in the past that I have a huge stash of unused corks in my arsenal thanks to my winemaker brother-in-law.  From time to time, I come up with ways to use them and am starting to incorporate them in my holiday decor.

Saturday, November 28, 2015

DIY Camper Snowglobe

Can you believe it's almost December?!?!  I know I say this every year to just about everyone, but time flies by so fast.  I've already started getting ready for Christmas - I figure that the earlier I get things done, the sooner I will be done and have time to just relax and enjoy the season!

Today, I have a really cute Christmas decoration to share.  I actually made it as a gift, but I'm thinking I'm going to have to some for myself and for other gifts!  It's so easy and cute!

Monday, March 16, 2015

Cork Bunny & Twine Wrapped Eggs

Hey there!  I'm in the middle of a couple of projects, so I'll share those once I'm finished.  But, in the meantime, I wanted to share a little bit of Easter with you.  

Monday, February 9, 2015

Valentine's Day Garland

I'm not big on decorating for holidays, except for Halloween & Christmas.  And even then, it's minimal.  My house isn't very big and I don't have room for a lot of "stuff" nor have the space to be storing "the stuff", so I try to keep it low-key.   But, when I was putting away the Christmas decorations a few weeks ago, I decided to be early & bring out my one Valentine's Day decoration - the Cork Heart that I made last year.

So, I put that out and decided to make a garland for the mantle as well.  I didn't take any pictures of the process as it was pretty easy.  I had some Ikea heart ornaments that I hadn't been using and strung them onto some red baker's twine from my stash.  I tied each heart onto the twine so they'd stay put.  And then hung it on my mantel with clear Command hooks.  Easy.

Monday, December 22, 2014

DIY Disney Antenna Topper Ornaments

Can you believe Christmas is here in a few more days?!?!  I think we all say it every year, but each year really does go by so quickly!

I have a quick project for you today.  In fact, I've shared these DIY Disney Antenna Topper Ornaments in the past, but wanted to give a tutorial on how to make them.

Monday, October 20, 2014

DIY Minnie Mouse Pumpkin Shirt

Just popping in to share a quick project...I actually made this t-shirt a year ago for my niece.   I got the t-shirt at Michael's (similar to this).  They are pretty cheap to buy & if they're not on sale, you can use a coupon.

There are different brands of iron-on transfer paper.  I'm currently using Jolee's brand, but I've used the Avery brand before too.  Either works fine - just make sure to buy the type for the color shirt you are using (there's one for white fabric & one for colored fabric).  The instructions will be included with the packet, so you can just follow those.

I found this image through a Google search.  Whatever image you end up using, just make sure to reverse the image if it has writing on it - that way when you iron it on, it will come out the correct way.

The shirt was actually too big for her last year.  It's still a bit big for her, so we tied it at the side on the bottom to bring it in.  I also used orange ribbon on the sleeves to pull those up a bit more, but one of the ribbons fell off early on in the day, so I'll need to fix that.

Have you ever used iron-on transfer paper to make things?  I've used it for t-shirts, pillows, tote bags, & even a dog bed - it's a great way to personalize things & make them your own and really easy to do!

Originally posted by Adventures in DIY
Thursday, October 16, 2014

Jack Skellington Halloween Jar

***Repost***  I thought I would share this post again since it's one of my more popular ones this time of year...

After I made these cute Halloween jars (using this tutorial on this Not So Idle Hands post), I finished up a jar of pickles leaving me with another empty jar that I could make another one with.  But, I had to figure out what I wanted for it to be.  Then, I had the great idea to make a Jack Skellington one!

Wednesday, August 27, 2014

Fabric Bunting

Hello - long time, no blog!  It's been a busy, busy summer and I also have a deadline to meet, so I've been slaving away to make sure I don't fall too behind.  So, things may be continue to be slow on the blog-front in the next few months, but I'll be sure to pop in from time to time.

Today, I'm sharing fabric bunting that I made.  I've always loved the look of these, but there's really no place for one in my home, so when the opportunity to make a few of them came up, I jumped on it.

Thursday, May 22, 2014

Seashell Canvas

Lately, I've been mostly doing major projects, so I decided to take a break and do a quick crafty project.

Monday, April 21, 2014

Address Plaque

Well, I still don't have a studio reveal for you.  The last, main part of pulling the room together was putting up the gallery wall.  I did that a couple of weekends ago and wasn't happy with it.  Not.at.all! So, I took it down and quickly formulated Plan B.  Plan B required a few new projects to be done, so I've been working on those and hopefully will get this darn gallery wall up soon.

But, I did get this project done!

Sunday, April 20, 2014

Happy Easter!

Wishing everyone a Happy Easter!  I hope everyone is having a wonderful time celebrating and enjoying time with family & friends!

My extent of crafting and decor for this Easter are these jute-wrapped & baker's twine-wrapped plastic eggs and the cork bunny that sit on the end of my mantel.  To make the jute-wrapped & baker-s twine-wrapped plastic eggs, just wrap the jute or baker's twine around those cheap plastic eggs and hot glue them as you go.

Originally posted by Adventures in DIY

Wednesday, April 2, 2014

Cork Bunny

Hey Peeps!
If you remember, my brother-in-law is a winemaker that I got a ton of un-used corks from.  I've been trying out various cork projects as they come to mind.

After making this cork heart for Valentine's day, I decided to make something for Easter.  A Peep-shaped bunny?  Sure!  Why not?

This was easy to make - I just laid out the corks on a table until I got the shape I wanted.  Then, I hot glued the corks together.  Anyone else have any Easter projects you're working on?

Originally posted by Adventures in DIY

Thursday, March 20, 2014

Jewelry Display

Hey there!  I've been slacking a bit with posting - life has been eventful in many ways and keeping me on my toes...So, I actually debated on whether or not to share this project.  I'm not 100% happy with how it turned out, but it will work just fine as a temporary solution until my master bathroom gets its makeover.

Even though I don't really wear much jewelry on a daily basis, I like to throw on a necklace or ring for when I go out on the weekends.  I've seen lots of cute jewelry displays made from cork board and have been really wanting to make one.  My non-crafty friend even made one and I was so proud of her!  In an effort to use my abundance of craft supplies, I decided not to buy anything for this project and use what I already had on hand.  Here is what I ended up with!

Tuesday, February 25, 2014

Studio Project: Map Wrapped Boxes

Oh. my. word.  Have I really been working on my Studio since July?  Geez louise.  In my defense, I had to wait to get this awesome Vittsjo shelf from Ikea, did some garage organization, reorganized my pantry, reorganized my linen closet, finished a complete bathroom overhaul, and had to deal with the holidays, so at least I did manage to get some things accomplished.  But, the main reason I haven't finished the studio is because the leftover things that need to be organized is all the piddly stuff that don't have "homes".  So, this is why this last part has been a struggle.  I accomplished some things in the room last week and finally came up with a game plan, so *hopefully* that will get done very soon.  

Some of you may or may not know, but I loooooooooooove maps.  Love them.  Always have and always will.  I used to stare & study them and daydream about where I wanted to go.  And since I'm a lover of maps, I've managed to gather a good collection of them (and they were all free! You can get them from your hotels, when you get a rental car, AAA.  I just grab them when I see 'em).   Anyways, I had some old photo boxes that had a nice palm tree pattern on them.  They were still in good condition and although the palm tree pattern isn't bad, it just doesn't fit in with my decor.  So, the boxes were just sitting around, not being used to their full potential.   

So, I grabbed a couple of maps and used them to cover the photo boxes.  On one box, I used Mod Podge, which was a bit of a pain to get the air bubbles out (they never completely came out, so it's a good thing maps have lines - helps hide the bubbly bits) and the other box, I used double-stick tape and a bit of Mod Podge on the edges.  This 2nd process was much easier, by the way.  I just cut the pieces for each side (the maps weren't big enough to wrap the boxes like you would a gift - I figured that you don't ever see the bottom of the box, so I left the bottoms "as-is") and stuck the pieces on.  The boxes already had the metal plates on them, so I used an Xacto knife to cut the paper around it.  Then, I slapped on a label and called them done. 

Now I can use them for much-needed storage, all while they sit there looking pretty awesome.  I'll just have to try not to stare at them & daydream and actually get some projects done.

Originally posted by Adventures in DIY

Tuesday, February 11, 2014

Cork Heart

I'm usually not big on Valentine's Day - to me it's just another day.  I don't mind doing something small for it, but I feel like there shouldn't be a special day to show the people in your life that you love them.  It should be something that you do on a regular basis, right?   But, Kim at Sand & Sisal shared her Valentine's Cork Heart project and I just had to make one for myself.  I mean, I do have 2 huge bags of never-used corks sitting around waiting for me to create something with them!

So, here is my "something small" for Valentine's Day.

It was really easy to make and only took about 15 minutes.  I just placed my corks in a heart shape on the table and glued the corks together (using hot glue) one by one.  It was seriously that easy.  Now go make yourself one.

Originally posted by Adventures in DIY


Tuesday, January 28, 2014

DIY Dropcloth Dog Bed

Since Sally has become more of a fixture around here, I've been trying to incorporate her things with the decor of my house.  Although she sleeps with me on my bed, I decided to make her her own bed for when she wants a place to lounge throughout the day.

In the past, I got Sally a store-bought bed, but she didn't like it.  Since she's been staying here, I noticed that she always tries to lay on my pillow.  This a no-dog-butts-allowed zone!  So, I decided to make her own dog bed out of an old king-size pillow I wasn't using anymore.

Monday, October 28, 2013

DIY Little Red Riding Hood Costume

Hi all!  It's finally feeling like Fall around here in Southern California and I'm loving it!

This year, I  decided to be Little Red Riding Hood for Halloween.  After last year's party, I started making a list of costume ideas for this year so I wouldn't have to scramble at the last minute.  Little Red Riding Hood was at the top of my list from the get-go.  There's just something about capes (cloaks?) that I love.