Sunday, July 31, 2011

Billy Bookcase Re-Vamp & Some Crafts

Hello, hello!

What a crazy day it has been today.  We've been having some major heat the past few weeks, but today it rained all morning and part of the early afternoon.  For the most part, it made the weather really nice & cool, but when the sun would peek through, it was warm & humid.  Also, for some reason, I couldn't fall asleep last night.  I didn't fall asleep until 7am and made myself wake up at 10am so my sleep schedule wouldn't get out of whack since I have to go back to work tomorrow.  So, it's been a crazy, weird day for me.

Last weekend I worked on my bookcase project.  I have an Ikea Billy Bookcase in black-brown and all the items on the shelves just kind of disappear into its darkness.  For a long time, I've seen in different magazines & blogs that you can put wallpaper, fabric, or even wrapping paper on the backing to give it contrast.  I have really liked the idea of doing this, but have always hesitated because: #1)  it would be a pain to take everything off the shelves, unscrew the bookcase from the wall, and then move it and take the backing off and #2)  I didn't want to ruin the backing in case I want to change it back.  But, I got really inspired recently when I saw Thrifty Decor Chick's post about how she redid her dining hutch.  She used foam poster board and wall paper and cut pieces to fill in the spots of the backing of her hutch!  I thought this would be so much easier and could do one shelf at a time - I didn't even have to take everything off the shelves.  I ended up using 3 foam poster boards and 2 rolls of shelf liner from the Dollar Tree for a total of $5!  Three of the shelves don't have boards that fill up the entire shelf space, but you can't tell because my books cover them up.   I forgot to take a "before" picture because I was excited to get started on it, so here is an old picture.  Just ignore my patio table set and all the messes.
"Before" - the bookcase on the right.  You can see how tall and dark it was
"After" - the green and white shelf liner lightens it up.
I plan on re-arranging the items on the bookshelf.  I'll be taking some of it off and adding more decor, but this will do for now.  I'm still trying to get used to backing, but it sure does lighten up the space.

I have also seen all the pretty coral products that Pottery Barn has.  They're a bit pricey for me, but then I found Home Stories A 2 Z post about how to make your own coral for cheap.  She found some coral at Walmart and just spray painted them white.  Um, brilliant!  They didn't have a very good selection at my Walmart, so I picked just one piece for $8 and got some spray paint.  Again, I forgot take a "before" picture (what a slacker), but here is the outcome.
Boy was it hard to spray in all those nooks & crannies!

I also made these today:
I have seen these (ahem) textured balls in magazines and many blogs and really like the look.  I want to make at least 2 more using different textures and put them in a bowl or jar of some sort, but just looking for what other materials to use on them.  I was going to use some leftover yarn that I had, but the colors I wanted to use, I'm already using for another project.  The cone shaped one on the right I just saw the other day on a blog.  I'm pretty sure I saw it on The Lettered Cottage site, but can't find the exact post.  I'm going to use this at Christmas, but figured I would just make it now since I already had all the supplies out.  Here is a before of the ball:
All it took was a ball-shaped foam form, jute, and a hot glue gun.  It was really easy to make - I did this in between spray painting, laundry, and watching tv.  :)

I also spray painted a couple of picture frames that I hadn't used in awhile because they didn't really go with my decor.  I sanded the frames up a bit and primed the one of the left.  I used Rustoleum's Heirloom White.  Once they dried, I distressed them (I hadn't decided if I was going to do that or not, but I didn't do a good job at spraying the one on the left) using the sand paper.
Before

They would look perfect in my Ikea Expedit shelf in the living room, but there's no room right now.  I might have to replace the 2 other picture frames I have in there right now, but they are covering my modem and router so these 2 will have to be able to do the same thing.
After

During my trip to Walmart yesterday, I also bought more poly fiber fill.  I'm planning on making some pillows that I'm very excited about.   And since I got that, I decided to stuff my current decorative pillows on my couch.  I had bought decorative pillow covers at Bed, Bath & Beyond quite awhile ago and put some cheap pillows that I already had inside them.  Well, they never properly fit, so I sort of didn't like them.  Well, after I got home from Walmart yesterday, that was the first thing I did.  I took those puppies out and stuffed them with the fiber fill and I am so happy with them now!  They look a lot better and feel better.
This isn't a very good picture since I took it at night, but before the corners were kind of floppy and now it's filled in very nicely.  Me likey!

So, I feel accomplished this weekend.  I wanted to get some other projects done, but wasn't really in the mood for "house" stuff.  I was more in the mood to be crafty.  Hope you had a good weekend!

Tuesday, July 26, 2011

DIY Lull

Not much to report here.  I've actually been working a lot of overtime, so by the time I get home from work, I've been too tired to do much around the house.  Also, Saturday I was gone for the whole day - had a great time with some great friends, so I just took the time to enjoy my weekend.

I did, however, get a project finished concerning my bookcase, so I'm kind of excited about that.  I'm still trying to get used to it, but it sure brightens things up.  I'm just waiting for the weekend to get some good pictures - the lighting in my house is not so good, especially at night.  Hopefully, I'll have gotten more projects done over the weekend that I can report on as well, but we'll see.  Have a good week!

P.S.  I have run 2 more loads in the dishwasher and so far so good - no leaks.  Woo!

P.P.S.  I broke my oven door about a week ago.  Sigh.  Long story, but something happened with the hinges and I can't push the door back down.  So, now I'm able to get it closed, but not properly.  I guess I'll be looking for a good deal on a new stove/oven now.  I guess I'll be converting my appliances to stainless steel sooner than expected. 

House:  9,  Me:  8

Monday, July 18, 2011

Feeling A Little Bit Accomplished

I don't have any completed projects this time around (and no pictures), but I sure am feeling accomplished after this weekend.

So, back to the dishwasher (I know, I know - it just needs to be finished already).  I attempted to take the air gap off so I could give it a good cleaning in case that was the source of the leak.  I tried and tried and couldn't take it off.  I declared the dishwasher to be done for now - I'll just leave a little bowl to catch the few drops of water and will have the plumber look at it when I finally have my master bathroom remodeled.   I had to run two loads in the dishwasher today and to my surprise, I found on the second load that there was no leaking at all.  Let's hope that it stays that way!

Also, the refrigerator has two leaks.  One leak is something that I definitely can't fix, so for now, I just have a bowl on the top shelf to catch the water.  The second leak (the water dispenser) started after I changed the filter to try to fix the first leak.  When the second leak started, I shut the water off since that was the only way I could get it to stop, but that also meant no more ice.  After some research,  I found that a possible solution would be to flush the water line -  just dispense water for 5 seconds, then off for 5 seconds and repeat several times.  I pulled out the fridge and turned the water back on (I also cleaned the floor under the fridge while I was at it) and followed those directions and there seems to be no more leak.  Yay!

I should have more time this week and weekend to try out some projects.  I have something specific in mind that involves my book case, but we'll see how it turns out.

House:  8,  Me:  8

Sunday, July 10, 2011

Adventures in Beekeeping?

All my plans for house projects were shot this weekend.  I knew Saturday was out the window because I had plans with a friend.  But, Thursday night when I got home from work, I discovered I had bees.  In. my. garage.  Ew, ick!  Ok, I understand that sometimes this happens - but on the outside.  They were coming in from outside through a vent.  Sigh....so, I made a trip to Home Depot Thursday night and got some spray.  Next night, I come home from work and there are more!  Crap!  My step-dad came over to assess the situation and we saw where they were all going - they were crawling up into a space just above some cabinets in my garage.  So, he sprayed the heck out of them.  Ran out of spray.  Ugh.   Off to Home Depot, again (this time I made sure to buy 2 more cans).  He said he would come back on Sunday to see if that worked.  So, after he left, I got to thinking - those cabinets in my garage have no backing on them.  They are just exposed to the studs.  Crap - that means dead bees would probably be inside the cabinet.  Gross - totally not looking forward to the clean up.  On Saturday, there seemed to be way less bees inside, but then I discovered this outside.
See that dark spot close to the roof line?  Yeah - that's bees.

I spared you the more close-up picture.  ICK!
That is some nastiness!  But, I was hoping that this was a good sign.  If they are gathering outside, then that must mean, they don't want to go inside (please, please, please), right?  So, today, my step-dad came over and reassessed the situation.  No more bees inside!  Yippee!  There were a few that came inside from the vent and went right to where we guessed the hive was and then they just flew away.   (We couldn't see the actual hive - it was hidden behind part of the cabinet).  So, that left me to do the dirty work - clean up.   I vacuumed up all the dead bees.  They were all over the floor and the inside of the cabinets.  Ew!  I made sure to clean inside the cabinets really good too.   "They" say that you should get rid of the hive also, but we didn't have access, so it will just have to stay.  To ensure that they wouldn't come back, I used some extra screen that I had and used spray adhesive (I need to replace my staple gun) to glue the screen to cover the vent so they can't get in anymore, but still allow airflow.  There were still some left on the outside wall, so we gave them a good spray.  I'm sooooo glad that they are gone and I don't have to worry about them being inside the garage anymore and can move on with my life!  (I couldn't even get to some of my tools since they were in that cabinet).

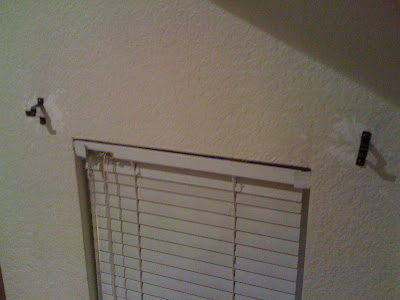
So, I didn't get much done as it took me awhile to clean up today (and oh-my-goodness, was it hot in the garage!  I was dripping sweat!).    I did fix the crappy spackle job that I did when I installed the curtain rod brackets in the kitchen as seen here.

Seriously, I know how to spackle.  I don't know why I did it so crappy that night.  Probably out of frustration.  Anyhow, I just scraped off the excess spackle.  I did have to take down these brackets though and I'm spackling up the holes again.  The curtain rods that I bought at Walmart (they were the shortest ones I could find anywhere) were being difficult when I tried to cut them shorter.  They left rough edges and I think that the fabric will get caught on it whenever I want to open up the curtains.  I ended up finding curtain rods that were the correct size at Bed, Bath & Beyond - score!  So, I got those and will need to install those now.  Unfortunately, the hole placement is different with the new set, so I have to start fresh again.

I decided to give up on projects for the rest of the weekend since the whole bee situation just wore me out.  I'll just enjoy the rest of my night!

Saturday, July 2, 2011

Dishwasher Woes Part II

At least I'm making progress!  But, will I ever be done with this darn dishwasher?  I managed to get the disposal connector onto the air gap tight enough without it leaking during quick test cycles.  I also put an extra clamp at the top just to be safe.
Make sure those clamps are on super tight.  Seriously.
I ran an actual load for a final test and it seemed to be okay - yay!  Jumping for joy!  So, I made sure to keep checking on it and I noticed there's a bit of water on the bottom of the cabinet.  Oh geez - here we go again.  I felt all around the white tube and black connector and they're dry...hmmm.  Then, I felt around the bottom of the air gap (where it meets the sink underneath) and it was all wet.  Yet, another leak.  I feel like a plumber (minus the plumber's crack).  Sigh.  So, I'll have to do some research to see if the air gap needs to be unclogged or cleaned out. 
So pretty!
 House: 8, Me: 7