
Showing posts with label Pinterest Inspired. Show all posts
Showing posts with label Pinterest Inspired. Show all posts
Friday, November 1, 2013
Minion Party
I have some friends that love those little Minions from the "Despicable Me" movies (ok, who am I kidding - I they are stinkin' cute & funny, too). We came across these two ideas: marshmallow Minions & Minion Twinkie cupcakes and decided we needed to make these asap. It ended up turning into a Minion party at my house!

Wednesday, December 26, 2012
The Beatles Abbey Road Canvas
Hi there! Today, I have a different type of craft than I usually do. It's more artsy than crafty. :)
 Not bad, eh?
I had found this (below) on Pinterest and being a huge Beatles fan, thought it was way cool.
Of course, I immediately thought "oh I can do that myself". I actually planned to make this as a gift for my brother, who is also a Beatles fan. Months went by, his birthday went by and I never made it. So, in November, I finally thought that I should make it as a Christmas gift for him and this would give me deadline to get it done. I made sure to not wait until the last minute either . Ya know - just in case it didn't turn out so well. :)
Here's how I did it...
Supplies:
* Canvas
* Paint
* Image printed on paper
* Craft scissors
* Paint brush (or sponge brush)
* Adhesive
1) I Googled images of the Beatles' Abbey Road album. I happened to find one that was just the silhouettes of them, instead of the original picture. So I printed it out and using my craft scissors (they were easier to use than regular scissors), I cut the figures out. I made sure to cut very carefully in case I needed to use the "reverse" stencil.

2) Once cut, I laid out the stencils/figures, I placed them on the canvas until I got them in a spot that I liked. I liked the placement of the original that I found on Pinterest, so I used that as my guide.

3) I didn't have any repositional spray adhesive and I didn't want to use my permanent spray adhesive for fear that the stencils wouldn't come off when it was time to remove them. So, I used double-sided tape. This ended up not being a good idea, but I digress.
4) I searched through my many sample pots of paint and decided on "Anonymous" by Behr. It's a nice, dark gray color and I figured it would match with pretty much most color/decor schemes. Using a sponge brush, I just splattered the paint in all different directions. There was no rhyme or reason to it - I just splattered it until I thought it looked good.

5) Since the paint was thick in some spots, it was sort of hard to see where the stencils were. So, I decided to take the stencils off while it was still wet.

6) If you look closely at the figures in the picture above, you can see that in several spots, the paint leaked. There were jacked-up feet, hands, heads all over the place. So, I racked my brain to try to think how to fix them or if I should just go buy some repositional spray adhesive and start over. Since I wouldn't be able to go to the store for a few days, I decided to just try and fix it - if it didn't work, then I would just start from scratch. I decided to use my reverse stencil that I had taken the time to very carefully cut out.

7) I matched the figure on the canvas to the figure of the reverse stencil and taped it into place over the figure. I also held it in place with my fingers to ensure that it stayed in place. Using my off-the-shelf Pure White Behr paint, I painted within the stencil with an artist's brush. It just so happened that this white paint matched the white of the canvas perfectly. If I accidentally painted "outside of the lines", I just dipped some of the gray paint onto the tip of a wood skewer and touched it up. It was actually very easy.

8) Paul went from looking like this...
 To this...
 It actually looks a lot better in person - for some reason the camera picked up on the glare from the paint and made it look a bit more rough than it really is. It's not perfect, but much better than how he started out.
George came out looking really good too.

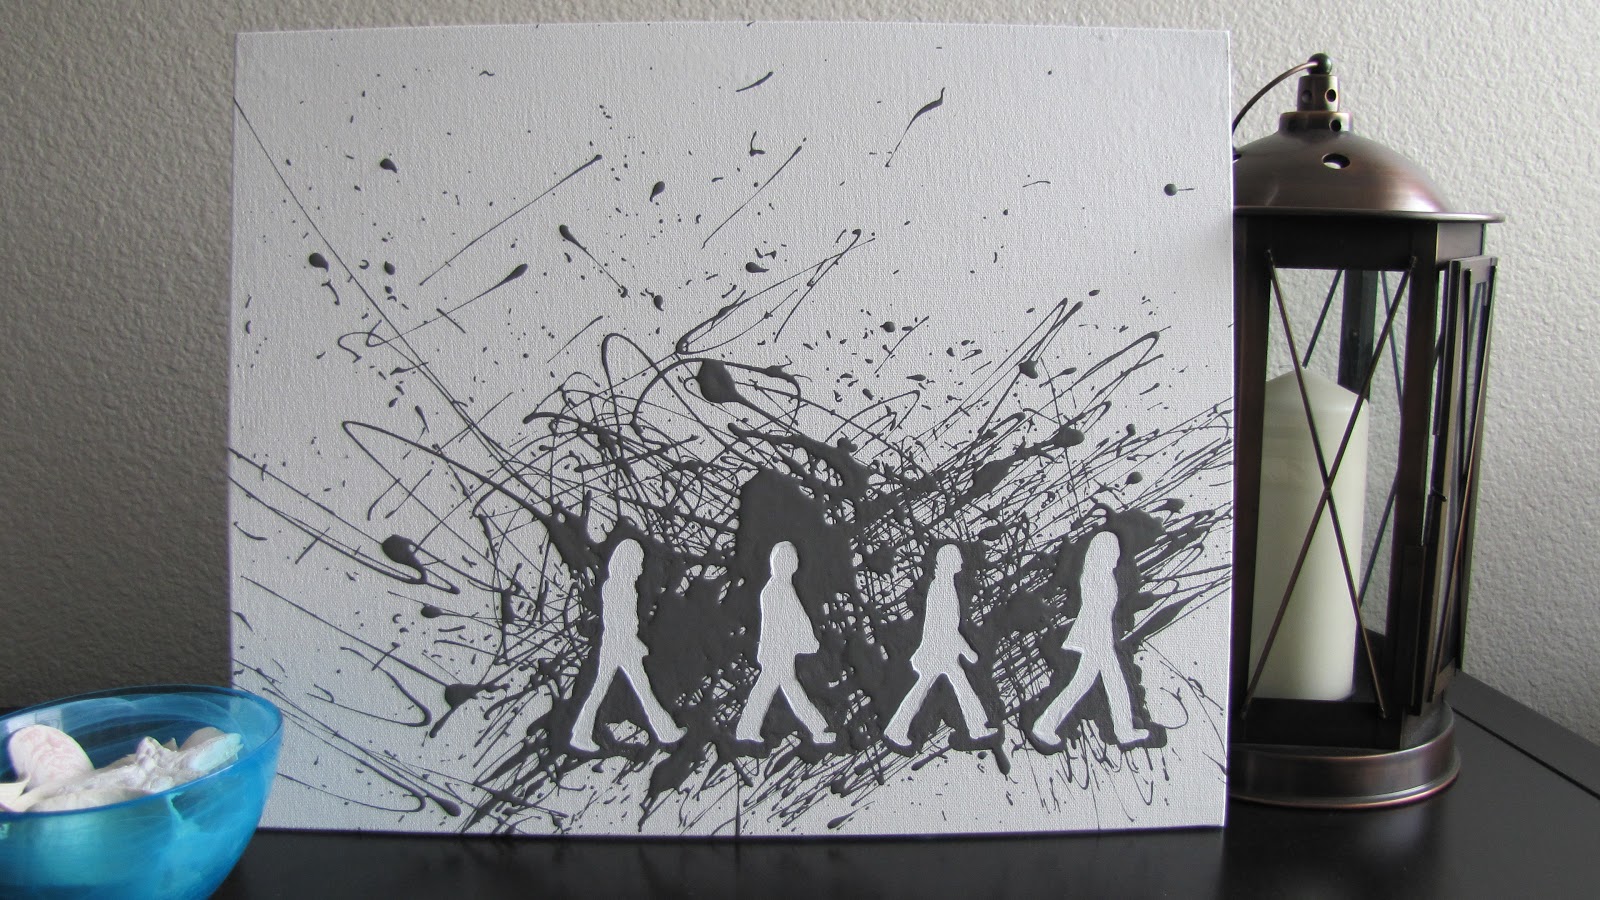
And here is all 4 of them after I touched them all up.

9) I wasn't sure if my brother would want to hang this or lean it up against a wall, so to give him the option, I added picture hanging hardware. I tend to save extra parts and had this in my stash. It came with small nails, but they were too long for the canvas - they would go right through to the front. So, I ended up super gluing it to the back of the canvas. It worked like a charm - I even tested it out.


And where it's hanging on the wall...

I hope he likes it!! I was actually very, very thrilled with how it came out. I'm going to make one for myself (eventually), but probably paint a nice chevron background. But, I'll definitely need to go buy that repositional spray adhesive first!
I hope everyone has been enjoying the holiday and time with their families! And as always, thanks for stopping by.
originally posted by http://adventuresindiy1759.blogspot.com/
Linked up to:
Homework's Inspiration Board link party

The DIY Dreamer's From Dream to Reality link party

Smart School {House} & The NY Melrose Family's Whimsy Wednesdays link party

Home Stories A to Z Tutorials & Tips link party

Lil Luna's link party

House on the Way's Twirl & Take a Bow link party

Live Laugh Rowe's Live Laugh Linky link party

House of Hepworths Hookin' Up With HOH link party

A Bowl Full of Lemons One Project At A Time link party

Delightful Order's Delightfully Inspiring link party

The 36th Avenue's weekly link party

One Artsy Mama's Shine On Fridays link party

Tater Tots & Jello Weekend Wrap Up link party

Too Much Time's Get Schooled Saturday link party

Creatively Living's Monday Funday link party

Liz Marie Blog & Love of Family & Home's Make It link party


I had found this (below) on Pinterest and being a huge Beatles fan, thought it was way cool.
 |
| Via Always in Wonder blog |
Here's how I did it...
Supplies:
* Canvas
* Paint
* Image printed on paper
* Craft scissors
* Paint brush (or sponge brush)
* Adhesive
1) I Googled images of the Beatles' Abbey Road album. I happened to find one that was just the silhouettes of them, instead of the original picture. So I printed it out and using my craft scissors (they were easier to use than regular scissors), I cut the figures out. I made sure to cut very carefully in case I needed to use the "reverse" stencil.

2) Once cut, I laid out the stencils/figures, I placed them on the canvas until I got them in a spot that I liked. I liked the placement of the original that I found on Pinterest, so I used that as my guide.

3) I didn't have any repositional spray adhesive and I didn't want to use my permanent spray adhesive for fear that the stencils wouldn't come off when it was time to remove them. So, I used double-sided tape. This ended up not being a good idea, but I digress.
4) I searched through my many sample pots of paint and decided on "Anonymous" by Behr. It's a nice, dark gray color and I figured it would match with pretty much most color/decor schemes. Using a sponge brush, I just splattered the paint in all different directions. There was no rhyme or reason to it - I just splattered it until I thought it looked good.

5) Since the paint was thick in some spots, it was sort of hard to see where the stencils were. So, I decided to take the stencils off while it was still wet.
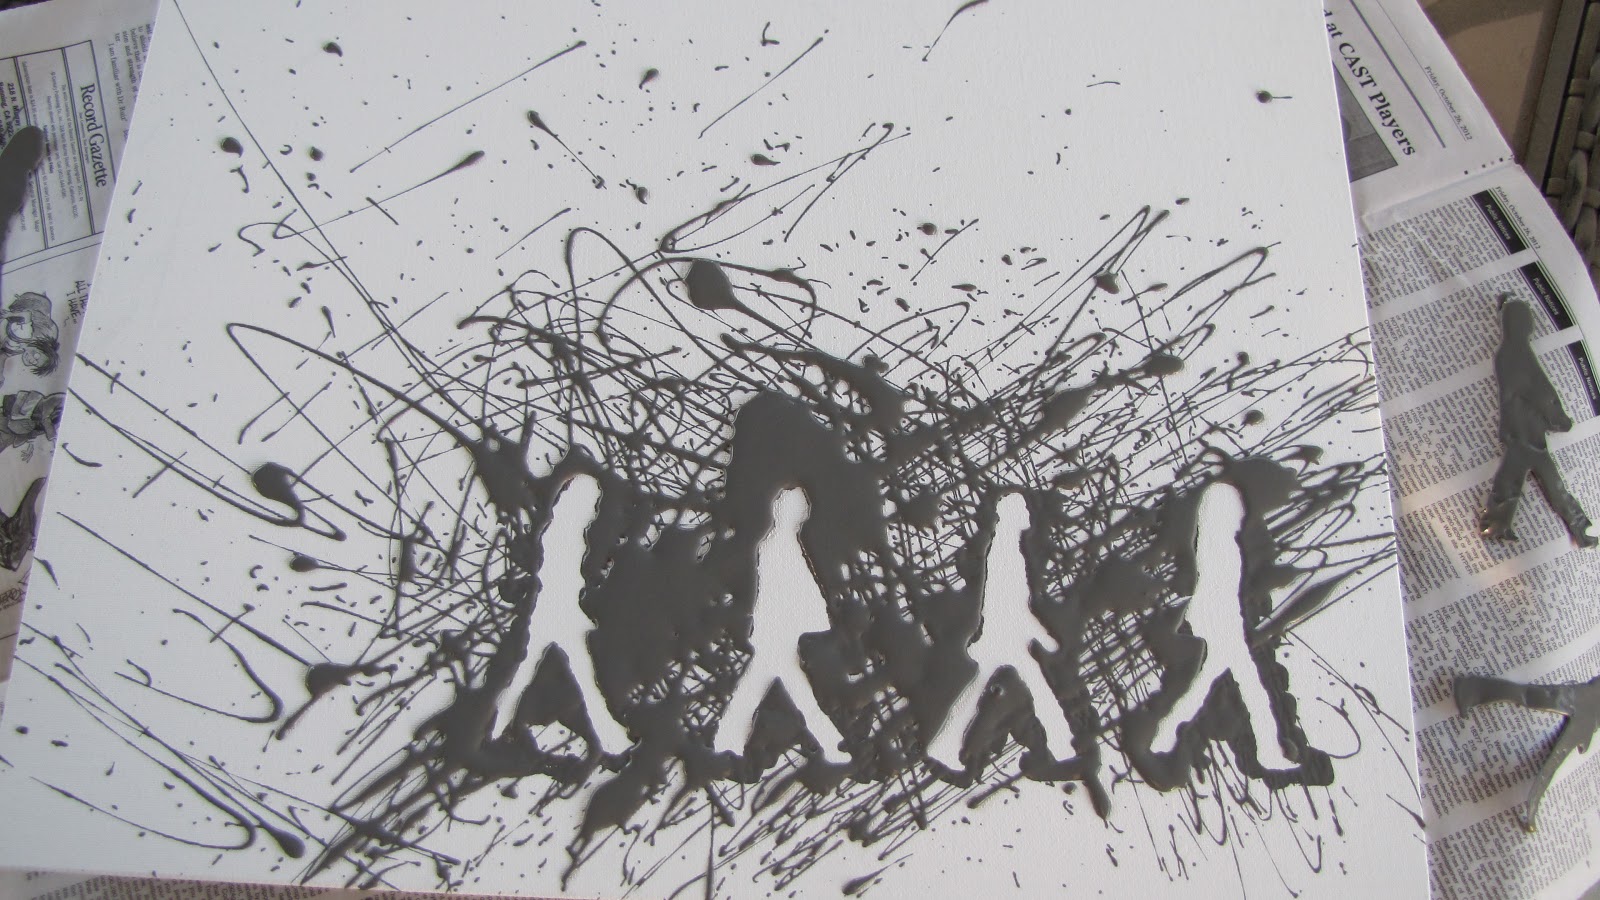
6) If you look closely at the figures in the picture above, you can see that in several spots, the paint leaked. There were jacked-up feet, hands, heads all over the place. So, I racked my brain to try to think how to fix them or if I should just go buy some repositional spray adhesive and start over. Since I wouldn't be able to go to the store for a few days, I decided to just try and fix it - if it didn't work, then I would just start from scratch. I decided to use my reverse stencil that I had taken the time to very carefully cut out.

7) I matched the figure on the canvas to the figure of the reverse stencil and taped it into place over the figure. I also held it in place with my fingers to ensure that it stayed in place. Using my off-the-shelf Pure White Behr paint, I painted within the stencil with an artist's brush. It just so happened that this white paint matched the white of the canvas perfectly. If I accidentally painted "outside of the lines", I just dipped some of the gray paint onto the tip of a wood skewer and touched it up. It was actually very easy.

8) Paul went from looking like this...


George came out looking really good too.

And here is all 4 of them after I touched them all up.


Here's the final product. This is one where it's leaning against the wall...

I hope he likes it!! I was actually very, very thrilled with how it came out. I'm going to make one for myself (eventually), but probably paint a nice chevron background. But, I'll definitely need to go buy that repositional spray adhesive first!
I hope everyone has been enjoying the holiday and time with their families! And as always, thanks for stopping by.
originally posted by http://adventuresindiy1759.blogspot.com/
Linked up to:
Homework's Inspiration Board link party

The DIY Dreamer's From Dream to Reality link party

Smart School {House} & The NY Melrose Family's Whimsy Wednesdays link party
Home Stories A to Z Tutorials & Tips link party

Lil Luna's link party

House on the Way's Twirl & Take a Bow link party

Live Laugh Rowe's Live Laugh Linky link party

House of Hepworths Hookin' Up With HOH link party

A Bowl Full of Lemons One Project At A Time link party

Delightful Order's Delightfully Inspiring link party

The 36th Avenue's weekly link party

One Artsy Mama's Shine On Fridays link party

Tater Tots & Jello Weekend Wrap Up link party

Too Much Time's Get Schooled Saturday link party

Creatively Living's Monday Funday link party

Liz Marie Blog & Love of Family & Home's Make It link party

Saturday, December 15, 2012
"Home Is Where The Heart Is" Map Frame
***This is an exact repost from 11/27/11. For some reason my "I *Heart* Maps" post was getting tons of spam comments. I got tired of getting them, so I have deleted that post and reposted it here today.***


I noticed recently that I have pinned a lot of cool stuff to do with maps. I knew I liked maps, but sheesh. :)
Anyhoo, I have a friend who just went into escrow on a house. It will be the very first home for her & her husband (and their cute little girl) and I had the perfect idea for a housewarming gift for them! I had found this picture on Pinterest.
 |
| maryruffle.tumblr.com |
I was going to include the original post it came from, unfortunately when I clicked on the link to that site, it says "not found". So, here is my quick tutorial on how I did this cute project.
Supplies Needed:
*Map of the city/place of your choice
*Sewing needle
*Red embroidery thread (or color of your choice)
*Scissors/paper trimmer
*Piece of scrap paper (to make the heart template)
1) I Googled a map of the city and saved it as a .jpg file.
2) Using my editing software, I typed the words "Home is where the... ...is." directly on the map and considering the space where the heart would go. (I decided to type the phrase on the map after I already did the project, so some these pictures don't show the phrase on it.)
3) Then, I printed it out on card stock (I used card stock since it's thick - this makes it easier to do the stitches).
4) I took a piece of felt (but a piece of scrap paper would work also) and cut out a heart in the size I wanted.

5) I used this as a template for stitching the heart around the city name. I just held it in place and poked holes all the way around it (it didn't matter if the holes were not evenly spaced - I just eyeballed it).

6) Using the red embroidery thread and a needle, I just back-stitched all the way around the heart.


7) After I was done with the stitching, I trimmed the paper to the appropriate size and framed it.


I had debated on putting their family name on the matte, but decided against it. I also thought about adding a few hooks to the bottom of the frame so they could use it as a keyholder as well, but the frame I picked wouldn't accommodate for that. However, these are always options that you can do to it - it's a pretty versatile little project. I hope they like it!
And linked up to Tater Tots & Jello Favorite Projects of 2011 link party.
Wednesday, September 19, 2012
Mini Tacos
Hello! I'm almost done with my current project, so I'll be able to share it very soon. In the meantime, here's a little something I tried that I found via Pinterest: Mini Tacos. These were pretty simple to make and would make for great little appetizers.

Supplies needed:
* Your choice of meat
* Your choice of seasoning for meat
* Wonton skins
* Cheese (grated)
* Muffin tin
* Pam (or something to grease the muffin tin)
 ***Preheat oven 350 degrees***
1) First, cook your meat. I used ground beef with taco seasoning. But, you could make it with any seasoning you'd like. You might be able to use other types of meat, but the ground beef is good for this because these are pretty small.
2) Once the meat is cooked (or while you're cooking it), prepare your muffin tin. Spray a bit of Pam and make sure the inside of the cups are greased completely. Then, put a wonton skin in each cup.

3) Fill the wonton skins with a bit of the meat.

4) I added shredded cheese to half of mine to see if I would like it better with melted cheese or non-melted cheese. It's up to you how you would like it (I preferred it with the cheese added afterwards).

5) Put the muffin tin into the oven at 350 degrees for at least 10 minutes.
 The directions I found on Pinterest stated to bake them for 8 minutes. I felt that this was not enough time. The 2nd batch I made, I put in for 10 minutes and it was much better. I'm thinking to try 12 minutes to see if that will work even better.
Here is how they came out!

You can add anything else to it that you'd like. I love hot sauce, but didn't have any and I think these would have tasted great with them. Buona appetito!
Posted by: http://adventuresindiy1759.blogspot.com/

Supplies needed:
* Your choice of meat
* Your choice of seasoning for meat
* Wonton skins
* Cheese (grated)
* Muffin tin
* Pam (or something to grease the muffin tin)

1) First, cook your meat. I used ground beef with taco seasoning. But, you could make it with any seasoning you'd like. You might be able to use other types of meat, but the ground beef is good for this because these are pretty small.
2) Once the meat is cooked (or while you're cooking it), prepare your muffin tin. Spray a bit of Pam and make sure the inside of the cups are greased completely. Then, put a wonton skin in each cup.

3) Fill the wonton skins with a bit of the meat.

4) I added shredded cheese to half of mine to see if I would like it better with melted cheese or non-melted cheese. It's up to you how you would like it (I preferred it with the cheese added afterwards).

5) Put the muffin tin into the oven at 350 degrees for at least 10 minutes.

Here is how they came out!

You can add anything else to it that you'd like. I love hot sauce, but didn't have any and I think these would have tasted great with them. Buona appetito!
Posted by: http://adventuresindiy1759.blogspot.com/
Tuesday, May 22, 2012
DIY Bath Mat - Project Fail!
I don't have anything too terribly exciting to post about right now. This past weekend was a bust - I think I got food poisoning. I was so sick and spent the entire weekend recovering. I did attempt another crafty project prior to getting sick, but it was a big fail. We all have projects like that, right? Not everything goes according to plan - such is life. So, I'm sharing it with you today - maybe I'll save you some time or maybe you'll have some suggestions for me.
Here's a little background on it first. I found my ex-stepsister (I really hate that term, but I'm being technical here) on Facebook earlier this year. She is 6 months younger than me and at the time we were very, very close. I think the last time I saw her was in my mid-teens? It's been soooooo long. I have so many great memories of the times we spent - crushes on boys, summers at the beach, stopping at little shops on our walks to the beach. So fun! So, we have reconnected and discovered that we still have a lot in common including we both love to craft and DIY. We also discovered that we have pinned a lot of the same stuff on Pinterest. Now, she lives in Arizona and I'm in California. We decided that we would start doing some of these pins together - it's a way for us to craft together while being so far away from each other and also a way for us to actually get some of these pins accomplished. Good idea, right? :)
The first project we picked was to do a bath mat.
 |
| Via Fine Craft Guild |
 |
| Via Rags By Sock Monkey |
I decided to use the technique from the t-shirt rug, but use towels instead. So, I got an old towel that I would use as the base of the rug. Then, you will cut another towel into little strips and tie the strips into holes in the base of the rug and you will get the cute fluffiness as seen in the two pictures above. Sounds easy, right? Heh.
So, I cut the towel to the size I wanted and was going to cut little holes all over so I could tie the towel strips into the holes.

I didn't take a picture of it, but you should have seen all the little fuzzies all over the place after I cut it. I was expecting a bit of a mess, but wow were their fuzzies everywhere. Looked like snow (ok, ok, that was an exaggeration, but still!). So, I decided to hem up the side I cut and that should do the trick, right? Heh, heh - silly girl. After hemming it, I shook it many times to get the fuzzies out, but they never really went away.

But then I realized since I would have to cut all the holes into the base of the towel, that there would be no way for me to hem them and there would be fuzzies all the time. And when I cut the towels into litle strips? Even more fuzzies! And I can only imagine how many there would be after washing it all the time too. So, I decided to save myself some time and I quit right there. I didn't even get to start snipping little holes in the base - I didn't want to waste my time.
I think my stepsister is going to use t-shirts instead of towels. She also found one of those grids, in the first picture, at the craft store and she's going to let me know how hers turns out. Unfortunately, I don't have enough old t-shirts that I can use and I'm trying to be, ahem, thrifty right now. I'm trying to think of another way to get this done using the resources I have - maybe I should use some of the leftover felt I have, but I'm not sure if I really want to use those colors. Well, for now, I'm considering this a project fail, but if I figure it out, you'll definitely be seeing it on here.
Subscribe to:
Posts (Atom)