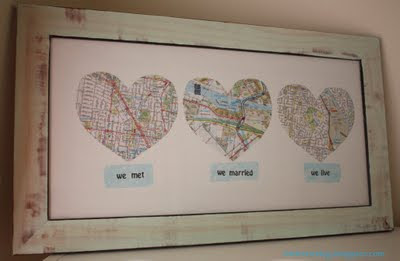
I got the idea from Pinterest (shocker). There were three different pins (seen below with links to their original websites) that all had the same general idea, so I used all three and came up with my own. It's similar to the "Home Is Where The Heart Is" map frame I made for a housewarming gift last year.
 |
| Kayla Danelle's Map Art |
 |
| Minimoz's Love Map |
 |
| Everything Fab's Repurposing Your Maps |
(Sorry for some of the crap-tastic nighttime photos. As you may remember, I'm a night owl and do most of my projects at night).
Supplies needed:
* Picture frame(s)
* Maps
* Red embroidery thread
* Needle
* Stamps
* Black ink
1) After determining the three cities of where they "met, married and live", I Googled them and printed out each place (cardstock would be ideal, but I had printed mine on regular paper before deciding to stitch on them). I was able to get exact locations for two of the cities, but the other I just used a map of the general area of the city. It really didn't need to be exact, though.
2) Using my felt heart from this previous project as a guide, I determined where I wanted the heart shape to go and then poked holes in the paper around the heart so that I could stitch the embroidery thread easily.
3) Using red embroidery thread, I back-stitched all the way around the heart.
4) After I finished stitching, I trimmed the maps to fit inside the matting of the frame and taped them to the paper that came inside the frame. In case you were wondering, I bought my frame at Ikea - it's the Ribba frame.
5) Before putting the maps inside the frames, I stamped on the matte. First, I stamped on a scratch piece of paper to make sure I got the spacing how I liked. Then I just held up the paper to the matte and used it as my guide for stamping on the actual matte.
6) Once I was finished stamping, I put everything back in the frame and wa-la!
This is really a sweet gift and quite easy to make as well. You could probably even whip one up still before Christmas!
originally posted at http://adventuresindiy1759.blogspot.com/
Linked up to:
Homework's Inspiration Board link party
The DIY Dreamer's From Dream to Reality link party
A Bowl Full of Lemons One Project At a Time link party
The NY Melrose Family's and Smart Schoolhouse's Whimsy Wednesdays link party
House on the Way's Twirl & Take a Bow link party
Live Laugh Rowe's Live Laugh Linky link party
Delightful Order's Delightfully Inspiring link party
The 36th Avenue's weekly link party
One Artsy Mama's and Happy Go Lucky's Shine On Friday link party
Tater Tots & Jello's Weekend Wrap Up link party
Too Much Time's Get Schooled Saturday link party
And a HUGE thank you to Smart School {House} for featuring this post!
Liz Marie Blog & Love of Family & Home's Make It link party


that is so stinking cute! i always love this idea! one to add to the books!
ReplyDeleteThis is such an adorable idea! Makes me want to dig up some old maps. Thanks for the tutorial!
ReplyDeleteThanks for stopping, Missy! You can always print something from the internet also, if you need a map for a specific place. :)
DeleteLOVE IT!! Soooo gorgeous Chrissy! WOW!
ReplyDeleteThanks so much for sharing this at The DIY Dreamer.. From Dream To Reality!! HAPPY NEW YEAR!!
what a beautiful project!! I would love to receive something like this as a gift! Love it!!! Great job!
ReplyDeleteWow, Laura - what a great compliment - thank you so much! Thanks for stopping by. :)
DeleteCongrats! This post is featured on Whimsy Wednesday at Smart School House today! Thanks for linking up with us. We can wait to see what you've got going on this week. The new party starts soon!
ReplyDeletehttp://www.smartschoolhouse.com
Kelly at Smart School House
I know how to back stitch on a sewing machine, but what does it mean to back stitch by hand?
ReplyDeleteHi Rachel - here is a video I found online that explains how to back stitch by hand. Hope this helps!
Deletehttps://www.youtube.com/watch?v=YruTAz86tT4