
Showing posts with label Corks. Show all posts
Showing posts with label Corks. Show all posts
Monday, November 30, 2015
Cork Christmas Tree
I've got another Christmas craft for you today! Now, I've mentioned in the past that I have a huge stash of unused corks in my arsenal thanks to my winemaker brother-in-law. From time to time, I come up with ways to use them and am starting to incorporate them in my holiday decor.

Wednesday, April 2, 2014
Cork Bunny
Hey Peeps!
If you remember, my brother-in-law is a winemaker that I got a ton of un-used corks from. I've been trying out various cork projects as they come to mind.
After making this cork heart for Valentine's day, I decided to make something for Easter. A Peep-shaped bunny? Sure! Why not?

This was easy to make - I just laid out the corks on a table until I got the shape I wanted. Then, I hot glued the corks together. Anyone else have any Easter projects you're working on?
Originally posted by Adventures in DIY
If you remember, my brother-in-law is a winemaker that I got a ton of un-used corks from. I've been trying out various cork projects as they come to mind.
After making this cork heart for Valentine's day, I decided to make something for Easter. A Peep-shaped bunny? Sure! Why not?
This was easy to make - I just laid out the corks on a table until I got the shape I wanted. Then, I hot glued the corks together. Anyone else have any Easter projects you're working on?
Originally posted by Adventures in DIY
Tuesday, February 11, 2014
Cork Heart
I'm usually not big on Valentine's Day - to me it's just another day. I don't mind doing something small for it, but I feel like there shouldn't be a special day to show the people in your life that you love them. It should be something that you do on a regular basis, right? But, Kim at Sand & Sisal shared her Valentine's Cork Heart project and I just had to make one for myself. I mean, I do have 2 huge bags of never-used corks sitting around waiting for me to create something with them!
So, here is my "something small" for Valentine's Day.
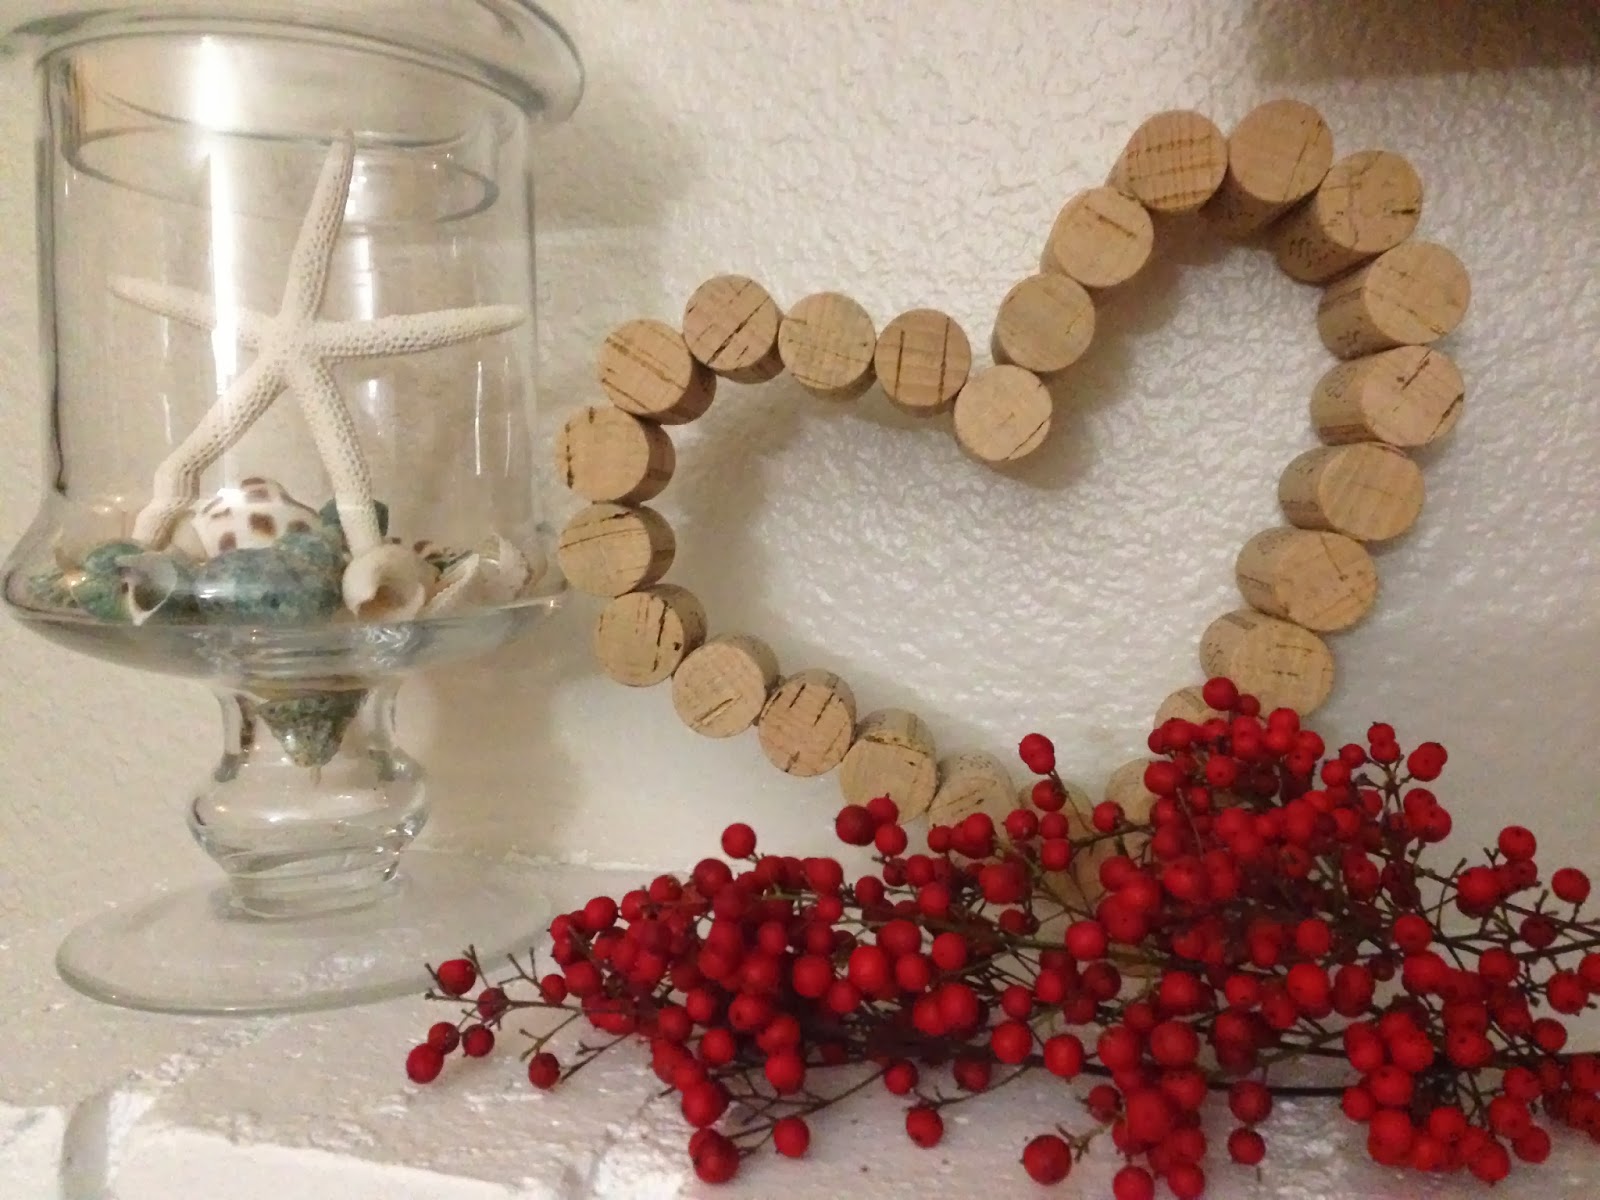
It was really easy to make and only took about 15 minutes. I just placed my corks in a heart shape on the table and glued the corks together (using hot glue) one by one. It was seriously that easy. Now go make yourself one.
Originally posted by Adventures in DIY
So, here is my "something small" for Valentine's Day.
It was really easy to make and only took about 15 minutes. I just placed my corks in a heart shape on the table and glued the corks together (using hot glue) one by one. It was seriously that easy. Now go make yourself one.
Originally posted by Adventures in DIY
Thursday, April 19, 2012
What up, 'G? Another Cork Monogram
Hello again - we're almost to the end of another week. Yes! I'm ready for some rest after having a long and busy weekend. I am seriously lacking in my posting these days. Between working on a semi-big project (painting the fireplace) and April being a big birthday month for family and friends (we're talking 10+ people including myself), I haven't really gotten much else done.
I wanted to stop in and share another cork monogram that I made earlier this week. A couple of weeks ago, I posted this tutorial on how to make a cork monogram. It was so simple to do. So, I decided to make one as a gift for my friend's belated birthday (another April birthday!). It was actually more difficult to do than the "F" I made, since the "G" has a good curve to it, but I think it came out pretty well if I do say so myself.

I followed the same process as in the tutorial for the "F" - I just laid out all the corks in an arrangement I liked and one-by-one glued them together. It was a bit harder on the curves because I couldn't keep the corks exactly as I had laid them out, but it was close enough.

I also wasn't able to make it so that it sat flat on its bottom, so you can see how it tilts to the left a bit. I was kind of bummed about that, but a hanger can be attached to the back so it can be hung up on a wall instead.
Thanks for stopping by to take a look! In addition to few quick projects, I'm hoping to start painting my interior doors this weekend. They are an off-white/cream/dingy color and have never been painted in the 2 1/2 years that I've owned the house, so they are long overdue for an update!
Linked up to:
How to Nest For Less' Just a Party with my Peeps link party

Creatively Living's Tell it to me Tuesday link party

The NY Melrose Family's Whimsy Wednesdays link party

Live Laugh Rowe's Live Laugh linky party

The 36th Avenue's link party

It's Overflowing's Overflowing with Creativity link party

Thanks for stopping by!
Posted by http://adventuresindiy1759.blogspot.com/
I wanted to stop in and share another cork monogram that I made earlier this week. A couple of weeks ago, I posted this tutorial on how to make a cork monogram. It was so simple to do. So, I decided to make one as a gift for my friend's belated birthday (another April birthday!). It was actually more difficult to do than the "F" I made, since the "G" has a good curve to it, but I think it came out pretty well if I do say so myself.

I followed the same process as in the tutorial for the "F" - I just laid out all the corks in an arrangement I liked and one-by-one glued them together. It was a bit harder on the curves because I couldn't keep the corks exactly as I had laid them out, but it was close enough.

I also wasn't able to make it so that it sat flat on its bottom, so you can see how it tilts to the left a bit. I was kind of bummed about that, but a hanger can be attached to the back so it can be hung up on a wall instead.
Thanks for stopping by to take a look! In addition to few quick projects, I'm hoping to start painting my interior doors this weekend. They are an off-white/cream/dingy color and have never been painted in the 2 1/2 years that I've owned the house, so they are long overdue for an update!
Linked up to:
How to Nest For Less' Just a Party with my Peeps link party
Creatively Living's Tell it to me Tuesday link party

The NY Melrose Family's Whimsy Wednesdays link party

Live Laugh Rowe's Live Laugh linky party

The 36th Avenue's link party

It's Overflowing's Overflowing with Creativity link party
Thanks for stopping by!
Posted by http://adventuresindiy1759.blogspot.com/
Monday, April 2, 2012
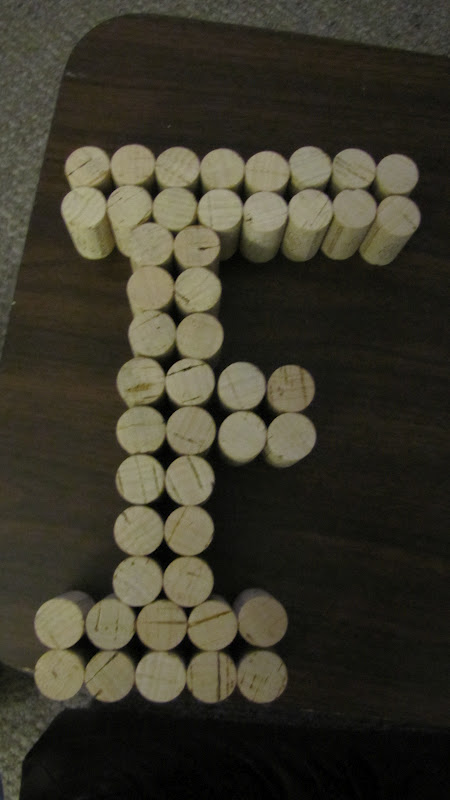
Cork Monogram
Hello - it's Monday, again, and we're already into April. It's crazy how time just goes by so quickly! This past weekend, I started working on a big project - it's still in the early stages, but I'll share it when it's completed. I'm very excited about it, but it's sure kicking my booty right now. I did manage to squeeze in a couple of other little crafty projects that were pretty quick and easy.
Awhile back, I shared a cork wreath that I made. My brother-in-law is a winemaker and gave me two HUGE bags of unused wine corks that they wouldn't be able to use, knowing that I might be able to use them for a crafty project. I've had this idea for a little while and finally was able to do it yesterday. Here is a quick tutorial (there's not much to it - it's that easy).

Supplies needed:
* Wine corks
* Hot glue gun and glue sticks
1) Once I determined which letter I wanted to do, I laid the corks, standing on end, and started placing them in the shape of the letter.

 I played around with the placement until I decided exactly what I wanted.
2) Start from the bottom and glue the corks together. Just keep them laying there in the placement you wanted and make sure to grab them in order and start gluing them to each other.

3) And keep gluing...

4) And you're done!


Easy peasy! Such a quick and cute project and it really didn't use that many wine corks. So, start saving corks - just don't drink that many bottles of wine all in one night! :)
Linked up to:
How to Nest For Less' Just a Party with My Peeps link party
Home Stories A to Z Tutorials & Tips link party

Creatively Living's Tell It to Me Tuesday link party
Our Thrifty Idea's Tutorial Tuesday link party

Homework's Inspiration Board link party

Live Laugh Rowe's Live Laugh Linky party
House of Hepworths' Hookin Up With HOH link party

The 36th Avenue's Show Me Extraordinary link party
One Artsy Mama's & Happy Go Lucky's Shine on Fridays link party

Imprintalish's Loves on Thursday link party

Too Much Time on My Hand's Get Schooled Saturday link party

Tater Tots And Jello Weekend Wrap Up link party

The Grant Life's Financial Friday link party

Delightful Order's Delightfully Inspiring Thursday link party

Liz Marie Blog & Love of Family & Home's Make It link party

And a HUGE thank you to Happy Go Lucky for featuring this post!

Posted by http://adventuresindiy1759.blogspot.com/
Awhile back, I shared a cork wreath that I made. My brother-in-law is a winemaker and gave me two HUGE bags of unused wine corks that they wouldn't be able to use, knowing that I might be able to use them for a crafty project. I've had this idea for a little while and finally was able to do it yesterday. Here is a quick tutorial (there's not much to it - it's that easy).

Supplies needed:
* Wine corks
* Hot glue gun and glue sticks
1) Once I determined which letter I wanted to do, I laid the corks, standing on end, and started placing them in the shape of the letter.

2) Start from the bottom and glue the corks together. Just keep them laying there in the placement you wanted and make sure to grab them in order and start gluing them to each other.

3) And keep gluing...

4) And you're done!


Easy peasy! Such a quick and cute project and it really didn't use that many wine corks. So, start saving corks - just don't drink that many bottles of wine all in one night! :)
Linked up to:
How to Nest For Less' Just a Party with My Peeps link party
Home Stories A to Z Tutorials & Tips link party

Creatively Living's Tell It to Me Tuesday link party
Our Thrifty Idea's Tutorial Tuesday link party

Homework's Inspiration Board link party

Live Laugh Rowe's Live Laugh Linky party
House of Hepworths' Hookin Up With HOH link party

The 36th Avenue's Show Me Extraordinary link party
One Artsy Mama's & Happy Go Lucky's Shine on Fridays link party

Imprintalish's Loves on Thursday link party

Too Much Time on My Hand's Get Schooled Saturday link party

Tater Tots And Jello Weekend Wrap Up link party

The Grant Life's Financial Friday link party

Delightful Order's Delightfully Inspiring Thursday link party
Liz Marie Blog & Love of Family & Home's Make It link party
And a HUGE thank you to Happy Go Lucky for featuring this post!
Posted by http://adventuresindiy1759.blogspot.com/
Thursday, October 27, 2011
Wreathapalooza Part II
I finished 2 cork wreaths a couple of weeks ago, so I have a little tutorial for you.
Supplies needed:
* Wreath form
* Lots of wine corks
* Hot glue sticks
* Glue gun
I found this 13 inch wreath form at the Dollar Tree - they had about 3 different sizes of these and I got the medium size one. My brother-in-law is a winemaker and years ago, he gave me 2 huge bags of unused corks. I think I gave one of the bags to a friend and have only gotten through about 1/3 of the other bag (even after making this wreath, it made only a small dent in the bag).
1) See how the twigs (vines? what is that called?) on here are twisted around? I just followed the twisty pattern and started gluing away. The twigs were thin & round and since the corks are round also, it was hard to get them to stick really good. You can start by gluing one of the corks to the twig, and then gluing the next cork to the previous cork AND the twig.


2) I made sure to start each row at the same spot, because at the end of each row, there wasn't enough room for one last full size cork, so I left the space empty - I wanted the empty spaces to be all in the same part of the wreath. I figure that I can either leave the space and cover it with the ribbon that will be used to hang it, or try to cut some of the corks to fit in the space (I have tried cutting corks before and it's a PITA).
Here's what it looks like after I finished gluing. You can see at the top, the bit of space and it's more obvious on the back.

3) Since, in the past, it was such a pain to cut the corks with a knife, I decided to try using my handsaw and miter box and it worked like a charm, so I was able to get those spaces filled in.
4) Next, I made these felt flowers. I used the video tutorial on this Home Stories A to Z post. It was super easy. I even made a jute flower just by wrapping it the jute in a circular motion (that went on the other cork wreath I made and unfortunately I didn't get a picture before I gifted it).

And here is the final product:
 I was very happy with how they came out and was thinking to make one for myself, but they didn't have any more of these larger wreath forms at the Dollar Tree when I checked today. Either way, I still have tons of corks for another project!
Supplies needed:
* Wreath form
* Lots of wine corks
* Hot glue sticks
* Glue gun
I found this 13 inch wreath form at the Dollar Tree - they had about 3 different sizes of these and I got the medium size one. My brother-in-law is a winemaker and years ago, he gave me 2 huge bags of unused corks. I think I gave one of the bags to a friend and have only gotten through about 1/3 of the other bag (even after making this wreath, it made only a small dent in the bag).
1) See how the twigs (vines? what is that called?) on here are twisted around? I just followed the twisty pattern and started gluing away. The twigs were thin & round and since the corks are round also, it was hard to get them to stick really good. You can start by gluing one of the corks to the twig, and then gluing the next cork to the previous cork AND the twig.


2) I made sure to start each row at the same spot, because at the end of each row, there wasn't enough room for one last full size cork, so I left the space empty - I wanted the empty spaces to be all in the same part of the wreath. I figure that I can either leave the space and cover it with the ribbon that will be used to hang it, or try to cut some of the corks to fit in the space (I have tried cutting corks before and it's a PITA).
Here's what it looks like after I finished gluing. You can see at the top, the bit of space and it's more obvious on the back.

3) Since, in the past, it was such a pain to cut the corks with a knife, I decided to try using my handsaw and miter box and it worked like a charm, so I was able to get those spaces filled in.
4) Next, I made these felt flowers. I used the video tutorial on this Home Stories A to Z post. It was super easy. I even made a jute flower just by wrapping it the jute in a circular motion (that went on the other cork wreath I made and unfortunately I didn't get a picture before I gifted it).

And here is the final product:

Subscribe to:
Posts (Atom)