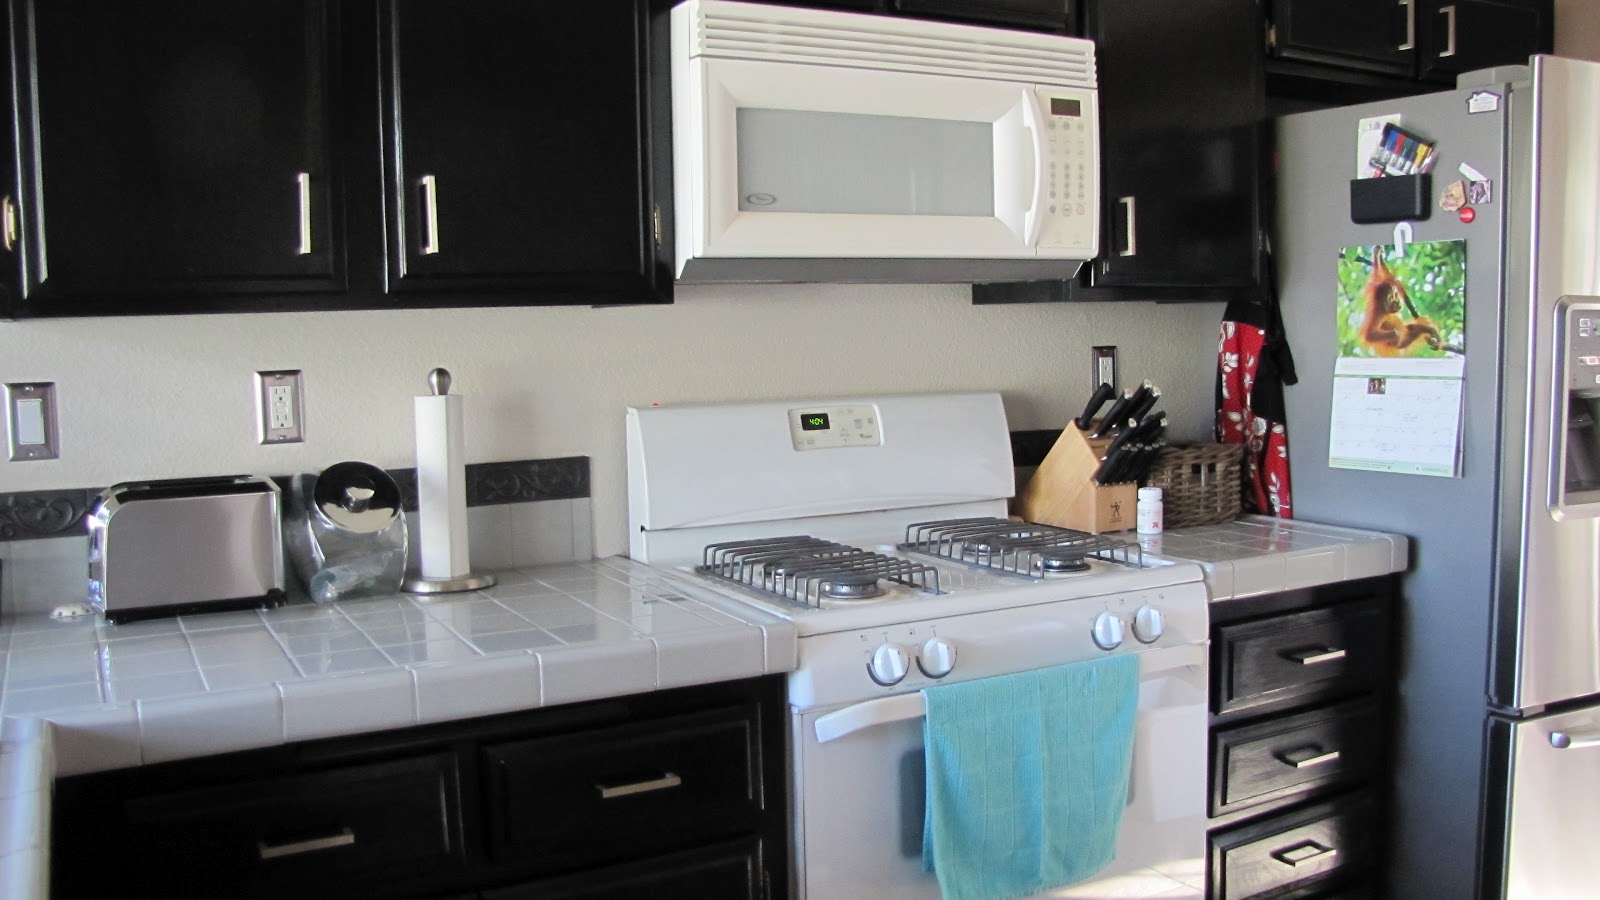
Today, I'm going to share my kitchen. Of course, there are already things I want to change (isn't that how it always works?). But, I have other priorities as far as the house goes, so I'm done for the time being. And it's not to shabby, if I say so myself.
Once upon a time, my kitchen looked like this.

I'll start with a list of changes that were made:
1) Cabinets:
The cabinets were sanded down and stained in Minwax's "Ebony".

The doors, drawers, and upper cabinets were removed for this whole process.


2) Counter tops:
The old counter's tile and wood trim were taken off and new tiles put in. I decided to go with tile vs. any other counter tops because a friend's friend did it for very cheap. I originally was not going to do much to the kitchen, so didn't do any research into any materials. The opportunity arose, so I jumped at it. I bought all of the supplies at Lowe's. The counter top tiles are American Olean's "Bright Smoke" and the grout & caulk was Custom Building Products' "Delorean Gray" (sanded grout). Before I decided on the tile, I had considered granite, but I really don't like the speckled look and at the time, that was mostly what the choices were. Plus, it would have been a lot more expensive than having to put the tile in. If I had a choice now, I would pick either butcher block (stained a dark walnut) or concrete. I love the look of both!

3) Accents:
I also added some accent tiles. I chose a metallic vine trim to go on the back splash (using Mapei's "Gray" caulk).

Under the picture window's sill, I chose a metallic pencil tile.
The smaller window sills got a mosaic tile treatment (by Daltile from Home Depot).


There are several outlets in the kitchen alone and some switch plates are expensive! I ended up finding some cheap, stainless "generic" ones at Home Depot. They don't have any detailing and are just plain, but I didn't need anything fancy. (Again, sorry about the picture. But, you can see how the switch plates were changed out).

4) Door/Drawer Handles:
There were no handles or pulls on the cabinet doors and drawers. I had debated for quite some time on whether or not I should add them. I ended up using Ikea's "Metric" handles and love them. They break up all the dark of the cabinets. I had a hard time with installing them because the drawer fronts were too thick for the screws that came with the handles and I had a hard time finding screws for it (as you can read about here and here). But, it all worked out in the end and looks great!


5) Window Treatments:
After buying my house, I learned that all of the windows are not a standard size. Meaning, if I wanted to replace any existing blinds, I would have to custom order or have store-bought ones cut down to size. Sigh... In the kitchen, there is a big picture window, and two skinny windows next to it. All of them came with those cheapo aluminum mini-blinds. They were very dirty and the strings were nasty. Ick. Here is a before picture showing all three windows and the icky blinds.

I finally put in new window treatments last year.

I also made curtains for the two smaller windows (as seen here). The only way to get blinds for them was to custom order and it was going to be at least $80 per window. There was no way I was going to pay that. I'm pretty happy with how they came out. In the picture above, you can see I had originally hung them by sliding the curtain rod through the pocket I made at the top. This was fine, but was a bit of a pain to open & close the curtains. So, a few months ago, I decided to buy clip-on rings and clipped them to the top of the curtain and the open & close waaaay easier now.

6) Dishwasher:
All the appliances that came with the house were white. I really like the stainless look and had planned to gradually replace everything. My dishwasher was the first to go. The one that came with the house was old & didn't work very well (when turning it on, sometimes the water would run & sometimes it wouldn't).
My friend had replaced hers and kindly gave me her "old" one - score! (The actual process of installing it was easy, but came across a few issues as seen here, here, and here).

7) Refrigerator:
Another appliance got replaced just a couple of months ago and she is a beaut! More details here.

8) Sink:
My kitchen also originally came with a ceramic, white sink.

I got a really good deal at Home Depot on a stainless steel sink. At first I hesitated to buy one - the ones I've seen before made a lot of clanging noises when you put dishes in it. This one sold me because it was made so that you don't hear a lot of that clanging. (I made sure to tap on it at the store to make sure. Ha). Sure enough, it doesn't make nearly as much banging noise as some other stainless ones.

9) Paint:
The walls also got a fresh coat of paint. The main walls were painted Behr's "Sandstone Cove" and the accent walls were painted Behr's "Oakwood Brown". You'll see them below in the before & after pictures. I wanted to paint the main walls a different color, but it wouldn't have looked right because the accent walls don't go all the way up to the ceiling (I have vaulted ceilings). The living room, dining room, and kitchen all share one big wall, so I made them all the same colors (it would have looked strange to paint the same wall 2 or 3 different colors).
So, are you ready for some before & after pictures?
BEFORE
AFTER

BEFORE


AFTER

BEFORE

AFTER

BEFORE

AFTER

There are still a few finishing touches that need to be done. When the cabinets were re-done, the trim was taken off and put somewhere in the garage. I need to find the trim, stain it, and attach it back to the cabinets. Once this is done, I will be officially finished with this room. Eventually, when I'm done with other projects for the house, I will start thinking about doing those changes above. But, I'm very happy with how all of it turned out.
Thanks for looking!
Posted by http://adventuresindiy1759.blogspot.com/
Linked up to Thrifty Decor Chick's Show Us Your Kitchens party

Wow, this is an amazing transformation! Crazy what hardware and a little paint can do!
ReplyDeleteOh my gosh! The after is gorgeous!! Glad to have found you, I'm now following along! :)
ReplyDeleteI love black cabinets! They always look sleek and stylish!
ReplyDeleteFollowing you now. Found you through the Networking blog hop.
--Katie
@ Creatively Living
Such a great makeover! The kitchen of my dreams is a black and white kitchen! I'm visiting from the blog hop! Just followed you via GFC. Would love to see you over at my place too!
ReplyDeleteLove, Olga
www.stardust-decorstyle.blogspot.com
Fantastic updates, it doesn't even look like the same kitchen! You worked so hard on your cabinets! If you're wanting something lighter, I love the look of white uppers and black lower cabinets also. You could try something like that before you commit to total white. It's beautiful as-is, though!
ReplyDeleteLove your new kitchen! It looks amazing and I love the black and white! It looks so clean! I'm your newest follower.
ReplyDelete-Cindy
www.pajamacrafters.blogspot.com
Cindy - thanks for stopping by and the sweet comments. :)
DeleteAbsolutely gorgeous! You did such a fantastic job! Night & day difference.
ReplyDeleteSuch an amazing transformation! I have a similar color scheme in my kitchen and just love it!
ReplyDeleteOh, and the fridge. I'm having some serious fridge envy...
:)
Linda
i love the new look
ReplyDeletewell done
Thank you for your nice comments and for stopping by! :)
DeleteThe kitchen looks awesome finally someone who didn't paint their cabinets white. The black looks awesome and the mosaic windowsill is great.
ReplyDeleteThank you so much! I do like white cabinets, but the black is great with my light colored walls. Thanks for stopping by!
Delete