Curtains:
I've had the fabric since May. I specifically waited until Joann had a 50% off fabric sale and I bought fabric for the kitchen curtains, the master bedroom window seat cushion, and the hallway bench cushion (the cushions have not been completed yet. See? Procrastinator). So, it took me a little time because I wanted to get some curtain rods and put them up first so I knew what size I needed to make the curtains. I had a bit of issues with the curtains rods here and here. I originally couldn't find rods short enough, so I put the brackets up and was going to cut the cheap Walmart rods that I bought down to the right size. But, that turned out to be more of a pain that I thought. I ended up finding rods at Bed, Bath, and Beyond in the correct size and got them up really easily. Once I did that, I started working away at the curtains. Boy oh boy - I sure can't sew in a straight line to save my life, but they came out fine and you couldn't tell that they weren't sewn perfectly straight. So, I put them up and this is how they looked.
Hmmm...something just wasn't right. They looked more like a tapestry hanging. I decided that the it needed to be "scrunchier" at the rod pocket. I had some extra fabric leftover, so I took out all the sewing I did on both of them and sewed on the extra fabric to both. Then, there was the issue of a seam showing on them from where I added the extra fabric. I decided that ribbon would be good to cover it and used iron-on fuse tape to attach it to the fabric. And let me tell you - it was a historic week! I used my sewing machine and iron all in the same week! Anyways, that seemed to work really well.
I also added small hooks on the side to use as holdbacks for when I wanted to have the curtains open (I tried regular holdbacks, but they were too big for the walls since the windows are on angled walls).
 |
| AFTER |
 |
| BEFORE |
Handles:
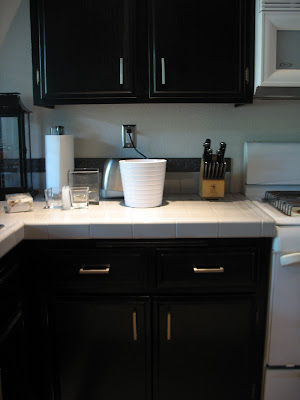
So, I was looking at old posts and I can't believe this project has been going on since the end of May! 3 months? What the? But, in my defense, there were problems that were a bit out of my control. First off, the screws that came with the handles weren't long enough to go through the drawers & doors and into the handles. When I went to Home Depot to find the right screws, they were not helpful at all (they usually are - I guess that's what happens when you try to ask someone who is about to go on lunch break). I also tried drilling a bigger hole from the inside of the drawer to get the screw to go in further, but that didn't work because the face front was hollow and one of the screws fell inside and I couldn't get it out. So, the project was put on hold until several weeks later I saw someone's blog post about True Value and remembered that there is one just a few minutes from my house. Off to True Value I went and lo-and-behold, they had the right screws (I learned that I needed Metric screws), but they didn't have enough in both sizes that I needed. So, they had to order them from their "guy" that comes in to place the orders and that actually took about 2 weeks (it's a small, individually owned True Value, so I guess that makes things a bit slower. And I can't use coupons - bummer!). Anyways, I had put all of the handles on that I could until more screws came in. I finally got them once they arrived (shout out to True Value in Cherry Valley for being so helpful when Home Depot was not), but of course I procrastinated in putting the rest of them on. My excuse was that it was going to be a pain because the only cabinets I had left were the really high ones in which I would need to actually get on the ladder. So, anyhow, I forced myself to do them the other night and it actually wasn't as much of a pain as I thought. I'm just so glad they are done now!
 |
| BEFORE |
 | |
| AFTER |
 |
| I used the bottom set of holes (the top ones weren't quite right). I also made a template for the drawers (this one is for the cabinet doors). |
And here's what the cabinet color used to look like:
One of these days I'll post a before & after of the entire kitchen. Unfortunately, the pictures might not be so great - my kitchen is a bit small and not an open concept kitchen, so it makes picture-taking in that room a bit difficult.
Anyways, I'm glad these are finally finished and now I can move on to my next project!


No comments:
Post a Comment
I would love to hear from you. Feel free to leave a message below - I will respond back via email, but if you have a no-reply or don't leave an email address, then I will reply below your comment. Thanks for taking the time to visit and commenting! It's much, much appreciated.