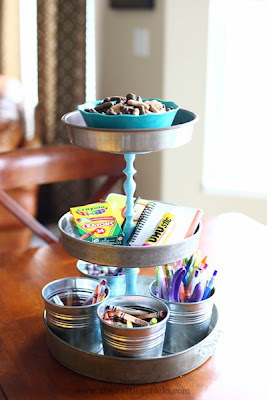
I've been eyeballing 3-tiered stands for awhile now. I've seen various versions (including the ones with baskets) and most I have seen at different stores were at least $20.
 |
| Source |
Supplies needed:
* 3 pie or cake pans in various sizes or all the same size ($1 each at the Dollar Tree)
* 2 candlestick holders ($1 each at the Dollar Tree)
* Glue ($4 at Home Depot)
* Spray paint in a color of your choice (already had on hand)
1) I primed the candlestick holders with spray paint before painting them.
By the way, the trigger for the spray paint cans shown above is the best $6 I've spent! It makes spray painting so much easier. You can find them at Home Depot.
2) After letting the primer dry, I sprayed them in my favorite Aqua color.
3) The glue I bought is Liquid Nails "Perfect Glue". I made sure that it would be ok to use on glass, but it's also good for all different types of surfaces. I put the glue on the bottom & top rims of the candlestick holder (depending on which part of the tier I was doing) and adhered them to the pie pans. I did one tier at a time and used a book or two to sit on top of it to help add weight during the drying time.
**As a side note, I stalked the Dollar Tree for months to try to find 3 different sized cake pans. They only had one size. So, I decided to just use the same sized pie pans for all 3 tiers and it looks just as cute.
4) And here is the final product!
I'm not sure where I'm going to use it or how I will use it (I'm thinking either the kitchen, bathroom, or craft room), but I can always make another one with cake pans or small bowls and different color spray paint and have them in different rooms. This project ended up costing me $9 to make, so I saved $10! And I have leftover glue to make more if I decide to. I really love how it came out.
Thanks for stopping by and have a great weekend!
Linking up to:
Creatively Living's Tell It To Me Tuesday link party
Home Stories A to Z Tutorials & Tips link party
Our Thrifty Ideas' Tutorial Tuesday link party
The NY Melrose Family's Whimsy Wednesdays link party
The 36th Avenue's link party
Live Laugh Rowe's Live Laugh Linky link party
One Artsy Mama's Shine On Fridays link party
Too Much Time's Get Schooled Saturday link party
Thanks for stopping by!
Posted by http://adventuresindiy1759.blogspot.com/


That is my favorite tiered stand ever! It looks so great! Thanks for the awesome tutorial as well!
ReplyDeleteThis looks great, Chrissy. I always loved the tiered stand from your inspiration photo and your take on it with the aqua looks lovely!
ReplyDeleteIf I were to make one it would have to be something that I could take apart again because I don't have the space to store something like this. My dollar store sells tart pans with a scalloped edge that would be the perfect starting point.
Visiting from Creatively Living!
I LOVE the blue that you popped in between! Thanks so much for linking up at Tutorial Tuesday.
ReplyDeleteI love this idea and going to use this for my next girls crafting night!
ReplyDeleteI love it! The pops of turquoise are great!
ReplyDeleteThanks for sharing!
--Katie
Love it. Thanks for the Tutorial. :-)
ReplyDelete