Sunday, January 29, 2012

Master Bedroom Closet

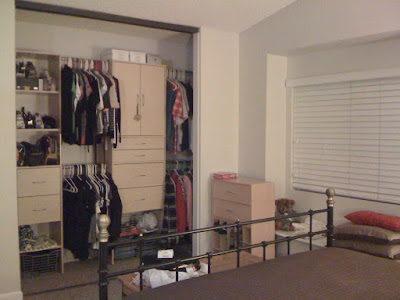
Hello there!  It's time for me to share another part of my home - my master bedroom closet.  Here's a sneak peek.

When I started looking for a home almost 3 years ago, the main two things that I really wanted were: 1)  a walk-in master closet and 2)  a laundry room inside the house (not in the garage).  Somehow, I ended up with a house that has neither - go figure.  This is what my master closet looked like before.  The closet had 2 sliding doors that went all the way up to the ceiling and were also painted the same color as the room.  (This is the wall color that came with the house - not my choice).

Unfortunately, I didn't take any "before" pictures of the closet itself, so these pictures will have to do (this was done over two years ago, before I started blogging, so I didn't always remember to take "before" pictures).  The closet had one long shelf at the top.  As you can see in the picture above, it had two rows of rods on the left side to hang clothes.  And on the right side of the closet, seen below, it had one rod to hang longer clothes like dresses & pants.  This was all fine, but it was original to the house, so 21 years old, and the plywood was a bit rough so I didn't feel comfortable putting folded clothes on the shelf.  I also wanted to be able to put all of my clothes inside the closet (so everything is in one place), so I wanted to include a system with drawers, shelving, and a shoe rack.  On top of all that, I hated the doors - they didn't slide smoothly and I think to paint the doors back to white would have been a pain, so off they came. 

First thing's first - I wrote down what types of items I had and how I wanted them stored in the closet (what to hang on the rods, what to place on shelves, and what to place in drawers).  Doing this, made it easier to figure out what I needed and if I had any flexibility in case the prices were ridiculous.  I did do a bit of research, as far as prices go, and decided to invest in the ClosetMaid system at Home Depot. Here is the set up I bought (sorry for the bad cel phone picture).

This is a picture of the closet in progress - the doors are still gone (I left them off for about a year) and the cubbies on the left were still open.  I discovered that the Ikea fabric bins that I used in my craft room fit these cubbies perfectly, so I bought a few to put there.  I was able to fit more of my purses and tote bags by using them.  (Side note: the room was painted Sandstone Cove by Behr).

IN PROGRESS

As for the closet doors, I couldn't find any pre-made doors that would reach all the way up to the ceiling.  I looked into having some custom made, but it was going to be very expensive.  So, the only solution was to build a header, this way, I could buy pre-made doors to fit.  This worked out perfectly.
YAY!  Finally doors on the closet!  They made my room feel much more complete.

Here are more pictures of the inside of the closet:
Everything is much more organized and eliminated a need for a dresser, which I didn't have nor have room for.  See how the black fabric bins from Ikea fit perfectly in those three cubbies?

The two doors on the right above those drawers opens up to reveal shoe storage.  Love!

There's also wire baskets that slide out.  They are perfect for all of my jeans.  I was also able to fit a wicker basket on one of the lower shelves to fit seasonal items like scarves, gloves, and beanies/hats.

On the left, as seen in the below two pictures, you can see that I was able to fit another rod for my longer clothes like dresses and pants.  The rod is hung perpendicular to the other ones because of the way that corner is. I was also able to put my laundry basket as well as a little step stool in that corner since there was no other room for it in the closet.

The picture below shows how the wall is at an angle, making the inside corner of that closet at a weird angle (what is it with my house and weird angles in closets?).

So, there it is.  My non-walk-in-master-closet!  Here's a before & after since we all love before & after shots.
BEFORE

AFTER

Thanks for looking!

Linked up to Thrifty Decor Chick's Show Us Your Closets link party.


Pin It

Wednesday, January 25, 2012

How To Organize Christmas String Lights

I know this is a bit late.  Now, it's not like I still had Christmas lights up on my house or Christmas decorations still up - I actually took everything down the week after Christmas.  But, I had seen on Pinterest, a clever way to store your Christmas string lights so they don't become a tangled mess.  Because no matter how nicely you put them away, those little knot-tying elves get in there and start making a mess of things.  Isn't that how that happens?  Hmmm.

Here was my inspiration:
Via Pinterest
Oh, Martha - you never cease to amaze me with your ideas.  So, I saved up some boxes for the cardboard and brought the plastic bin filled with Christmas string lights in from the garage and there they sat for a couple of weeks.  I told you about my project A.D.D. right?
Here is what you will need for this project.

Supplies needed:
*  Cardboard
*  Masking tape (optional)
*  Scissors or box cutter
*  Storage bin or box 
Yep.  This is what was sitting in the living room for a few weeks.  Hot mess.  Usually I think that if I bring the mess in, I'll get tired of it enough to take care of it.  Um, yeah - that doesn't work all of the time.  And yes, I actually thought that the thin cardboard soda boxes would work for this project.  Silly me.  Score a point for me trying to recycle though, right? 

1)  Separate your lights into piles and untangle what you can.  Surprisingly, most of mine were easy to untangle, so I didn't have to spend a lot of time doing that.
I forgot to take a picture of the bin before I started taking the lights out and had already wrapped some around the cardboard (bad blogger!).  But, this is pretty much what it looked like - just imagine the whole bin filled completely with lights.

2)  Figure out how big you want your cardboard pieces to be.  You'll need to make sure that:  a)  the cardboard is thick enough (don't use thin cardboard that will bend easily), b) they will fit easily inside the box, c) that the lid on your bin/box will close easily, and d) that the entire string of lights will fit on the piece of cardboard.  Once you have this figured out (it's not an exact science), cut your pieces with scissors or a box cutter (scissors worked just fine for me).

3)  Start wrapping a string of lights around a piece of cardboard.  You can secure the end of the string to the cardboard with masking tape (which is what I did) or you can just tuck it into a part of the lights that are already wound around the cardboard.
Please excuse my pj's.  I did this while on the couch watching TV.  (By the way, that shows how easy this project is: pj's + couch + TV = organized Christmas string lights).

4)  Once you've wrapped all of your sets of lights onto the cardboard, just file them away in your bin or box like I did below.

 
I was even able to fit my snowflake lights on top of them and still close the lid on the bin easily.  I also included the extra light tips in a baggie as well as an extra extension cord.  I was able to fit 11 strings of lights (2 of these sets being extra long) all in 1 bin.

I didn't time it, but it really didn't take too long for me to do this - maybe an hour and half from start to finish?  Also, I noticed that this may not exactly be a space saver - I wouldn't have been able to fit anymore sets of lights, but previously I could have fit 1 or 2 more.  However the advantage of doing this is that you can easily pull out a set of lights and they won't get tangled with each other, which is totally worth the time it will save you to untangling them. 

BEFORE

AFTER

FEATURED AT:
&


Pin It

Tuesday, January 24, 2012

Cans Wrapped in Pretty Paper

Well, I can't believe the weekend is over and I made it through Monday already.  It went by so fast!  I'm still in the middle of getting things re-organized.  Right now, I'm not focusing on one specific room or project - just doing what I feel like at the moment (I call it A.D.D.) and getting some of the prep work done.  My 10-year-old nephew was here on Sunday and I enlisted his help in the garage for a bit.  He was a great little helper, so I made him one of his favorite dinners and gave him a bit of cash.  I usually don't pay him for helping me because he should be learning how to help out.  But, today he was extra helpful and he never complains when I ask for help, so he definitely earned it!

Today I have a good recycling project for you.  I found this picture on Pinterest awhile back:
Via Pinterest
I've also seen something similar on other sites.  I thought I'd give it a whirl, since I remembered that I have a set of scrapbooking papers that has pinks, browns, and whites that I thought would go perfectly in my craft room since I have those pink fabric bins in there.  Here is a quick tutorial - it's super easy!

Supplies needed:
*  Recycled food cans (these can be of any size you want.  I saved various sizes and also even saved a plastic can from one of those Welch's frozen drink mixes)
*  Papers (your choice here - use all the same pattern or different variations.  Scrapbook papers work well for this, but you can also use wrapping paper).
*  Adhesive
*  Scissors or paper cutter

1)  I had managed to save some cans in different sizes.  The white Welch's plastic actually works really well for this project.  It's easy to clean and won't rust - also no sharp edges.  You can use any adhesive for this - I just happened to choose my hot glue gun and glue sticks. 

2)  Choose which papers you want to use to cover the cans.  Hold the piece of paper up to the can and make a mark where you want to cut.

3)  I used a paper trimmer since it's easiest and just trimmed away .
I measured everything all at once so I could just cut all the papers at the same time.

4)   I then held the paper up to the can, making sure it fit when wrapping it around.  Then put dabs of hot glue at the corners to secure the paper onto the can.

5) Wrap the paper around the can and once the paper is positioned the way you'd like,  put a line of hot glue on the edge and press into place.

6)  Since I washed these and they're made of metal, I was worried about any rust spots (although I didn't see any).  So, I just put a layer of Mod Podge on the bottoms and bottom edges as a coating, so it wouldn't ruin any surfaces that I set them on.

7)  Once the bottoms were dry, they were all done!
(don't mind kitty cat's bottom half on the left side there)
I actually wanted to stack them like in the Pinterest picture, but since the cans were all different sizes, it didn't work out so well.  So, for now, I put them in one of the cubbies of my Ikea Expedit shelf unit in the craft room to test them out and they look pretty good.  This is a quick & easy project and great to use as an organizing tool.


Pin It

Sunday, January 22, 2012

Embroidered Map Pillow: Pinterest Addiction #7

Well, it's finally looking like winter, here in Southern California.  I'm enjoying this gloomy, rainy weekend.  It's nice relaxing weather, especially after the week I've had.

First thing's first - I decided I'm not going to do a "weekly" post of Pinterest inspired projects anymore.  Some weeks, I haven't done a project for this, so I feel like I have to do one just for the weekly post and when I force myself to do something, it doesn't become fun anymore.  On the other hand, sometimes I have several that I've done in a week, but don't want to wait until it's time to do the weekly post.  So, I've just decided to post them when I want to.  And trust me - there will be more Pinterest inspired projects to come. 

Today, I'm sharing this really cool gift I made for my brother.  I got the idea from my sister-in-law.  She pinned this on Pinterest:
Via Pinterest
She made a really cute version of this for my nephew & his wife.  I had planned on making something else for my brother involving maps, but after I saw hers, I decided to try this instead.
So, let's roll with the tutorial...

Supplies needed:
*Fabric
*Thread
*Sewing machine
*Embroidery floss (colors of your choice)
*Sewing needle
*Embroidery hoop (optional, but it helps and they're pretty cheap)
*Poly fiberfill
*Printed outline of the state and/or country of your choice

1)  First, I decided to use some of the leftover canvas dropcloth that I used for the Christmas tree skirt that I made last month.  I worried about it not being soft enough, even after I washed it 3 times.  But after handling the fabric so much during this project, it wasn't too bad.  It wasn't super soft, but not real rough either.  It's supposed to be decorative, so I figured that it would be o.k.  Also, because I was going to use 1 country and 3 states, I needed the pillow to be more of a rectangular shape than square.  I ended up cutting 2 pieces measuring 14 1/2" x 21".

2)  I printed outlines for the country and 3 states I was going to use for this project.  I debated on how I would get the outline onto the fabric, but I needed to get this done fairly quickly, so I decided that tracing it onto the fabric would take too long.  So, I cut the outlines out and just pinned them onto the fabric.
In case you're wondering, my brother was born in Thailand, moved to California as a child, then to Arizona as an adult, and now he's in Idaho.  Also, these are not to scale.  At. All.   I couldn't do them to scale or it would look weird.  Just go with it, ok?

3)  After I pinned them onto the fabric, I placed my embroidery hoop around the area I was going to stitch on.  The hoop keeps the fabric taut, thus easier to do any hand-stitching.   Then, using the sewing needle and embroidery floss, just stitch around the shape of the paper.  It actually was pretty easy doing it this way and one less step without having to trace the image.  Hopefully, your template won't tear like mine did (at least it was after I was already done with the stitching part).

4)   I completed step 3 for all of the other states.  I picked another color of embroidery floss that I had and used that to make the dashed lines in between the

5)  Did you notice the dents the hoop makes on the fabric?  Well, you'll just have to whip out your trusty 'ol iron and ironing board and iron those puppies out.  Just iron both pieces while you're at it.

6)  Place both pieces of fabric with the right sides facing each other and sew 3 of the sides together.

7)  I have a couple of old pillows that were so out of shape and didn't fit my decor anymore, so I decided to take one of them apart and use the filling inside for this new pillow.  Yay for recycling!

8)  Just stuff the pillow until you feel it's a good amount.  Now, you'll need to stitch up the last side of the pillow.  Fold down the rough edges into the inside of the pillow to make a hem.  Using thread that matched the fabric, I did a stitch (I think it's called a ladder stitch) to connect both hems together from the inside of the seams, but concealing the thread so you can't see it.

9)  Here is the final product.

I am really, really pleased with how this came out.  And I plan on making more as gifts.  My brother liked it too - you know, even though he is a guy and shouldn't care about pillows.  :)

Linked up to Too Much Time on my Hand's Get Schooled Saturday link party.

Linked up to Tatertots & Jello's Weekend Wrap Up party

Linked up to The 36th Avenue's link party

Linked up to It All Started With Paint's Pillowpalooza link party


Pin It