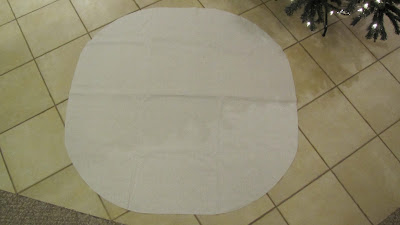
After I bought my new tree and found a burlap garland, I decided that I needed a new tree skirt. I also wanted a tree skirt that I could wash if need be (for some reason, I know people who have had situations in which a tree skirt needed to be washed. Example: a cat eating a mouse on the skirt - ewwwww!). I haven't really seen any store-bought ones that really excited me, so I got the idea to buy a painters drop cloth at Home Depot and turn it into a tree skirt. I didn't really have an exact idea of how I wanted to make it, so I kind of just winged it. Heeeeeeere's the tutorial...
Supplies needed:
*Painters canvas drop cloth
*Thread to match
*Sewing machine
*Hot glue sticks
*Hot glue gun
1) Firstly, wash the drop cloth - I washed mine 3 times and used about 3 dryer sheets per drying cycle. It wasn't super soft, but manageable for this purpose.
2) Determine the size you want for the tree skirt and then draw a circle using a pencil and string as a compass. I folded the cloth in quarters. I used a pencil and yarn for the compass - this didn't work out so well for me - I think because the yarn was stretchy, but I wasn't looking for perfection here.
3) After you draw your circle, cut that puppy out. Again, not looking for perfection, as you can see below that my circle is far from perfect. No one will notice - it will be all squished under your tree and gifts.
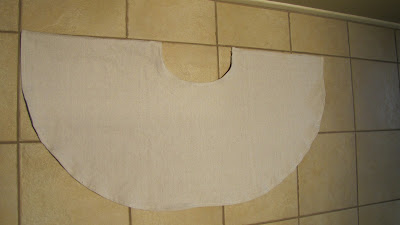
4) Cut out a circle in the middle. The size of your circle depends on how you want it. Since I have an artificial tree, it didn't need to be very big. I cut mine too big. Oops.
5) Cut a slit from the inner circle like below. This will allow you to get the skirt to go around the tree trunk.
6) I then used my sewing machine to hem the outer circle edge and the edges of the slit.
7) I then set my sewing machine tension to the highest number and set the stitching to the longest and sewed around the outer edge of the skirt. Since the material was a bit thick, it gave the outer edges a slight ruffle. Again, this was not perfectly even all the way around, but it's ok. No one will notice. Trust me.
8) I then cut strips of the same drop cloth and ruffled them by using the same sewing machine settings to make them slightly ruffled.
My original plan was to sew one ruffled strip around the inner circle edge that I cut, but because I accidentally cut the circle too big, I had to accommodate for that by adding extra strips. I used 2 skinny strips and then used the extra fabric that I had cut to make that inner circle.
 |
| First strip |
 |
| Second strip |
 |
| Last strip |
Again, it's not perfect, but no one will notice that it's not a perfect circle and that my sewing was uneven. I think it gives my tree a great natural look. Also, this project was great for the budget! It cost me $10 for the drop cloth and I only used about 1/2 of it (maybe less than 1/2), so I can use the leftovers for another project, so it cost me about $5 for the whole project. Score!
Linking up to Thrifty Decor Chick's Christmas Tree link party.


No comments:
Post a Comment
I would love to hear from you. Feel free to leave a message below - I will respond back via email, but if you have a no-reply or don't leave an email address, then I will reply below your comment. Thanks for taking the time to visit and commenting! It's much, much appreciated.