Sunday, October 30, 2011

DIY Miss Potato Head Costume

This could technically be my nickname.  I love potatoes.  Especially mashed potatoes - yum.  But, this is not what this post is about.  I found this great tutorial on how to make a Mr. or Mrs. Potato Head costume (in my case, it's "Miss" Potato Head thank you very much).  I was invited to a Halloween party and this seemed so easy (and cute!) that I decided to try it.  And it only took me a few hours to do!  (please excuse the bad pictures - I did this at night).

I did some quick measurements and figured that I would need about 2 yards of felt.  I also bought some of the square pieces in white, pink, red, and black to make the face.   ***Update:  I bought 2 yards of felt, but didn't use that amount.  I probably used about 1.25 yards & still have quite a bit leftover - probably enough to make a kids' version of this.***

I just free-hand cut all the pieces for the face, but drew/cut patterns for the eyelashes and lips. I laid out all the pieces and pinned them so I could sew them on.

After I sewed on the face, I tried it on to make sure it was ok before finishing it up (please excuse my pj's underneath - oops).  Then, I just followed the rest of the tutorial and it was so easy to do.   I don't have any great pictures from the party that shows my costume very well,  so I will take some when I go trick-or-treating with my nephew & niece and will post it then.

***Update***  Here is a picture from tonight's trick-or-treating.  Can you tell that my sister has kids with all those toys in the background? lol  After the party and trick-or-treating, I decided that I may need to amend my costume by adding pockets inside if I end up wearing this again in the future.

This is a great project if you need a last-minute costume.  It's so easy and I got lots of compliments.
Have a great Halloween!

Saturday, October 29, 2011

Adventures in Gardening: the Black Thumb Turned Green-ish?

Remember my post about my horrible gardening skills and how I make easy plants die?   Well, I might not be such a bad gardener after all.  We are having some spring-like weather here in Southern California and I think my plants are confused.  Well, a couple of weeks ago, I pruned some of my flowers, plants, and bushes,  just to get the dead flowers and leaves off so they didn't look so bad.   And to my surprise, some of them are making a nice comeback!  How 'bout that?!

My calla lillies are looking so healthy right now!  There's no new flowers, but those leaves grew like crazy in the last couple of weeks.

And my poor hydrangeas that I planted in the spring, which promptly died after about a week and a half?  They sprouted new leaves!  See those dead leaves on the taller branch?  That's what all three hydrangea heads looked like.  Pretty bad - I know, I know.
I was so excited to see I didn't kill it after all.  Yay!


And my purple Salvia came back looking amazing!  It's one of my favorites in my backyard.
Maybe next spring I'll try a bit more to see how I do.

Thursday, October 27, 2011

Wreathapalooza Part II

I finished 2 cork wreaths a couple of weeks ago, so I have a little tutorial for you.
Supplies needed:
* Wreath form
* Lots of wine corks
* Hot glue sticks
* Glue gun

I found this 13 inch wreath form at the Dollar Tree - they had about 3 different sizes of these and I got the medium size one.  My brother-in-law is a winemaker and years ago, he gave me 2 huge bags of unused corks.  I think I gave one of the bags to a friend and have only gotten through about 1/3 of the other bag (even after making this wreath, it made only a small dent in the bag).

1)   See how the twigs (vines? what is that called?) on here are twisted around?  I just followed the twisty pattern and started gluing away.  The twigs were thin & round and since the corks are round also, it was hard to get them to stick really good.  You can start by gluing one of the corks to the twig, and then gluing the next cork to the previous cork AND the twig.


2)  I made sure to start each row at the same spot, because at the end of each row, there wasn't enough room for one last full size cork, so I left the space empty - I wanted the empty spaces to be all in the same part of the wreath.   I figure that I can either leave the space and cover it with the ribbon that will be used to hang it, or try to cut some of the corks to fit in the space (I have tried cutting corks before and it's a PITA).

Here's what it looks like after I finished gluing.  You can see at the top, the bit of space and it's more obvious on the back.


3)  Since, in the past,  it was such a pain to cut the corks with a knife, I decided to try using my handsaw and miter box and it worked like a charm, so I was able to get those spaces filled in.

4)  Next, I made these felt flowers.  I used the video tutorial on this Home Stories A to Z post.  It was super easy.  I even made a jute flower just by wrapping it the jute in a circular motion (that went on the other cork wreath I made and unfortunately I didn't get a picture before I gifted it).

And here is the final product:
I was very happy with how they came out and was thinking to make one for myself, but they didn't have any more of these larger wreath forms at the Dollar Tree when I checked today.  Either way, I still have tons of corks for another project!

Sunday, October 16, 2011

Pottery Barn Place Mat Pillows

About 1 1/2 months ago while I was in San Diego visiting the 'rents, we made a special trip to the Pottery Barn since I don't have one close to where I live.   I found some very cute napkins that I thought I could turn into pillows, but ended up finding some place mats that were made with 2 pieces of fabric which would make the process way easier. 
The red place mat was $8.50 and the one with the bird was on sale for $5.89! (that was a nice surprise when I was checking out at the cash register).  Here's how you can turn a place mat into a pillow.  Supplies needed:
* Seam ripper
* Thread that matches the place mat
* Polyfiber fill

1)  I got my handy seam ripper and ripped out the middle part of the seam on the side.  I only took the seam out of the middle part of the side (instead of ripping out the entire seam) so that it would be less for me to stitch back up.

2)  I then took some polyfiber fill that I already had and just stuffed away until I got the firmness I wanted.  (If you have to buy polyfiber fill, it's fairly cheap.  I bought a big bag for about $6 and I've already made 4 pillows with it and still have some leftover).
3)  After I filled it, I just sewed up the opening using a needle and thread.  
These will go on the bench in my hallway once I make the cushion for it (yeah, we'll see how long it takes me to do that).
Pottery Barn pillows can cost up to $59 and their pillow covers up to $29 (each!), so I think this was a great savings.  $9 for one and $6 for the other!

Linked up to:
It All Started With Paint's Pillowpalooza link party

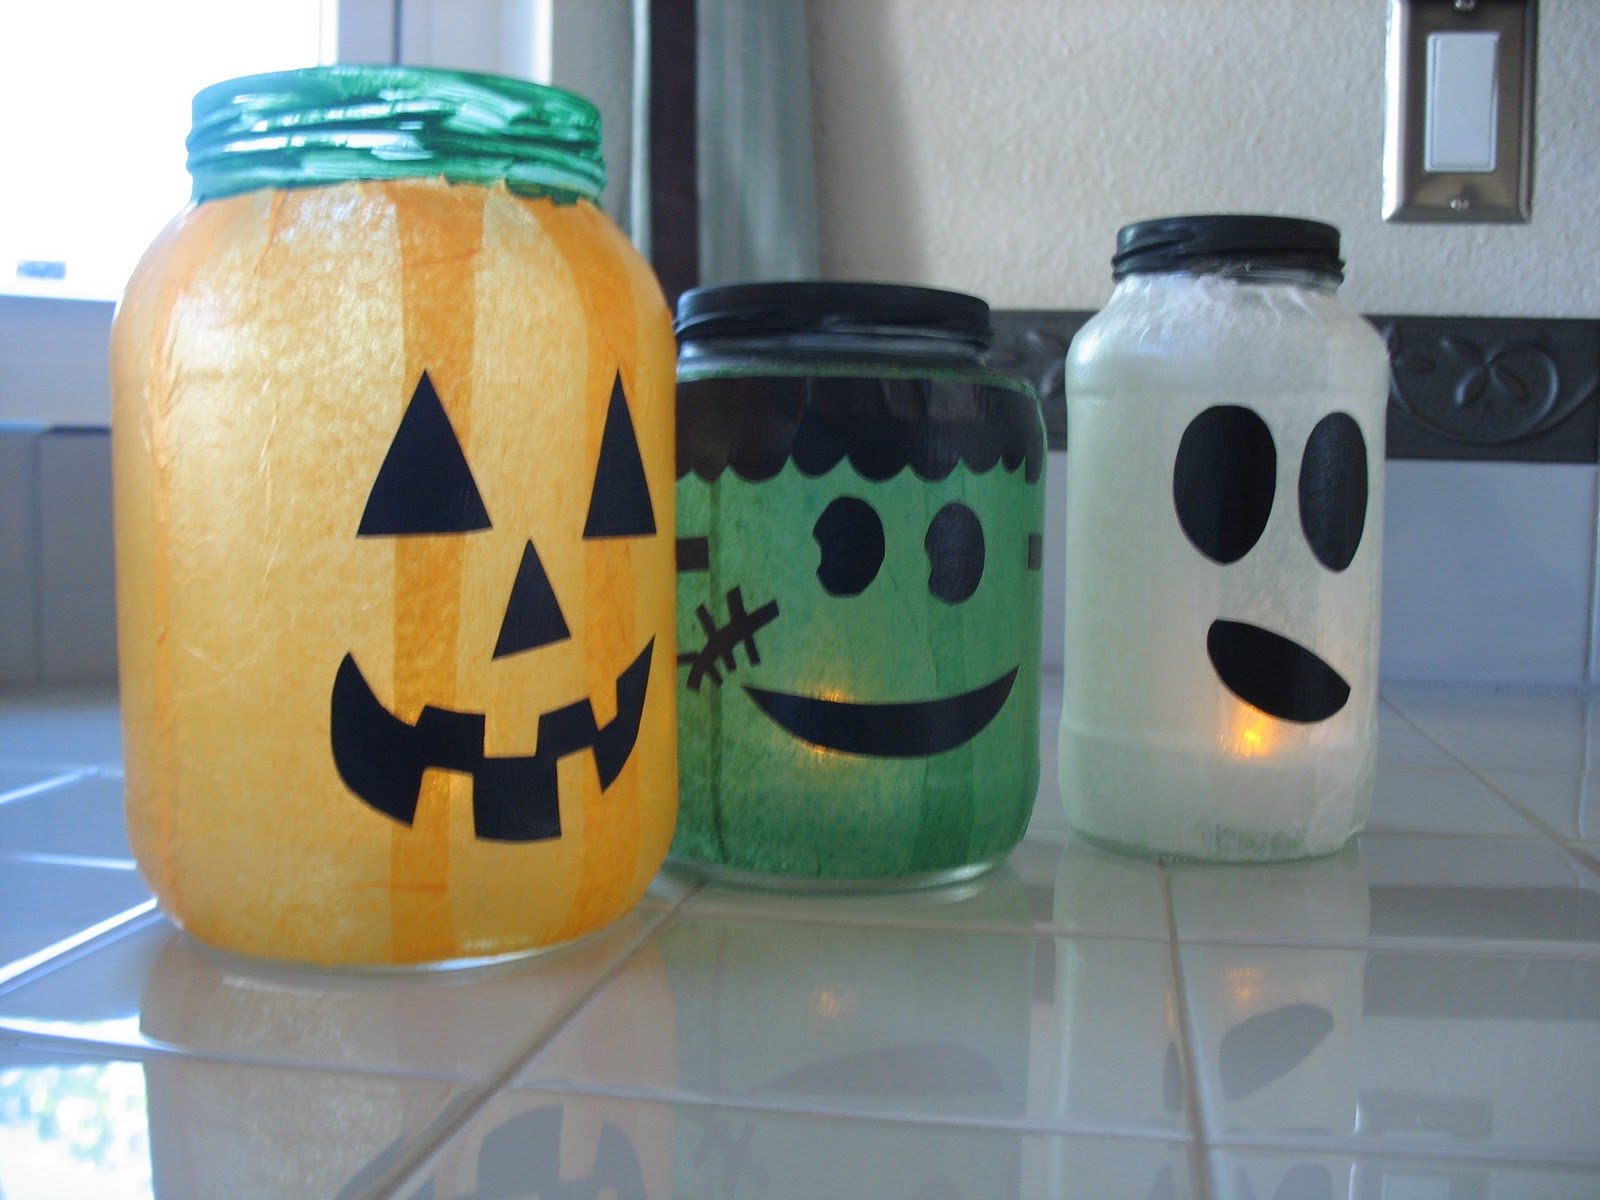
Halloween Jars

Last year, I found this cute Halloween project on the Not So Idle Hands blog.  I gathered up all the supplies and collected empty jars so I could do the project.  And then they sat there.  For a whole year.  I had run out of time to make them last year, so I vowed to do them in time for Halloween this year.  And lo and behold, I did them!  Woo hoo!

They were actually very easy to make - I just wish I would have saved more jars to make more.  I had most of the supplies already, so the only things that I had to buy for this project was a bottle of Mod Podge and battery operated tea lights at the Dollar Tree ($1 for a pack of 3!).  I decided not to use the string lights in them since I only had 3 jars, but as I make more later on down the road, I can always switch to the string lights - it will give much more lighting that the tea lights.

And by the way, this was my first time using Mod Podge.  I thought it was going to be super messy to use, but it was really easy and now I'm wanting to use it for more projects!

Monday, October 10, 2011

Wreathapalooza

The weather has been cooler lately (yay!  I have been waiting for the Fall weather) and this week we got some rain, so that means I've been in a very crafty mood.  I have seen tons of wreaths all over the blogs and got inspired to make a few.

Lima bean wreath:
I saw this great lima bean wreath on lil pink pocket's blog.  She used small lima beans, but I opted for the large ones so I could spend less time gluing them.   The supplies I used were:  1) almost 2 full 1 lb bags of the large lima beans,  2) a foam wreath form that I got at Michael's (with my 50% off coupon of course),  3) the letters were also purchased at Michael's on sale,  4) ribbon from the Dollar Tree for $1,  5) spray paint,  6) hot glue sticks,  and 7) hot glue gun.  Some of the supplies I already had on hand, so the wreath probably cost me less than $10 to make.

I started in the middle and worked my way around and out.  Just keep on gluing.  And gluing.  And gluing.  Once I finished, I spray painted it all with Rustoleum's Gloss White (I already had this on hand).  I liked the color of the beans just fine, but some of the shells had chipped, so I just wanted to give it an all-around even color.  After the paint dried, I tied the ribbon in a bow around it.  I then worked on the letters (sorry, no pictures) - I debated if I should paint them or glue scrapbook paper to them.  In the end,  I opted for the paper - I had a perfect piece of Halloween that had the same color green as the ribbon.
Here is the final product.  I glued the letters together, making sure that they would fit perfectly inside the circle and hung it with jute from the ribbon (I had the jute on hand, so that's what I used).  I had bought a wreath hanger at the Dollar Tree also, but it didn't fit properly on my ugly screen door (I eventually will either paint or replace the screen door and my front door, but for now, they are there in all of their ugliness) because the screen is thinner than a regular door.  So, I just threaded a twist tie through the screen and hung the ribbon from that - the ribbon hides the twist tie very well.

Grapevine wreath:
I found this small wreath at the Dollar Store (I am loving that place these days).  I had seen several different wreaths with yarn wrapped around them (there were several different blogs and different variations of these wreaths, so I don't remember if there was one similar to my wreath or not - sorry).  I particularly liked these felt flowers on this wreath by Home Stories A 2 Z, which included a video tutorial on how to make them.  The supplies I used were: 1) yarn in 2 different colors, 2) 3 different colors of felt pieces, 3) hot glue sticks, 4) hot glue gun, 5) ribbon.  All I did was wrap 2 different colors of yarn in blocks around part of the wreath.  I then followed the tutorial to make 3 different colors of felt flowers and hot glued the flowers on the yarn.

You can see how small the wreath is since it's hanging from one of the doorknobs in the house.  I like that it's small enough to hang inside the house since I've gone all wreath crazy and only have one front door to hang them on.

I also started a cork wreath, which is coming out very well - I'll share it when I'm finished.  So, it was a wreath-a-palooza weekend for me and I quite enjoyed making these.

Thursday, October 6, 2011

French Door Hardware - Finito!

I finally spray painted the knobs on the sidelites of my french doors (Oil Rubbed Bronze by Rust-oleum).  I first mentioned them here.  Wow, oh wow!  What a big difference it makes!  Whenever I look at them, they just look like they were always naturally meant to be a non-brass color.  I love it!  I have only recently discovered the wonder of spray paint this year and can't believe I wasn't using this stuff sooner.

BEFORE

AFTER
With the Satin Nickel hinges & ORB knobs to match my door knob and dead bolt, it looks 100 times better!  I decided that I will clean up doors and paint them in a bright white color, but that's probably not going to happen for awhile since I hate painting.  But, I'm happy with the small changes I've made now.