Sunday, October 16, 2011

Pottery Barn Place Mat Pillows

About 1 1/2 months ago while I was in San Diego visiting the 'rents, we made a special trip to the Pottery Barn since I don't have one close to where I live.   I found some very cute napkins that I thought I could turn into pillows, but ended up finding some place mats that were made with 2 pieces of fabric which would make the process way easier. 
The red place mat was $8.50 and the one with the bird was on sale for $5.89! (that was a nice surprise when I was checking out at the cash register).  Here's how you can turn a place mat into a pillow.  Supplies needed:
* Seam ripper
* Thread that matches the place mat
* Polyfiber fill

1)  I got my handy seam ripper and ripped out the middle part of the seam on the side.  I only took the seam out of the middle part of the side (instead of ripping out the entire seam) so that it would be less for me to stitch back up.

2)  I then took some polyfiber fill that I already had and just stuffed away until I got the firmness I wanted.  (If you have to buy polyfiber fill, it's fairly cheap.  I bought a big bag for about $6 and I've already made 4 pillows with it and still have some leftover).
3)  After I filled it, I just sewed up the opening using a needle and thread.  
These will go on the bench in my hallway once I make the cushion for it (yeah, we'll see how long it takes me to do that).
Pottery Barn pillows can cost up to $59 and their pillow covers up to $29 (each!), so I think this was a great savings.  $9 for one and $6 for the other!

Linked up to:
It All Started With Paint's Pillowpalooza link party

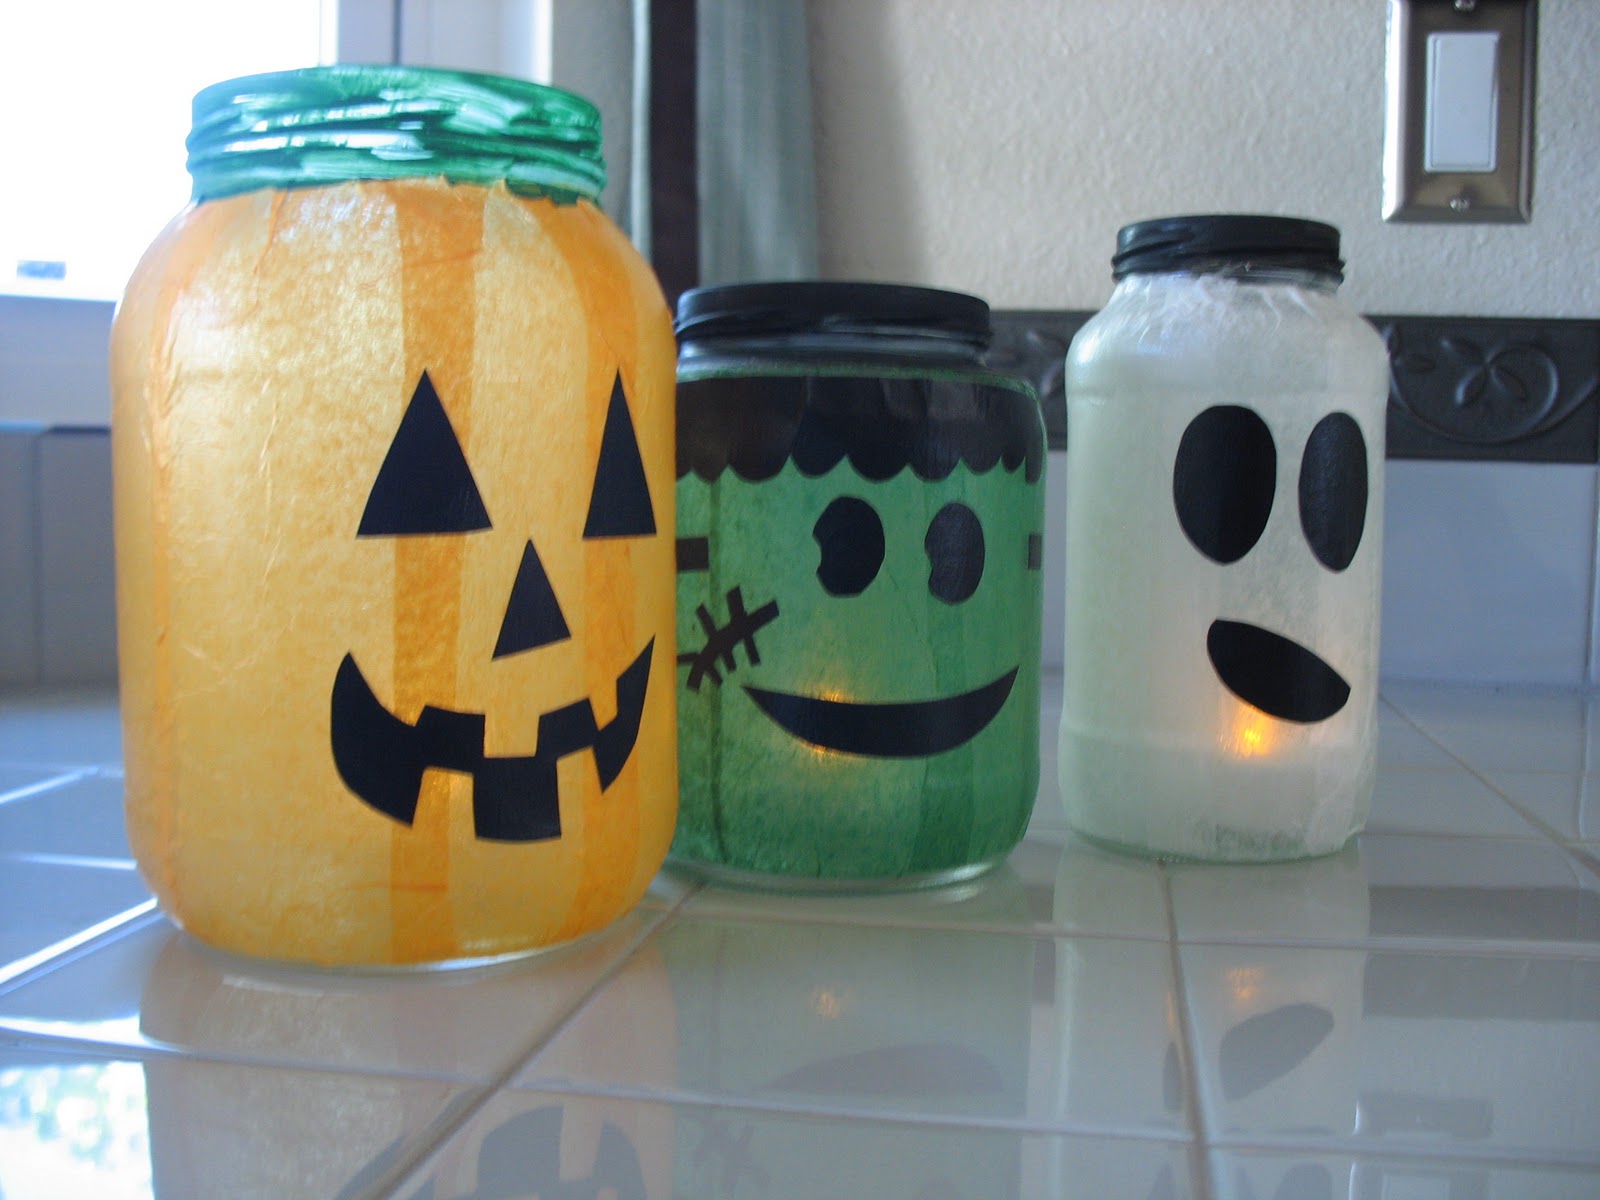
Halloween Jars

Last year, I found this cute Halloween project on the Not So Idle Hands blog.  I gathered up all the supplies and collected empty jars so I could do the project.  And then they sat there.  For a whole year.  I had run out of time to make them last year, so I vowed to do them in time for Halloween this year.  And lo and behold, I did them!  Woo hoo!

They were actually very easy to make - I just wish I would have saved more jars to make more.  I had most of the supplies already, so the only things that I had to buy for this project was a bottle of Mod Podge and battery operated tea lights at the Dollar Tree ($1 for a pack of 3!).  I decided not to use the string lights in them since I only had 3 jars, but as I make more later on down the road, I can always switch to the string lights - it will give much more lighting that the tea lights.

And by the way, this was my first time using Mod Podge.  I thought it was going to be super messy to use, but it was really easy and now I'm wanting to use it for more projects!

Monday, October 10, 2011

Wreathapalooza

The weather has been cooler lately (yay!  I have been waiting for the Fall weather) and this week we got some rain, so that means I've been in a very crafty mood.  I have seen tons of wreaths all over the blogs and got inspired to make a few.

Lima bean wreath:
I saw this great lima bean wreath on lil pink pocket's blog.  She used small lima beans, but I opted for the large ones so I could spend less time gluing them.   The supplies I used were:  1) almost 2 full 1 lb bags of the large lima beans,  2) a foam wreath form that I got at Michael's (with my 50% off coupon of course),  3) the letters were also purchased at Michael's on sale,  4) ribbon from the Dollar Tree for $1,  5) spray paint,  6) hot glue sticks,  and 7) hot glue gun.  Some of the supplies I already had on hand, so the wreath probably cost me less than $10 to make.

I started in the middle and worked my way around and out.  Just keep on gluing.  And gluing.  And gluing.  Once I finished, I spray painted it all with Rustoleum's Gloss White (I already had this on hand).  I liked the color of the beans just fine, but some of the shells had chipped, so I just wanted to give it an all-around even color.  After the paint dried, I tied the ribbon in a bow around it.  I then worked on the letters (sorry, no pictures) - I debated if I should paint them or glue scrapbook paper to them.  In the end,  I opted for the paper - I had a perfect piece of Halloween that had the same color green as the ribbon.
Here is the final product.  I glued the letters together, making sure that they would fit perfectly inside the circle and hung it with jute from the ribbon (I had the jute on hand, so that's what I used).  I had bought a wreath hanger at the Dollar Tree also, but it didn't fit properly on my ugly screen door (I eventually will either paint or replace the screen door and my front door, but for now, they are there in all of their ugliness) because the screen is thinner than a regular door.  So, I just threaded a twist tie through the screen and hung the ribbon from that - the ribbon hides the twist tie very well.

Grapevine wreath:
I found this small wreath at the Dollar Store (I am loving that place these days).  I had seen several different wreaths with yarn wrapped around them (there were several different blogs and different variations of these wreaths, so I don't remember if there was one similar to my wreath or not - sorry).  I particularly liked these felt flowers on this wreath by Home Stories A 2 Z, which included a video tutorial on how to make them.  The supplies I used were: 1) yarn in 2 different colors, 2) 3 different colors of felt pieces, 3) hot glue sticks, 4) hot glue gun, 5) ribbon.  All I did was wrap 2 different colors of yarn in blocks around part of the wreath.  I then followed the tutorial to make 3 different colors of felt flowers and hot glued the flowers on the yarn.

You can see how small the wreath is since it's hanging from one of the doorknobs in the house.  I like that it's small enough to hang inside the house since I've gone all wreath crazy and only have one front door to hang them on.

I also started a cork wreath, which is coming out very well - I'll share it when I'm finished.  So, it was a wreath-a-palooza weekend for me and I quite enjoyed making these.

Thursday, October 6, 2011

French Door Hardware - Finito!

I finally spray painted the knobs on the sidelites of my french doors (Oil Rubbed Bronze by Rust-oleum).  I first mentioned them here.  Wow, oh wow!  What a big difference it makes!  Whenever I look at them, they just look like they were always naturally meant to be a non-brass color.  I love it!  I have only recently discovered the wonder of spray paint this year and can't believe I wasn't using this stuff sooner.

BEFORE

AFTER
With the Satin Nickel hinges & ORB knobs to match my door knob and dead bolt, it looks 100 times better!  I decided that I will clean up doors and paint them in a bright white color, but that's probably not going to happen for awhile since I hate painting.  But, I'm happy with the small changes I've made now.

Monday, September 26, 2011

Baskets

Just wanted to share these cute baskets I bought today.

I have been looking for a basket for my bicycle and found a decent one at Walmart.  I've noticed a lot of these baskets come with a special mechanism on them to hook it to the bike and I could never figure out if I needed to buy another piece or how in the heck those work.  But, this one I found today had simple little belts that looped from the basket to the handle bars, so it made it really easy to install it on the bike.  I would have preferred if the basket was a darker color, but this is fine.  I may spray paint it later, but that will be very low on my list.

(Please excuse my messy garage - reorganizing the garage is another project on my "to do" list)
I also have been looking for a basket to hang on my hook rack for my super-mini-mudroom - for mail or other items I want to remember to take with me.  It needed to be:  not too big, not too small, not too heavy, have a handle, and a flat back so it would sit flush to the wall.  I've learned that these are hard to find!  But, I did find one today at the Dollar Tree, so it was the perfect price and works for what I need it for.

It fits perfectly on there!  And here it is in action.

Window Seat Cushion

**Update:  for instructions on how to make this cushion, please see my post about how I made my  bench cushion.  Even though the measurements are different, it would be made in the same way.**

Way back over Memorial Day weekend, I took advantage of the sale at Joann's and bought some fabric and foam (that stuff is expensive!) for 50% off.  They were for my master bedroom's window seat and also for a bench I have in my front hallway.

I have been hesitating to make these for a few reasons.  1)  I'm not much of a sewer and sewing a straight line is something that apparently is difficult for me, 2)  Since I'm not much of a sewer, it was going to take a lot of thinking as to how I was going to put this thing together, 3)  How the heck am I going to cut this foam?,  4) It's been super hot and the heat makes me lazy.  Those are some pretty good reasons, right?   But, with the holidays coming up (and for me, they start with Halloween since that is my favorite holiday), I wanted to get some of these projects done so I have time during the holidays for crafts and to just enjoy them.

I didn't take many pictures of all the steps in making this - mostly because I was really concentrating on how in the heck was I going to make this thing and also because I wasn't quite sure if what I was doing was going to work.

First of all, I put the foam onto the window seat and measured where I needed to cut.  I tried using regular scissors, but that barely worked - would have taken me forever.  I decided to try a bread knife and that actually seemed to work.  The only problem with using the knife was that the serrated edges didn't make a clean cut and I also didn't cut very straight (I ended up having to hot glue some of the foam back onto the main cushion I was going to use).  But, it worked - it was a pain, but it worked.  The next step was to lay the fabric over the cushion and cut the fabric so that it would fit the cushion (with some extra for seams and any mistakes).  Then, I pinned the first 2 pieces together by lining up the edges and started sewing.


For the rest of the pieces, I had to measure from the seam that I sewed to the length I needed for each side and pinned at that spot so I would know where to sew.  It was a really pain-in-the-butt process (I'm sure there is an easier way, but this is how I attempted it since I didn't know any better).  Because this fabric has a lot of texture to it and because I would only be using it for when I get dressed or putting on shoes, there shouldn't be a lot of wear & tear on it, so it wouldn't need to be washed.  So, I ended up just leaving the end open so I could stuff the foam in (wow, was that an experience!) and then hand-sewed the end closed. 


It actually turned out pretty well considering this is my first time making something like this!  I'm so glad it's finally done!

Since this was a learning experience and I now know what works and doesn't work, I have a plan for when I make the bench cushion.  I will measure the fabric and cut exactly the amount I need including allowance for the seams - this will eliminate the need for measuring during the pinning & sewing process (that took too much time).   I also bought one of those rotary cutters (I think that's what you call them) & cutting mat so I can make a nice straight cut.  Hopefully the next one will go a lot smoother!

**Update:  It was much cheaper for me to make this myself than ordering a custom cushion.  The fabric was about $23 and the foam was $30.  I got both the fabric and foam on sale for 50% off.   The total cost was $53.  If I had ordered a custom cushion, it would have cost me about $120 - $135.  This is a savings of $67 - $82!  I even have some leftover fabric and foam in case I want to make something else.

Sunday, September 25, 2011

French Door Hinges

Finally, the last couple of weekends, I've been able to get some projects finished.  I had several busy weekends and that along with the horrible heat, I wasn't able to or felt like getting anything accomplished as far as projects go.  But, I finally got 2 projects done that have been on my list for awhile.  I'll put them in 2 separate posts to make it easier to look at.

French door hinges
The hinges on my french doors & sidelites were brass.  The sidelites open and the knobs are also brass.  They really stick out and have been bothering me since I bought this house 2 years ago.


Way back when I first bought my house, I had looked into buying new knobs for the sidelites, but it was too hard to find the exact ones that fit.  Also, I didn't really want to spend the money on replacing the hinges.   I got the idea to spray paint all the hinges and knobs, but had procrastinated because I was worried about taking the doors down because I thought it might be difficult to get them back on by myself.  I talked to my dad about it and he had a great idea - just do one hinge at a time and this way the other 2 hinges will still hold up the door (duh!).  Brilliant!
So, I took one hinge off of each door at a time.

And put the screws into cardboard.

And sprayed away.  I used Rustoleum's Metallic Satin Nickel.
(Don't mind the Ninja Turtle in the background.  He came with the house and I never got rid of him.  He seems to be my project mascot)
This is the paint I already had at home.  It had a bit of a sparkle to it.   It worked out fine, but I would have rather had a non-metallic one in Nickel to eliminate the "sparkle".  They look way better now.
BEFORE

AFTER
It took about 3 full days to get this done.  I used 1 full day per hinge set because I wanted to make sure that they got lots of drying time (so they wouldn't stick to the doors or to themselves).  It was totally worth it to take the time to do this - that brass doesn't jump out at me anymore.
I didn't do the sidelite knobs yet - not sure why, since I had time.  I'll tackle that next weekend when I have a full day to let them dry.   I did check and they are really easy to take off and on (I thought that they would be more difficult), so it should be easy peasy.