Thursday, April 25, 2013

Contact Lens Calendar

Ok - I know I'm not the only one out there that does this, but I'm very bad at changing out my contact lenses.  I'm supposed to change them every 2 weeks, and well, it just doesn't happen when it's supposed to (I won't admit to how long, mmmkay?).  Anyways, after my last eye appointment, I vowed to be better at changing out my contacts (it helps that I have a friend that works for my eye doctor and she gave me a friendly lecture reminder about changing my contacts on time).  But, I quickly realized the main problem as to why I would always change them out too late - by the time I leave the bathroom after putting in a new set, I would forget to write in on my calendar.  I know how my brain works and I have to write stuff down or I will forget.  So, this idea popped into my head and I'm hoping it works in the long run...


This next picture should explain much better just why it should help me remember when it's time to change out my contacts.

BAM!  Yep - it's a magnetic miniature dry erase calendar on the inside door of my medicine cabinet.  Dry erase marker included.  Stroke. of. genius.  Ok, ok, maybe not genius, but man it's the little things that get me excited sometimes.

I took one of those magnetic plastic picture frames that I already owned and found a free yearly calendar online.  I printed the calendar to the size of the frame (mine was 4x6).
(Please excuse the horrible, night time picture)
I also had this pen with an attached holder from a magnetic dry erase board that I already had.  I wasn't using the pen for it, so I repurposed it by hotgluing it to the back of the frame.
***Update #1***  When I originally tested the dry erase marker on the plastic frame, it wiped off easily with a tissue.  However, after using it for about a month now, it's not wiping off with a tissue anymore. A quick fix?  Rubbing alcohol!  Just dab some rubbing alcohol on the tissue and it will wipe right off.

For some reason, the magnet on the frame wasn't strong enough to hold onto the back of the medicine cabinet door (this was before I added the marker.  It worked just fine where I was using it previously - weird).  So, I had to hotglue a ton of the small, round magnets on the back.
***Update #2***  After using the hot glue to add the extra magnets, I discovered that the hot glue (since it goes on thick) made the height of the magnets un-even.  I ended up taking them all off and used superglue instead.  This worked out way better!
I even had to add more of the magnets after I took this picture.  Hey, whatever works.

I added washi tape to the top and bottom to add a bit of color.  Then, cut the calendar to size and slid it inside the frame.  Easy peasy!

You just have to make sure that the frame will clear any of the shelves or items on the shelves.  Otherwise, when you try closing the door, it won't stay shut.  I had to rearrange a couple of things on the bottom shelf, but it wasn't a big deal.

Since the calendar is pretty small, I just mark a black dot on the date that I change my contacts.  So far, this is making it much easier for me to keep track.

Originally posted by Adventures in DIY

Linked up to:

Tuesday, April 23, 2013

Replacing an Electrical Outlet

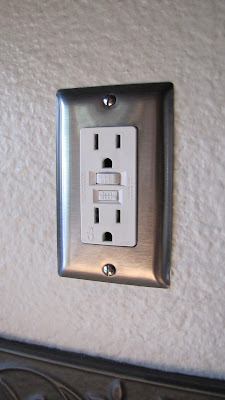
A couple of months ago, I went to use one of the electrical outlets in the kitchen and it didn't work.  I thought, no big deal, I'll just press the reset button on it and it will start working again.  No luck.  I tried another outlet in the kitchen (the kind without the reset/test buttons) and same thing - it didn't work.  Uh oh - no bueno!  My dad happened to be visiting about a week after it happened, so we took a look at the fuse box and it appeared everything was fine.  He then took a look at the outlet and determined that the outlet was no longer good and said I would need to replace it.

I had previously pinned a couple of good blog posts on how to change an outlet, so I used them as my guide.  The main one I used was this one by Young House Love.  The step-by-step pictures really helped!

I picked up a new GFCI outlet at Home Depot - I just happened to be there to get other stuff, so I didn't have anything written down as far as what exact outlet I needed.  So, I grabbed one that looked right and figured if it was the wrong one, then I could return it and get the right one.

FIRST AND FOREMOST, TURN THE POWER OFF!  Safety first!

So, this is what I started with.   Take the decorative plate off.


Then, unscrew the outlet from the wall and carefully pull it out as much as you can.

Now, since I wasn't sure if I bought the right outlet or not, before I started to un-hook the wiring, I looked to see what outlet I had vs. the one I bought.  You can see in the below picture that on the left side it says "125V, 60HZ, 20AMP".  I compared that to my new one and bada bing!  It was the right one.  Lucky me!

I did look at the instructions that came with the outlet and they were a bit confusing.

So, I proceeded to follow what I had read online - you just match up the wires from where they were on the old one.  You just unscrew those screws on the side, slide the bare wire in and then tighten the screw.  Easy peasy.

There was also this wire underneath - it just wrapped around the screw.  I think it's called the "ground" wire.

Once all the wires were connected, I turned the power back on and tested out the outlet by plugging something in and...WHAT?!?  It didn't work.  But, that little light in the bottom right hand corner was on!  Hmmm...

Luckily, it didn't take me too long to figure it out.  After looking at the directions again...

...I remembered that I had noticed that on the backs of the outlets it showed this.
See how is says "LINE" on the left (which was the bottom) and "LOAD" on the right (which was the top)?  Well, these were flipped on the brand new outlet as you can see on the directions.  So, I took the outlet out again and reversed the wiring (after I turned the power back off).

Once I did that, I screwed it back onto the wall and turned the power back on.  Apparently the little light just means that all the wiring is hooked up and doesn't necessarily mean you've done it correctly.  Hmph.

I hit the reset button and tested it out - BAM!  It worked!  I figured that the other outlet that wasn't working was connected to this outlet, so after I hit the reset button, I also tested that one out and it worked.  Whew!  Now, I don't have to use all my appliances in the cramped spot where the one working outlet was.

I would say that this took me about 1/2 hour to do from start to finish.  The hardest part was dealing with the wiring because it was pretty thick, so they didn't move very easily.  And pushing it back into the wall was a pain because of the thick wiring, but since that was the hardest thing of the whole project, I'm not going to complain.  And the best part of it all?  I didn't shock myself!  Yay!

So, now I can say that I can do minimal plumbing and electrical work!  It's really nice to be able to attempt both - it saves me money from hiring a plumber or electrician to do simple jobs.  Just remember to be safe when attempting anything like this!   (***Disclaimer***  I'm not a professional electrician by any means.  Attempt this at your own risk. )

Originally posted by Adventures in DIY

Sunday, April 21, 2013

DIY Fail

While attempting to fix something on a project I had finished, this happened...

I have spared you the gore.  Just to the right of my thumb, in that little crook, I accidentally stabbed myself with an X-Acto knife.  I tried my best to work the knife in a direction away from other hand, but it slipped and stabbed me.  And I had just broken the tip off of it, so I got stabbed with a non-pointy X-Acto knife!  Oh. my. word.  It's a pretty good cut and I thought I might need stitches, but hopefully I won't.  So, basically that means, I will be laying off the projects for a day or two until this starts to seal up and heal (I don't want it to split open again - yikes!).  I have some projects & posts already in the pipeline, so you'll see a couple of them come across - just know that those were "pre-stabbing".  I guess this will force me to rest and maybe finally start the book I've been wanting to read!

Originally posted by Adventures in DIY

Friday, April 19, 2013

Adventures in Gardening: Part 6

I have shared my hydrangea woes in the past.  A couple of years ago, I decided to tear out an ugly bottle brush bush (say that 5 times fast) and replace it with pink hydrangeas.

This is what they looked like when I first planted them.

It died after about a week, but then several months later, new leaves grew back, but no flowers.


Over the next two years, new leaves would come in - fuller and fuller each time, but never any new flowers.  I really thought that it was never going to bloom again.  I've read that depending on the hydrangea, new blooms can grow on "old wood" or "new wood" and this is dependent on how you prune them.  So, I figured that maybe I just pruned it at the wrong time.

I still check for blooms whenever leaves come in and each time, I expect nothing.  This is how it looked the other day.

As I took a closer look, I found these...

Oh YES!  New blooms are coming in.  And there are about 8 or 9 of them!  I'm so excited and surprised that they made a comeback.  Stay tuned for pictures from when they fully bloom...

P.S.  I mentioned in my Spring Has Sprung! post, I mentioned that my Dutch Iris was making it's first appearance since I first put them in.  Here is the first bloom that came in.
I'm hoping the others will come in soon.

My Gerbera Daisies came in nicely, except they are kind of pinched and squishy-faced.  Not sure if it's because of the way they are facing the sun, but this is the first time they've bloomed in a couple of years, so I'll take what I can get.  I love their coral coloring too.

Originally posted by Adventures in DIY

Tuesday, April 16, 2013

Hashbrown Potato Casserole aka "Crack Potatoes"

I've been meaning to share this recipe for awhile - it's really good comfort food!  I've seen different versions of this online, but I got this recipe many, many years ago and why mess with a good thing?
Matryoshka seemed to think it's good!
As a side note, the Matryoshka is actually a set of nesting measuring cups.  Functional, space-saving, and cute!

Ingredients:
*Frozen hash brown cubed potatoes (1 2 lb bag)
*Sour cream (1 16 oz carton)
*Cream of chicken soup (1 10 3/4 oz can)
*Shredded cheese (2 cups - cheddar, sharp, or whatever you prefer)
*Corn flakes (2 cups)
*Butter, melted (1/4 cup)
*Chopped onions (1/2 cup) - optional (I skip the onions)

Supplies:
3 quart casserole dish or 9 x 13 glass pan

Prepare:
1)  Thaw potatoes - the recipe said you can use them while still frozen, but this has never worked for me.  I usually just put the bag of frozen potatoes in the refrigerator the night before I'm ready to make them.
2)  Preheat oven at 350 degrees
3)  Grease casserole dish

Directions:
1)  Combine sour cream, soup, cheese, (and onions if you choose to use them) in a large bowl.  Just stir it all together.

2)  Add potatoes to mixture and stir it up.

3)  Pour the entire mixture into your greased up casserole dish (or glass pan).

4)  In a separate bowl, melt butter.  I usually do about 10 or 15 seconds at a time until completely melted.

5)  Add corn flakes to the melted butter and mix it up to give the corn flakes a good coating of the melted butter.

6)  Sprinkle the corn flakes all over the top of the mixture in the pan.

7)  Bake at 350 degrees for 1 hour.  Remove from heat and let cool a bit.  Then serve and enjoy.


I'm super hungry now just from looking at all these pictures.  Yum!

Originally posted by Adventures in DIY
Linked up to:

Sunday, April 14, 2013

Ikea Shopping

I made an impromptu trip to Ikea and a few things caught my eye, so I thought I'd share.

I've been eyeballing these for awhile, but passed on them again.  They're cute though.

After a few times of passing on buying them, this was actually on my list to finally buy the aqua version.  And sure enough, they were out.  Figures.  But, they are way cute.  I was tempted to buy the coral version, but passed since I was kind of mad that they were out of the aqua.  Hmph!


Seriously?!?  Why, why, why didn't they have this color 3 years ago when I bought several of these in pink for my Expedit in the craft room?  Gah!  The best color they had at the time was pink, so that's what I got.  Don't get me wrong - pink is a nice color, but it's not really my thing.  I was super tempted to replace them all with these, but I would need to buy 9 and at $5 a pop (which is actually pretty cheap), I didn't feel like parting with $45, especially when I wasn't planning on it.  Hmmm...maybe another time.

And look at how cute these hanging pots are!  I'm seriously loving all the aqua/turquoise, coral, and yellow that Ikea has available these days.

Even though I didn't buy any of these items, I will eventually share with you what I did buy...as long as it comes out good.  :)

Originally posted by Adventures in DIY

Saturday, April 13, 2013

Wednesday, April 3, 2013

Summer Wreath Re-Deux

Last summer, I made this cute wreath using a foam pool noodle.

Turns out the pool noodle was not the best choice to use as a wreath form for this particular project.  The jute & sisal I used was way too heavy and after only a little bit of time caused it to sag, giving it an egg shape.
It was even more "eggy" than this picture.  Not good.

But, I really love this wreath and decided to try to save it.  Using an Exacto knife, I carefully sliced all the shells and felt flowers off the front and sliced all the jute & sisal off the noodle.   It was not fun, but I wanted to re-use all my supplies if I could.  And, bonus, I was able to catch up on some tv and movies while I did it.  Multi-tasking.

I bought this straw wreath form and got to hot glueing away.

Ahhh...much, much better.  No more eggy wreath.


Originally posted by Adventures in DIY

Featured at:
AND