Sunday, July 29, 2012

Summer Vacation

Well, hello there - long time, no talk!  It's been...holy moly!  It's been over 2 weeks since I last posted.  I've been very, very busy this month and boy, am I exhausted!  One of my best friends who lives in Utah came out with her family to spend their vacation with me here in Southern California.   We went here...


(Disneyland & California Adventure)

And here...


(Sea World - San Diego)

We did tons of walking and my legs, ankle, and feet were hurting so bad, I had to skip out on the beach day (which totally bummed me out!  I was looking forward to going).  But, I had such a great time visiting with them.  It had been many years since I had seen her and her husband and their two older kids and had never met their youngest!  It was a jam-packed week, but we had a blast.  And to top that off, her extremely handy hubby helped me with some house stuff!  Score!  (I'll be posting more on that later).

After my friends left, I took my nephew here...


(Universal Studios - Hollywood)

The new Transformers ride is pretty fun!  We even went on it twice.  I heard that they will be making a Harry Potter section like they have in Florida, which I'm looking forward to.  And oh. my. goodness.  I just noticed in the picture above that my nephew is almost as tall as me now.  Geez - I hate when the kiddos start passing me up in height.  :)

I hope everyone is enjoying their summer and stay tuned for more posts soon to come!

Posted by Adventures in DIY

Wednesday, July 11, 2012

Guest Room Makeover - Sneak Peak

Hello again!  Time sure is flying.  Seems like the weekend was just here and now, we're already in the middle of the week.  I've been super busy getting things in order in the house.  I can't remember if I mentioned it before, but soon I'll be having some guests coming to stay for a week,  so I'm using that as incentive to get a lot of stuff done around here.

Here is a sneak peak of what I had been working on:

For a long time, even before I bought my house, I really wanted a red accent wall.  So a couple of years ago, the guest bedroom got one.  I liked it at first, although if you don't know anything about painting a wall red, there is a trick to it.  A trick that the people who sell the red paint are supposed to clue you in to in case you didn't know it.  Which was not told to me by the folks at the Home Depot when I bought it and made the red wall a pain in the booty to paint.  Let's put it this way - it took 1 1/2 gallons to paint a wall that is approximately 9x13.  And I did complain to Home Depot and got 1 gallon of paint for free.  Or maybe it was discounted.  I don't remember, but I made sure to complain about it to the manager, who it turns out sold me the red paint!  Anyways, I liked the wall at first.
July 2010
But, I got tired of it real quick.  As I've mentioned before, the lighting in the house is bad and the red wall darkened up the room.  Me no likey!  I felt bad to repaint it after all the trouble it took to paint the red.  Well, I got over that soon enough and it was just a matter of picking paint colors.  I narrowed it down and finally made my choice.  I figured this was a great time to get it done since I was going to have guests staying in that room soon.  Here's what I chose.
Bay Mist by Valspar.  I was very, very happy with my color choice!  And I was so excited to get this room brightened up and ready for my guests.  (I'll be giving more details in a future post.)

And then, dun dun dun.  I moved the bed away from the wall so I could paint.  When I moved the bed, that's when I saw them.  2 spots (1 small and 1 big-ish) that were under the bed.
I had long suspected mold since I first started moving stuff in the house (due to a pungent smell in the room), but never really saw anything to push the thought any further.  But, with guests coming, I needed to look into it more.  So, instead of getting some other stuff done, this is what I'll be taking care of.   Fun times.   Not.  Sighhhhhhh.

I also completed another crafty project for the guest bedroom, but won't be able to take some pictures until I rid the room of mold and it get it all in order.   Here is what the project involved.  Curious?  :)

As you can tell, I've got lots of "in-progress" projects going, but nothing finished yet (or at least, not able to take pictures yet), so this is all you get for now - sneak peeks.

Stay tuned and have a great week!

Posted by http://adventuresindiy1759.blogspot.com/

Saturday, July 7, 2012

Adventures With A Broken Toilet Lever

Presenting another exciting and thrilling post for you all!  Heh.  Ok, you got me.  It's not exciting or thrilling, but my blog is called Adventures in DIY after all and that includes the good, the bad, and the ugly.  This is the ugly.  Really ugly.  Like, I'm-sorry-you-have-to-look-at-ugly-pictures-inside-of-my-toilet's-tank kind of ugly.  Ahem.  But, the reason I am posting this today is because I was at a party last weekend and had mentioned to a girlfriend how the lever on my toilet had broken that morning, so I needed to make a trip to Home Depot to get a replacement part and fix it.  She gave me a strange look and said "you can fix that?!".  I said "Sure!  It's easy!".  Mind you, I've never fixed a toilet lever before, but I figured it couldn't be so hard, right?  So, I'm writing this today so you too can learn to fix a toilet lever and impress your family & friends with your new skillz.  Yep - skillz with a "z" - that's how cool you'll be!

When you're toilet lever breaks and you still need to flush, take the lid off the tank and don't be afraid!  Just reach right in there and pull up on the piece that has the chain hanging from it - this will pull up the flapper,  causing your toilet to flush.  You'll then need to assess the situation and see exactly what you need to get this puppy fixed!  As you can see in the picture below, the lever broke at the point where the plastic piece meets the inside of the handle.  The long plastic piece then connects to the chain that connects to the flapper.   Situation has officially been assessed!

I made a trip to Home Depot and found this.  I made sure to buy the universal one since I didn't know what brand my toilet is.

The directions were pretty clear on the back of the package.

1)  I removed the handle by unscrewing the plastic nut first and just pulled out the handle.

2)  Take the new handle and put it through the hole.  It took a bit of pushing and shaving off some of the square edges of the plastic, but I got through fairly easily.

3)  Once the new handle is in, unhook the chain from the broken piece of plastic (but don't unhook it from the flapper!) and then hook it onto the new piece of plastic that is connected to the handle (it's that long, black plastic piece in the above picture). 
There were 3 holes in the plastic - the chain was hooked into the 2nd hole, so I hooked it into the 2nd hole of the new lever.

4)  Once it's all back together, do some test flushes to make sure it will:  a) flush, b) doesn't run after flushing.  Mine wouldn't flush at first, so I had to adjust the chain and make it shorter.  After I adjusted it and it was flushing, the water was running afterwards, so I had to adjust the chain and make it just a tad shorter and now it works just fine.

Back to being like new!  So, the lesson here is that, although plumbing can seem daunting, just give it a shot if it doesn't seem to complicated.  I have actually fixed several plumbing issues on my own just by taking a good look at what the issue is and using the internet and other people as resources.  I've probably saved myself hundreds of dollars by not having to call a plumber and it makes me feel pretty good to be able to do it myself. 

Thanks for stopping by!
Posted  by http://adventuresindiy1759.blogspot.com/

Monday, July 2, 2012

Peanut Butter Blossoms

Well, well, well.   Lookie what we have here.  It's a first for Adventures in DIY.  A recipe!  I don't cook or bake much and that's not to say I don't know how or that I'm not good at either.  In fact, I'm actually pretty good at what I do cook & bake.  I just don't do much of it since there's not much of a need.  Anyhoo, this weekend I made some of these yummy Peanut Butter Blossom cookies and took them to a party.  They were a big hit - not one left!  (although, I probably should have made at least two batches since there were a ton of people at the party)  They are my favorite cookies and I thought that I would mix it up a bit and share the recipe that I always use (courtesy of Better Homes & Garden's website, www.bhg.com - sorry, but I don't have the exact link to the recipe for you).


List of Ingredients:
*  Shortening (1/2 cup)
*  Peanut Butter (1/2 cup)
*  Granulated Sugar (1/2 cup)
*  Brown Sugar (packed) (1/2 cup)
*  Baking Powder (1 teaspoon)
*  Baking Soda (1/8 teaspoon)
*  Egg (1)
*  Milk (2 tablespoons)
*  Vanilla (1 teaspoon)
*  Flour (1 3/4 cups)
*  Granulated Sugar (1/4 cup - optional)
*  Hershey's Milk Chocolate Kisses

1)  Pre-heat oven 350 degrees.

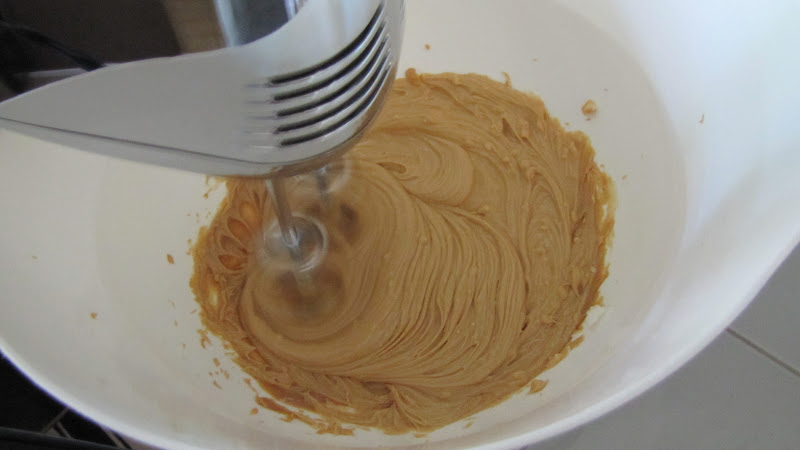
2)  In a large mixing bowl, beat shortening and peanut butter with an electric mixer on medium to high speed for 30 seconds.


3)  Add the 1/2 cup granulated sugar, brown sugar, baking powder, and baking soda. Beat until combined.

4)   Beat in egg, milk, and vanilla until combined.

5)  Beat in as much of the flour as you can with the mixer. Stir in any remaining flour.


6)  Shape dough into 1-inch balls.   Roll balls in the 1/4 cup granulated sugar (this is optional - I always skip this part). Place 2 inches apart on an ungreased cookie sheet.

7)  Bake for 10 to 12 minutes or until edges are firm and bottoms are lightly browned.

8)  Immediately press a chocolate kiss into each cookie's center. Transfer to a wire rack and let cool.


***Makes 54 cookies.

These are really, really tasty and if you love peanut butter, you will love these.  The heat from the cookies even makes the Kisses soft and gooey - so yummy!  You can also use the many different types of Hershey's Kisses (the ones with almonds would be great!) and one of these days I was thinking to use the mini-Reese's Peanut Butter Cups on top.  My mouth is totally watering right now!  Go make these now!  They're good - really, really good!  Enjoy!

Linking up to:
Our Thrifty Ideas Tutorial Tuesday link party


Thanks for stopping by!
Posted by http://adventuresindiy1759.blogspot.com/

Friday, June 29, 2012

Adventures in Cleaning Blinds

Ahhhhh, yes!  An extremely exciting topic here....NOT!  :)   The very last thing on my "to do" list from last year (yes, you heard right - last year) was to clean the blinds in my house.  It was going to be a big task because in the 3 years that I've owned my home, I have never cleaned them.  Yeah, I know, I know, but don't be disgusted with me, ok?  Actually, when I first got the house, they were already pretty dusty and back then, I had no idea about all these helpful cleaning tips, so I tried cleaning them with a household cleaner I had with paper towel.  Well, let's just say that I got through about 1/2 of one of the blind sets and stopped because I went through a lot of paper towels and it didn't seem to be cleaning very well.  I decided that I finally needed to get this done because I have guests coming for a week-long visit in a a few weeks and well, it's just a good excuse to finally get some of this stuff done that I've been procrastinating on.

So, I found this cleaning tip for blinds on Pinterest.
Via Keep Home Simple blog

Now, I know white vinegar is great for cleaning (it has worked wonders for me), but I also hate using it because I cannot stand the smell of vinegar.  Blech!  But, I gave it a shot - especially because one of the sets of blinds had a bunch of spots all over the back side.  Let's check out some before pictures (this was all done at night, so please don't mind the night time pics).

It's sort of hard to see in this picture, but the dust was pretty bad (you can see some finger marks there).  This is the set in the master bedroom.  I did the first 4 slats the exact way that the link states to.  I didn't feel like it was doing anything special, plus the wet sock on my hand was driving me crazy (and boy, did that vinegar smell stay on my hand for a couple of days) - it was like a puppet show gone wrong.  So, I decided to try a different route and it's what I ended up using for all the blinds.  I took each slat out from the strings and just used a mixture of water and Dawn with a sponge and wiped both sides of the slat down (the tougher spots got a good scrubbing).  I then made sure to dry them off with a towel and slid them back in the slots.  Easy!  I did notice that there was some sun damage to many of the slats - some of them were yellowed in areas.  Hmmm - maybe spray paint would do the trick?  Although, that sounds like a pain in the booty to spray paint all of those.  I think I can live with them as they are.  :)

Here are the after pictures - much better!

The guest bedroom blinds had a bunch of spots on the back.
At first I thought it was some kind of mold, but I found another similar spot on these blinds and it was in the shape of finger prints.  So, I think it was some kind of oily/greasy substance that got on the blinds, never was cleaned, and then the dust just stuck to the spots like crazy.  For the spots, I actually dabbed the Dawn on them directly and for the most part, the spots came out.  Some spots, you can still see, but only very lightly.
Tons better - you can't even see the spots anymore in the picture.

So, what did I learn from this?  #1  Water & Dawn seemed to do the trick.  #2  I have resolved to give the blinds a good dusting with my Swiffer once or twice a month so they don't get this bad again.  YAY!  Another thing checked off my list and I'm officially done with my 2011 list.  :)

Thanks for stopping by!
Posted by http://adventuresindiy1759.blogspot.com/

Thursday, June 28, 2012

Summer Wreath

Hey there!  I hope everyone is enjoying their summer so far.  It's been pretty warm here in Southern California.  We didn't get much of a winter, so I'm thinking that the summer heat is only going to get worse.  And I am dreading that!  Typically, the extreme heat just sucks the energy out of me, but so far, I've had tons of motivation to get things done around here.  That's why I've been a bit M.I.A. on the bloggy blog.  I've mostly been doing the boring stuff:  painting, cleaning baseboards, cleaning blinds (and more painting to come).  Nothing terribly too exciting.  But, I did manage to get a crafty project done and now I'm finally getting to this post.    Whew!  ***Please see my updates near the end of the post***


I saw this great summer wreath on Sand and Sisal's blog this month.  I pinned it right away and knew I had to make something similar very soon.  So, after I finished painting my interior doors, I gathered up my supplies and made it.  Here's a how-to for you...

Supplies Needed:
*  Pool toy noodle
*  Duct tape
*  Beach decor of your choosing
*  Rope and or jute  
*  Hot glue & glue gun

1)  As you can see in the picture above, you'll need to form a circle with the noodle and then use duct tape to tape them end to end. (I got my noodle at the Dollar Tree)

2)  Get your rope and/or jute and start hot gluing away (I started where the duct tape is).  I already had sisal and jute on hand, but not enough of both, so I alternated.  My stepmom, Liz, suggested it and boy, is she a smartie!  So, you just wrap, wrap, wrap, glue, and repeat.

3)  And keep wrapping.

Until you get this.

4)  I made felt & dropcloth flowers in beachy-type colors using this technique by Home Stories A to Z (she included a great video tutorial).

5)  I then hot glued a starfish, sand dollar, a couple of driftwood pieces, and my felt flowers to the bottom of the wreath. 

6)   I added pretty aqua colored ribbon to hang the wreath from.
Oh. My. Word.  I knew my security screen door was bad, but geez louise!  That's bad.  (I will be putting in a new entry door next month and this screen door may be going bye bye too).   Please ignore it and just look at the pretty wreath.  Wait!  Here's a better shot.

Originally when I made the wreath and hung it up on the door, it hung in an egg shape.  I was not happy with it - I tried to deal with it for a couple of days, but it bugged me.  It turns out it was hanging that way because I hung it from the part where it was duct taped.  So, I took everything off and flipped it 180 degrees and re-glued everything. It was a pain and although it doesn't hang like a circle (the rope is too heavy for the foam noodle), it's much better in this new oval shape than the egg shape.  

Thanks for taking a look and bearing with my silent moments on the blog this month.  Ok, now back to more blinds-cleaning for me.  

***Update:  I noticed that over time, my wreath kept sagging into an oval, oblong shape.  It appears that the pool noodle couldn't withstand the weight of both the sisal & jute.  I would suggest that you use a more substantial wreath form for this project and save the pool noodle for a wreath that uses lighter material (like for yarn or fabric).  I bought a straw wreath form, so I'll be re-doing this wreath soon.  With all the hot glue used, this will not be an easy task, but I really love this wreath.***
***Update #2:  To see how my wreath looks now, click here.***

Linking up to:


Our Thrifty Ideas Tutorial Tuesday link party


Homework's Inspiration Board link party


Delightful Order's Delightfully Inspiring Thursday link party

One Artsy Mama's Shine On Fridays link party and Happy Go Lucky's Shine On Fridays link party

Thrifty Decor Chick's July  Before and After Party

Posted by http://adventuresindiy1759.blogspot.com/