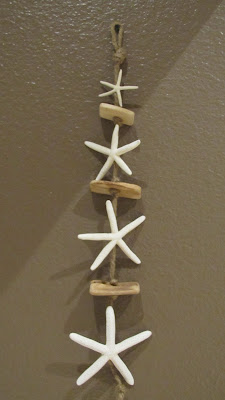
I have finally completed a project that I've been wanting to do for months. I didn't really know how to execute it and then other projects got pushed to the top of the list and then I kind of forgot about it. See how I am? Anyhoo, I decided to just get it done and boy, was it a super simple project.
I originally saw this on The Lettered Cottage's blog post and immediately knew that I wanted to make my own version (love those planked walls by the way).
 |
| Via The Lettered Cottage |
Here is a quick tutorial in case you'd like to make your own.
Supplies needed:
* Jute or other type of rope (I used jute)
* Starfish (purchased on-line)
* Driftwood (purchased at JoAnn)
* Hot glue & hot glue gun
* Drill & drill bit
1) First, determine how long you want your piece to be. Cut your piece of jute considering you'll need an extra length of it to account for the knots.
2) Based on the jute size, determine which size drill bit to use. Then, drill holes in the driftwood pieces to thread the jute through.
3) Make a loop at one end of the jute and tie a knot. You will need this in order to hang the piece on the wall.
4) I hot glued the smallest starfish onto the jute.
5) Once I did that, I eyeballed where I wanted to put the driftwood underneath the starfish and tied a knot. Then, thread the jute through the hole in the driftwood and push the driftwood flush against the knot. Then, tie another knot flush underneath the driftwood so it stays in place.
This second picture shows how both knots keep the driftwood secure.
6) Continue these steps by alternating starfish and driftwood down the length of the jute.
7) At the end, I just tied a simple knot in the jute. I hung it on a couple of different walls to see how it would look.
I love how it turned out and can't believe it took me so long to get it done. It only took me about 20 minutes to complete. Thanks for looking!
Linked up to:
Hating Martha's Stinky Linky Party v.5
How To Nest For Less' Just A Party With My Peeps
Delightful Order's Delightfully Inspiring Thursday Party
The 36th Avenue's Show Me Extraordinary Link Party
Live.Laugh.Rowe's Live Laugh Linky Thursday#1
Tater Tots & Jello Weekend Wrap Up Party
Too Much Time On My Hand's Get School Saturday Link Party
One Artsy Mama's Shine On Fridays Link Party
Brassy Apple's Make It Monday Link Party
Ask Anna's Weekend Warrior link party


Adorable!
ReplyDeleteSO AWESOME!!!!!!!!!!!!! I love it, Chrissy! :-D
ReplyDeleteThanks for taking a look, Layla!! You made my day. :)
DeleteThanks for linking up at The Stinky Linky Party! Featured you on my Facebook page today!
ReplyDeleteOhhh, wow! That is just gorgeous! I looove beachy decor. I just may have to try this! Would you pretty pretty please consider sharing this project at my party, going on now?
ReplyDeletehttp://oneartmama.blogspot.com/2012/03/shine-on-fridays-19-and-some-fabulous.html
I love this project! And what a fun way to capture memories from a day at the beach! Thanks for sharing!
ReplyDeleteGreat project!! Thanks so much for linking up at Live Laugh Linky! Hope you'll stop by again this week. Hugs!!
ReplyDelete