Sunday, August 5, 2012

DIY Bed Skirt

Today, I'm going to share the bed skirt I made for the bed in my guest bedroom.  The one that I had been using was pretty old - maybe about 10 years old?  


It's hard to tell, but it's a sage green color and matched the bedding I had bought at the time.  Although I had changed my bedding, I never changed the bed skirt - not sure why, but just never did.  I've had the idea for a long time to make a new bed skirt using painter's dropcloth (I bought mine from Home Depot) - I just needed to figure out exactly how to execute it.  And since I was going to have houseguests, I figured it would be a good time to finally get it done.

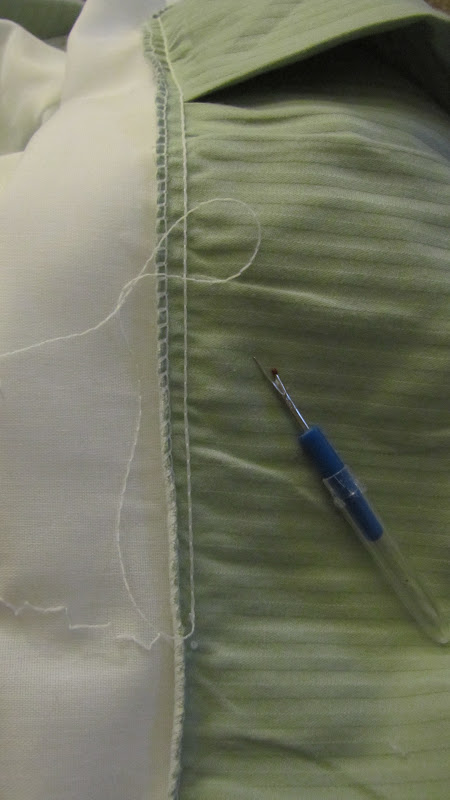
The white part of the old bed skirt is made out of fabric.  Originally, I was going to just undo the seams where the green skirt and white fabric meet and then sew on the dropcloth, but there were actually two seams per side sewn in so it was going to take me too long to take them out.

So, I decided to just sew over the green skirt.  The old skirt was a bit short, so I just measured the height again and decided to make the skirt a little bit longer. 

I cut the dropcloth to the size I wanted.  I tried to use as much of the edges that were already hemmed so it would save me a step.  I made sure to hem any edges that still needed it.

Once I cut & hemmed all the pieces, I pinned them right up against the edge where the green skirt meets the white fabric.
I just sewed right on top because I knew that this part wouldn't be seen (the mattress would sit on top and also the sheets would cover it).  Also, you can see in the picture above that I made a pleat.  This is because at the foot of the bed, there is a bar that prevents the entire skirt from hanging down, so I had to make a pleat and then I also cut it so would fall on either side of the bar.

At the corners, I just overlapped the pieces.

Once I sewed all the pieces on, I cut most of the old green skirt off so you wouldn't accidentally see it underneath.

Here is the finished product!


I'm so happy with how it turned out - it looks so much better than the old one, which clashed with the new wall color.  It was actually quite easy also and didn't take a whole lot of time.   Plus, it was very cheap!  The bed skirt was $10 and I still have plenty left to use for other things, so it actually cost me under $10 to make.  Stay tuned for the guest bedroom reveal!

Linked up to:
Our Thrifty Ideas' Tutorial Tuesday link party

The DIY Dreamer's From Dream to Reality link party

The NY Melrose Family's Whimsy Wednesdays link party

Live Laugh Rowe's Live Laugh Linky link party

House of Hepworth's Hookin Up With HOH link party

Delightful Order's Delightfully Inspiring Thursday link pary

The 36th Avenue's link party

One Artsy Mama's Shine On Fridays link party

Thrifty Decor Chick's August Before and After link party

Too Much Time's Get Schooled Saturday link party

Tater Tots & Jello Weekend Wrap Up link party

House on the Way's Twirl and Take a Bow link party

Homework's Inspiration Board link party


Thanks for stopping by!
Posted by http://adventuresindiy1759.blogspot.com/

Tuesday, July 31, 2012

Guest Room Accent Wall

Hello again!  Even though I was quiet on the blog for awhile, I actually got a lot done around here - just didn't have time to post since I was super busy.  During that time, I got some painting done.  The guest room had an accent wall - it was a nice red color, but it was too dark for the room and I very quickly got tired of it.  I had other projects that were more of a priority, so I just left it red until I felt like painting (have I mentioned that I hate painting?  Although, I'm starting to enjoy it.  Except for the prep work.  That's the worst).  I decided to use my guests' visit as an excuse to paint.  I gave you all a sneak peek of what color I chose.

This is how the room looked when I bought the house.

And here's a picture of the red accent wall that was painted almost a year after I bought my home.

The red is Behr's California Poppy and the other walls were painted Behr's Wheat Bread (the bottom picture is a cel phone picture - the actual color looked more like the top one).

Here is what I chose to re-paint it with...
Valspar's Bay Mist.  I had decided that I wanted an aqua/turquoise/teal color and after buying a few samples, this is what I chose.

I could have bought the paint with the primer in it, but I decided to prime the wall separately first.  There were lots of problems when painting the wall red - the manager at Home Depot didn't tell me that red is a tricky color to paint, so it didn't get done correctly and 1 1/2 gallons of paint was used on just this 9x13 wall!  (And yes, I did complain to Home Depot about it and got the 2nd gallon free).   So, I put two coats of primer on the wall.  Yay!  It already looks so much better!

And then I put on two coats of the paint color.  Love it!

As I mentioned, I hate painting.  And I'm not good at it - well, I don't paint often enough to get better (that is slowly changing though - I'm liking it more now).  I don't know if it was the brand of tape I bought, the texture on the walls, or what, but when I pulled the tape off, it pulled up some of the new paint.  And no, I didn't pull up the tape when the paint was still wet like you're supposed to - I had to leave the house right after I put up that 2nd coat.

Anyhoo, you can see in the picture above that the primer seeped through the tape and got on the Wheat Bread walls.  And then it pulled up the new Bay Mist paint - some of it down to the old red color.  But!  I came up with an easy solution.

I bought a set of artist paint brushes (with my Michael's coupon & gift card - score!) and figured that it would be the easiest way to cover up those "imperfections".  It worked perfectly!  I didn't have to re-tape - I was able to free-hand it very easily.  And while I was at it, I covered up some other imperfections that I found on the Wheat Bread color with the sample container that I still had.  :)
Much better, yes?

And here's the wall all done.

I'm so happy with how the wall turned out.  I love this color - it's so much brighter and cheerier (yes, that is a word.  I thought it wasn't, but I just looked it up.  Hee).  It also goes really well with the other color in the room.  And because we love before & after pics...

BEFORE

IN PROGRESS

AFTER

I'll have a guest room reveal post up soon.  It's more of an "in progress" reveal, but it's looking much better than before.  And by the way, is everyone shocked that it's already going to be August?  One of my boss' kids already started their new school year today!   Crazy!  But, I'm ready for this insane summer to be over and head into one of my favorite times of year - the Fall!  I hope everyone is having a great week and stay cool!  Thanks for stopping by.  :)

Posted by http://adventuresindiy1759.blogspot.com/

Monday, July 30, 2012

Cars Land Review

As I previously mentioned in this post, I was lucky enough to go to the Cast Member (employee) preview of the new Cars Land at Disney's California Adventure before it opened to the public.  They didn't allow any pictures or video to be taken and they even restricted anyone from posting on social websites about it!  I was totally bummed about that.  But, I recently took time off from work when one of my besties came out to visit with her family.  One of the places we went to was Disneyland & California Adventure (it was a 1st time visit for their 3 kids!).   We checked out the new Cars Land & the new Buena Vista street while there, so I was finally able to get some pictures and thought I'd give a review of the new areas while I'm at it (*Spoiler Alert - if you want to be surprised as to what happens on the rides, do not read ahead*).

We got to the park about 30-45 minutes after it opened and I was surprised that there was a huge line just to get a Fastpass for the Radiator Springs Racers ride.  It is a great ride, but I was still surprised at this.  When we walked by later, we saw that the Fastpasses were sold out by 10:30 or 11am!  So, my advice to you if you want to be able to get on this ride, is to get there when the park opens and either get in line right away or get a Fastpass right away.  It truly is a great ride, but since the wait times were from 90-120 minutes (yikes!), we didn't go on it.  I felt bad for the kids because they didn't get to ride it, but hey - they'll just have to come back so we can go again.  :)  Here are some pictures of the ride.


It's so amazing how authentic the "desert" looks here.  Disney's attention to detail is truly amazing - that's why I'm such a huge fan of their theme parks.  When you first get in your "Car", you cruise in the desert,  past the waterfall, and then enter inside a building.  The different "Cars" movie characters are inside - they move and talk - it's pretty amazing how far technology has come.  Then, your car either goes through Luigi's shop for new tires or Ramone's shop for a paint job and then your car is put side by side another car and then you race against them.  It's really fun and at the end, if you're the winner, your car lets you know.  They do have a single rider line on this ride - when my friend and I went on it, we chose to do the single rider line.  It was only a 15-20 minute wait (as opposed to 60 minutes).  We weren't put in the same car, but our cars raced against each other, so that was fun.

Another new ride in the Cars Land area is Mater's Junkyard Jamboree.   This ride is cute and fun!  You sit in tractor trailers and you get pulled and whipped around in circles - it reminds of a fair ride.  One of the best things about this ride is the spanish safety announcement which is made by Mater himself.  It's hilarious hearing him speak in spanish! 


And the third new ride in Cars Land is Luigi's Flying Tires. This is also a fun ride, but I think it's my least favorite.  It requires a little bit of work.  Once you are in the "tires",  you float on air that is pumped through the ground.  You and your partner(s) have to lean together in the direction you want to go.  It ends up being sort of like bumper cars because you bump into the other tires.   They also have a bunch of giant beach balls that you can throw around to the other people on the ride.  It's fun, but there's not a lot of room to move and it's a short ride - would be better if it was longer. 


You can see here the round spots on the ground that the air is pumped out of.


This is my view while holding the beach ball - it's ginormous!
Here are some other scenes from Cars Land...


Here are the two main characters that make appearances...


You can also get your photo with them.  And yep!  They do drive & talk - pretty cute!

Another new area in California Adventure is Buena Vista Street.  As soon as you walk through the gates into the park, you are in this new area.  It's very nice - it was built to look like 1920s Los Angeles when Walt Disney first arrived there.  I didn't get a lot of great pictures - it was pretty crowded - and I didn't get to spend much time there.  I look forward to going back soon and getting more pictures and spending more time looking at the details. 


So, all in all, I think the new Cars Land & Buena Vista street is just what California Adventure needed.  They are a great improvement to the park.  I've always thought that it needed more character based rides there and I think more people will enjoying going there now.  I can't wait to go back and explore a bit more.

Thanks for stopping by!
Posted by http://adventuresindiy1759.blogspot.com/