Thursday, June 27, 2013

Movies In The Park: "Monsters Vs. Aliens"

What I like about the city I live in is that it's a smaller city with a small-town feel, but we are nearby bigger cities and even some major cities (San Diego is about 1 1/2 hours away.  Los Angeles is 1 - 1 1/2 hours away - it all depends on traffic, of course).  So when I want to do some good shopping or go to major concerts or sporting events, it's definitely manageable.

Part of that small-town feel that I love is the sense of community - there are constantly local events going on and now that it's summer time, there's lots to do.   Weekly market nights, monthly festivals, a free summer concert series (with decent singers/bands! sometimes even famous!).  And every Monday night, they have movies in the park.  For FREE!  My sister's only day off from running her restaurant is on Mondays, so it's perfect that we can all have a night to enjoy together.  


We took the kids this week and the movie was "Monsters Vs Aliens".  I took my nephew to see it when it came out years ago, but he hadn't seen it since then and this was the first time that the rest of the family saw it.  It's a cute movie with lots of laughs for the adults too.  What's nice is that before the movie, they allow you to picnic, have bounce houses for the kids, contests for the kids, snacks to buy, and even roasting marshmallows & making smores.  The kids had a ton of fun and we look forward to going to many more of these.

Hope you are all enjoying your summer so far!

Originally posted by Adventures in DIY  


Tuesday, June 25, 2013

Bye Bye, Google Reader: Part 2

As most of you may already know, Google Reader will be gone as of July 1st, which is fast-approaching!  It was previously my main source for following all of my favorite blogs, so when I first heard about it, I slightly panicked.  I posted about that here.   I made the switch to Bloglovin' at the end of March and am loving it.  The only thing I don't like is that I can't Pin directly from it (at least, I haven't figured out if I can - if you know how, please let me know).  I did try some other readers and so far I have found that Bloglovin' is the best.

I would love for you to continue following my blog - it truly does mean a lot to me.  I've provided several different ways to make it easy for you.  You can follow me via TwitterPinterestBloglovin', Google+, Linky Followers, or you can subscribe via your choice of reader or via email - all of these have a button on the right-hand side of my blog page.  Honestly, I haven't quite figured out Linky Followers, but I'm regularly on the others.

Thanks again for stopping by and hope you continue to do so!
--Chrissy

Originally posted by Adventures in DIY

Thursday, June 20, 2013

"Monsters Inc" Movie Day

I found out that my 4 1/2-year-old niece has never seen the Disney movie, "Monsters Inc"!  How did I find out?  I told her that I want to take her to see the new "Monsters University" movie when it comes out and my nephew then told me that she never saw the first one.  Say what?!?!?!  So, I told her that we need to have a "Monsters Inc" movie day at my house, pronto!

I ended up having her, my nephew, and our family friend's grandson over at my house for movie day and I decided to do some extra special things since it was my first time having my niece over (without my sister being here).

Monday, June 17, 2013

Thursday, June 13, 2013

Disney Care Package #2

My BBF (best bloggy friend), Brenda at Chatting Over Chocolate and her family will be making a trip to Walt Disney World and I wanted to surprise her with a Disney Care Package.  I made one for my sister & her family earlier this year and it was hit (and also fun to put together), so I thought I'd do the same for Brenda.

I had a couple of plain tote bags leftover from the last care package, so I decided to make both of her girls Disney tote bags that they could use during the trip.  I found out what their favorite characters are and went from there.  I searched online for images and used Photoshop to put them all together.  The one with all the Star Wars Disney characters was put together using single images of each one that I found online.  I'm not sure where/who each image was posted by, but whoever drew those did a great job!  (Also, as a side note, on of my "personal" goals for the year is to learn how to use Photoshop, so I'm slowly accomplishing that).  After getting my images together, I printed the mirror images on iron-on transfer paper.


I then ironed them on the tote bag with the technique I shared with you previously here.

 This is how they looked after I was done.

Over a few trips to Disneyland (I have an annual pass), I collected some items:  a Mickey kitchen towel, Enchanted Tiki Room recipe for one of their yummy smoothies, Mickey-shaped foods magnets, Collector Packs with Star Wars mini characters, Disneyland Mickey antenna ball, a little Mickey bag, and also included some packets of the yummy popcorn I make that tastes just like Disneyland popcorn (I shared that previously here).

I mailed it off to her and didn't say one word to her about it.  I was sooooo tempted to at least tell her that a package was on it's way, but I didn't!  I got a very excited email when she received it - the care package was a hit!  It even made #3 on her Five Loves On Friday post!  ;) I just love giving gifts and when they are surprises, it puts a big smile on my face.  If you haven't met Brenda, you should stop by her blog Chatting Over Chocolate.  She has a weekly post series called "Magical Monday" and she is constantly posting yummy-looking recipes!

**Update:  Brenda did a wonderful post about this care package that you can check out here.


Originally posted by Adventures in DIY

Linked up to:

Tuesday, June 11, 2013

Summer Fun - Disneyland

My nephew's school let out for summer vacation last week, so I wanted to start his summer with some major fun.  Our Disney annual passes will be blocked after June for most of the summer, so I wanted to take him before that.  We got there soon after the park opened, which was perfect because there were less crowds and the weather wasn't so bad (it was actually chilly until about 11:30 or 12).  We took advantage of the short wait times and Fastpasses and rode most of the bigger rides.

We stopped at California Adventure first and got our Fastpasses for Radiator Springs Racers.  Every single time we go, the Fastpasses sell out by 10 or 10:30am and if you don't get one, it's a guaranteed 90-180 minute wait!  On the way out, we got our picture with the Mickey & Walt statue.

Friday, June 7, 2013

Front Entry Door

Last July, I bought a new entry door which I shared about here on the blog.  It came primed and ready to go, but I never got around to painting it until now.

Here is what I started with...
Go ahead.  You can say it..."YUCK!"  Trust me - my feelings are not hurt one bit.

Here is the new, primed door after it was installed (you can see how the primed door is a different color than the casing)...
Much, much better already!

I started out by taping off the bottom seal of the door and around the casing.   I also taped off the hinges, hardware, and used foil on the handle.  It's all ready for paint now - I used my go-to white, Behr's off the shelf Ultra Pure White.


I used the directions from Thrifty Decor Chick's tutorial on how to paint a door with panels.  I've always painted flat doors, so I thought I'd get as many tips as I could.  I started out using a paint brush and painted on the edges of the 2 panels, the trim around the windows, and around the hardware.

I learned from painting my french doors that you don't need to tape off the windows - the paint will easily scrape off them if you use a razor blade (I use this paint scraper).

I used a foam roller brush to paint the rest of the door.  Here it is after one coat...

Two coats...

And here it is after it's all painted with the 3rd and final coat (and with the paint scraped off the windows).  I also gave the casing 2 coats of the same white to match...

And here's a quick round-up so you can see them all together...

The front entry door & the garage entry door are very close to each other and the new paint job is already making that dark corner a bit brighter.  It also inspired me to makeover my teeny tiny entryway.  I'll be sharing that soon.

Originally posted by Adventures in DIY

Linked up to:

Wednesday, June 5, 2013

Google+

I've heard about Google+ for awhile now.  I even tried using it before, but didn't quite "get it".  I think part of that reason is because not many people were using it at the time, so I wasn't quite sure what the point was.


A couple of weeks ago, Kelly at Smart School House wrote this post about how to use Google+ as a blogger, so I decided to give it another shot.  And boy, is it a lot different than what I remember when I first checked it out.  It's sort of like a Facebook mixed with a blog reader.  At least, that's what I've gathered from it so far.

If you'd like to check out my Google+ profile, you can click here.  I've also included a button on the right-hand side of my blog so you can add me to your Google+ circle if you would like to.  ;)

And don't forget, you can follow me on TwitterPinterestBloglovin', Linky Followers, or you can subscribe via your choice of reader or via email - all of these have a button on the right-hand side of my blog also.  I don't say it enough, but thank you for taking the time to read Adventures in DIY - I truly, truly appreciate it!

Originally posted by Adventures in DIY

Monday, June 3, 2013

Garage Entry Door

Hello!  I've been busy lately getting things done from my project list.  I just love crossing things off of lists.  :)

I've painted most of the doors in my house, but I still had 2 left to do.  You can see how I painted my interior doors hereherehere, and here.  And the french doors herehere, and here.  I didn't use any fancy colors, just plain white, but it truly made a difference with all the doors.  Everyday, I still look at them and think what a difference a fresh coat of paint did to brighten up the place!

So, 1 of the last 2 doors I had left to do was the garage entry door.

Here is a "before" picture.   Unfortunately, with the wall & door placement, these are the best pictures I could get using natural light.  It's a bit hard to tell, but you can see the color difference between the door and the door's casing (the casing was already painted the brighter white a few years ago).

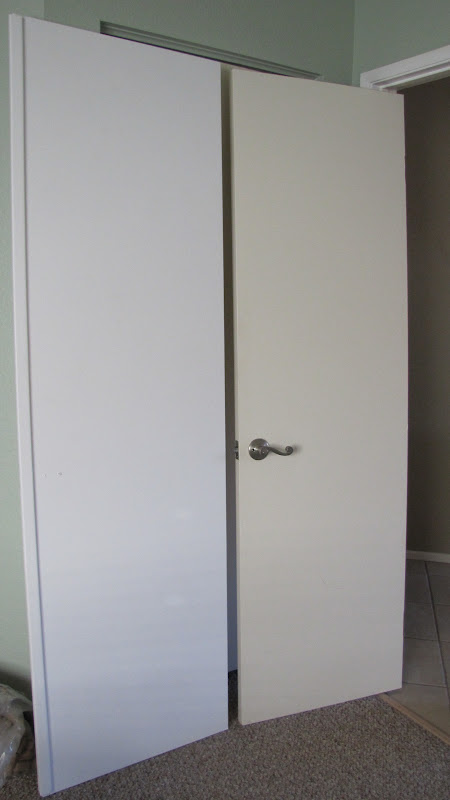
Here is a good "before and after" of other doors in the house since they are side by side.  The door on the left got a fresh coat of Ultra Pure White by Behr (off the shelf) and the door on the right was the original color from when I moved in.  It looked like a very dingy white.  This is a good example of the color difference because all of the doors in the house were this dingy color.


It was very, very obvious that whoever painted this door previously, didn't let it dry enough before closing the door.  A lot of the paint had ripped off the door & stuck on the weatherstripping.  I didn't want the same thing to happen this time, so before I starting painting, I got a piece of yarn and tied it to the door knob and to the metal rack so it would hold the door open.
Side note:  the lighting in my kitchen looks pink/red, but it's not really that color.  It's weird that it turned out that way in the picture.

I sanded down the parts of the door where the paint had come off from the previous paint job.  I did as much as I could, but didn't put great effort into it because this door stays shut all the time, so no one will really notice it.  When I painted the new white, this is how it looked.
The perfectionist in me really had to resist fixing it, but it was a lot better than before and at least it's not as noticeable as previously. 

I let the door dry for over 24 hours and haven't had a problem with the paint ripping off or sticking to the weatherstripping at all.  Here's a before & after of the door after it was painted.

It's only a slight difference in the picture, but you can really notice in person how much brighter the door is now.  It doesn't look so dingy and dark in that spot anymore. 

Next up...the front entry door.  Stay tuned...

Originally posted by Adventures in DIY

Linked up to...